Showing posts with label spring. Show all posts

Tuesday, December 21, 2021

I Got You a Cake - Way To Goat Stamp Set

Hello and welcome to my blog; today I am going to share with you a fun little card using the Way To Goat Stamp Set.  I was in a pink mood today:  So, I used Polished Pink as the main color of my card.  Here's a look at todays card.  

Check out this cute little birthday card using the Way to Goat Stamp Set with the sentiment I got you a Cake!

Wednesday, March 25, 2020

I am Always Here for You - Botanical Prints

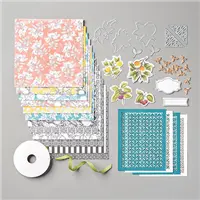
Hello and welcome to my blog; today I am going to share with you a card that I made using the products in the Botanical Prints Product Medley from the January-June Mini Catalog.  Creativity comes easy when you've got amazing coordinating products. Stampin' Up! doesn't want to brag, but coordination is one of their strong points. The Botanical Prints Product Medley is a perfect example. The medley includes stamps, paper, dies, and accessories for creating cards and more.  Here's a look at my card.


I love the look of the black and white with the pop of color on the paper in the Botanical Prints Product Medley.  I cut the piece of Terracotta Tile DSP down to 3 3/4 x 5 and added it to a Old Olive Cardstock Mat cut at 5 1/4 x 4.  I then added it to my card base.  The card base is a piece of Whisper White Thick Cardstock cut at 4 1/4 x 11 scored at 5 1/2.  Once I had the card front attached to the card base.  I stamped the matching floral image from the stamp set in Tuxedo Black ink.


I then colored the stamped floral images with my Calypso Coral Dark, Old Olive Light and Dark Petal Pink Light & Dark blends and the Dark Soft Suede Stampin' Blend.  The Dark Calypso Coral is very close to Terracotta Tile.  There isn't a Terracotta Tile Stampin' Blend so this was as close as I could get.  I just did simple coloring with the blends to add color to each flower.  I colored with the dark blend first and then blended out with the light.  I stamped the sentiment from the stamp set and used the Label Me Fancy Punch and punched it out.  I used the ribbon slit on the punch and punched it above and below the sentiment.  I then took some of the Terracotta Tile Scalloped Linen Ribbon and some of the Old Olive Ribbon from the Product Medley.


After putting the ribbons together I slid them through the slits in the sentiment.  I added a couple dimensionals behind the sentiment and placed on the card.  I tucked the floral blossoms behind the sentiment.  I then added one of the copper bee elements from the product medley with a mini glue dots.  I added a piece of the backside of the DSP to the flap of the envelope as well as a strip on the inside.  I also stamped the same floral image to the inside of the card.  This finished off my card.

Thanks for dropping by I hope that you have enjoyed my little look at the Botanical Prints Product Medley.  This is probably one of my favorite products in the catalog.  You get so much in the Product Meadley.  Inside the box is the Stamp Set and Die Bundle, a Pack of 6 x 6 DSP, Embellishment and ribbon. 

Happy Stampin' 
Rick Adkins 


Use the March Host Code on any order of $50 (before taxes & shipping) or more during the month and receive a gift from me in April as a Thank You.  If your order is $150 or more, please don't use the host code.  You will forfeit your Stampin' Rewards if you do; and I want you to get those rewards.


If you place any size order with me during the month of March, you will receive the March Creative Stampers Tutorial Bundle from me as a little thank you.  This month's tutorial bundle features fourteen floral themed tutorials.  The Creative Stampers Tutorial Bundle can either be earned for FREE with any size order or Can be purchased for $20 from me.

Stampin' Up! Shopping List: 

Tuesday, March 24, 2020

Timeless Tulips for The Spot Color Challenge #103

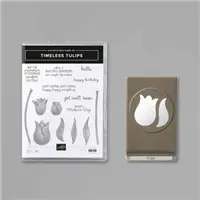
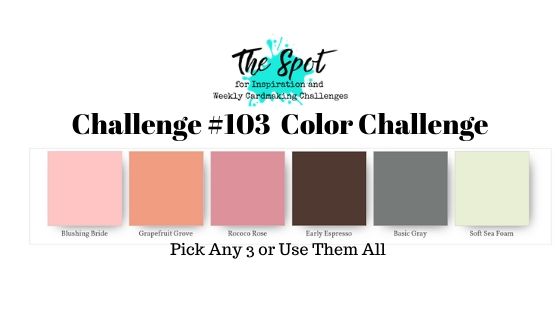
Hello and welcome to my blog; today I am going to share with you the card that I made for this week's Color Challenge over at The Spot.  This week we have a super fun color challenge for you to play along with and it's perfect for Springtime.  I used the Timeless Tulips Bundle to create my card for today's colorful challenge.  I thought it matched perfectly with the colors that were put together.  Here's a look at my card.


And here's a look at this week's color challenge that inspired my card today.  You can click on the challenge image to play along or (click here) just to see what all the other design team members came up with.

Tips & Tricks: 

I picked five of the six colors to create my card with today.  I went with Blushing Bride, Grapefruit Grove, Rococo Rose, Early Espresso and Soft Sea Foam.  I wanted to create something that was very springy in feel so I thought those colors would be fun to play with.  I also picked the Timeless Tulips Bundle to feature on my card because I thought it would lend itself to a very spring filled card.  
Once the colors and stamp set were picked it was pretty easy to move forward


Then it was just a matter of figuring out how I wanted to use the items.  I decided that I would make a springtime bouquet on my card and make it an encouragement card.  I thought it was a great time for a card like this with everything going on right now.  So I started out my stamping all my stems in a grouping to mimic a bundled bouquet.  Then I needed to stamp my tulips.  I stamped three on them directly on the card and then two I used the matching punch to punch them out.  For the triumph tulip I stamped the leaf in the that matches the punch twice.  One I did mirror stamping and then punched it out.  On that tulip I actually inked it up first with Blushing Bride and used a sponge dauber to go around the outside with Rococo Rose to create a darker area as well.    I repeated the inking process on the other tulip that I punched as well.  I just changed the starting color to Grapefruit Grove instead of the Blushing Bride.  I kept the Rococo Rose around the outside to create the two tone.  


I popped those two tulips up on a couple Stampin' Dimensionals to add a little height to the card.  Next I needed something to bond the bundle together so I decided to use the Polka Dot Tulle Ribbon but died it with a little Early Espresso ink, a clear block and a baby wipe.  Once I had the ribbon die I tied it into a bow and added it to the card front.  I added my sentiment in Early Espresso Classic Ink at the bottom left of the card front.  


I added the card front on to a piece of Early Espresso Cardstock cut at 4 1/8 x 5 3/8.  And, then added the entire thing to my Soft Seafoam Card base.  I decided at this point that I did a little more dimension to the card so I stamped one more leaf in Soft Sea Foam and punched it out and added it to the card with a little liquid glue and a dimensionals behind.  


Thanks for dropping by today, and I hope that you will play along with use this week over at The Spot.  We have fun cardmaking and paper crafting challenges every week.  So make sure you go and check it out and have a little fun.  If you need any of the supplies you have seen today you can pick them up in my online store 24/7 by clicking on the items in the shopping list below.  
Happy Stampin' 
Rick Adkins 

Stampin' Up! Shopping List: 


Use the March Host Code on any order of $50 (before taxes & shipping) or more during the month and receive a gift from me in April as a Thank You.  If your order is $150 or more, please don't use the host code.  You will forfeit your Stampin' Rewards if you do; and I want you to get those rewards.


If you place any size order with me during the month of March, you will receive the March Creative Stampers Tutorial Bundle from me as a little thank you.  This month's tutorial bundle features fourteen floral themed tutorials.  The Creative Stampers Tutorial Bundle can either be earned for FREE with any size order or Can be purchased for $20 from me.

Tuesday, March 3, 2020

Bloom and grow - The Spot #100 Getting to Know You Designer's Choice Challenge

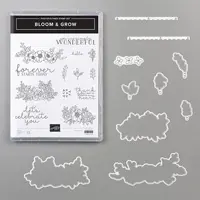
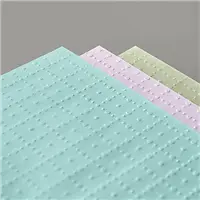
Hello and welcome to my blog; I am super excited today to share with you one of the first post for the new Design Team and Challenge blogs that I am on.  This is our very first challenge for the new weekly challenge blog called The Spot!  The design team is composed of other Independent Stampin' Up! Demonstrators from around the world.  Our first theme challenge for the new Challenge blog is Getting to Know you - Designer's Choice!  We wanted to share a card that represents our styles and showcases what we like to do as well as you sharing a card that showcases your talents and what you like to do.  I picked the Bloom & Grow Bundle from the Annual Catalog and the So Very Vellum New Sale-A-Bration item that just came out today to create my card with.  Here's a look at my project.


And here's the challenge card that inspired my project today.  You can click on the challenge image to go to our website and check out what the other design team members came up with and play along.


I know that you will be extremely inspired by all the wonderful creations from this wonderful design team that has been assembled to be part of The Spot.  I also know that you will have so much fun playing along with us each week.

Tips & Tricks: 

As I mentioned above I picked the Bloom & Grow Bundle and the So Very Vellum Designer Series Vellum to showcase on my card today.  One thing that I love to do when I am designing a project and that makes me happy is to use a product in a different and unexpected way, along with using my coloring media to create something beautiful to share.  For this card I used my Stampin' Blends to color the flowers that I used on my project.  And, I am just going to go ahead and tell you that apparently I am in the mood for Spring because a majority of my projects that you will be seeing this week have flowers on them.  

For the coloring on my flowers I used Purple Posy, Flirty Flamingo, Pool Party, and Soft Sea Foam plus a little So Saffron.  I also did a little under painting of the shadows on the berries with my light Smoky Slate blend.  A underpainting is where you come in with a gray and add in your shadow colors before hand to give the image a little more detail and to create a darker shadow color and a this also lets you add a more dramatic effect and get more tone from a light color marker.  When doing a underpainting you want to pick a lighter color gray to start building your shadows up before coming on top with the other color.  If I had just colored the berries with the Soft Sea Foam light and dark you wouldn't see as much detail and tonal value as you do in the image above.  When doing the under painting you have to start with the gray to get the best result.  If you where to start with the sea foam and then come back in with the gray you would get a completely different color since alcohol markers are transparent.  Meaning that what ever color you lay on top of another color will show through.  

Once all my coloring was complete I then used the matching dies to cut out the two floral swags.  I also used the Let's Celebrate You sentiment from the stamp set and stamped it onto a piece of Whisper White Cardstock in Flirty Flamingo ink and used the largest stitched circle from the Stitched Shape Dies to cut it out.  I actually cut out one blank of the two floral swags and the stitched circle to add to the inside of the vellum card front.  This allowed me to hid any adhesive that may show from the inside of the card.  To make the vellum card front I cut my vellum to 6" x 4 1/4 and scored it at 1/2" from the top.  I adhered the vellum to a piece of Thick Whisper White cardstock (that was cut at 4 1/4 x 5 1/2) with a strip of Tear & Tape Adhesive on the back side.   I also added a sentiment to the inside of the card with Soft Seafoam Ink; I placed it where when the card was closed it would not see through the vellum.  


So Very Vellum Specialty Designer Series Paper

Dress up your handmade cards, scrapbook pages, and other paper crafts with a little extra texture and flair. Our So Very Vellum Specialty Designer Series Paper includes three different colors of vellum with a fun embossed design. Earn this fancy paper FREE with a qualifying purchase March 3–March 31, 2020, during part two of our Sale-A-Bration promotion!   You can download the 2nd Sale-A-Bration Brochure by clicking here.  This will allow you to check out the new offerings that you can start earning today.  
The So Very Vellum Specialty Designer Series Paper features: 
* 6 sheets of embossed vellum: 2 each of 3 colors
* 12" x 12" (30.5 x 30.5 cm)
* Acid free
* Lignin free

Product colors: Pool Party, Purple Posy, Soft Sea Foam

image by Stampin' Up! 
To finish off my card I used a few Basic Rhinestone Jewels and sprinkled them around the card for a little sparkle, and I added a two layer bow.  I made the bow with the Whisper White 5/8" Polka Dotted Tulle Ribbon.  I cut this to length first and tied it into a bow.  To add a little texture to the card and bow I took some of the 5/16" Braided Burlap Trim and pulled it apart and tied another bow which I layered on top of the Tulle Bow.  I love how this adds a different texture to the texture of the vellum and the tulle.  It's such a fun play on texture that makes the card just pop. 


Thank you for dropping by today, I hope that you will take time to visit us over at the Spot; which I know will become your spot for weekly inspirational card challenges.  You never know if you play along you may be chosen and put on the spot as one of our challenge winner.  If you need any of the supplies that you have seen today you can pick them up in my online store by clicking on the items in my Shopping List below.  I hope to see you and your creations over at the Spot.  
Happy Stampin' 
Rick Adkins 
Use the March Host Code on any order of $50 (before taxes & shipping) or more during the month and receive a free gift from me in April as a Thank You.  If your order is $150 or more please don't use the host code.  You will forfeit your Stampin' Rewards if you do; and I want you to get those rewards.  


If you place any size order with me during the month of March you will receive the March Creative Stampers Tutorial Bundle from me as a little thank you.  This month's tutorial bundle features fourteen floral themed tutorials.  The Creative Stampers Tutorial Bundle can either be earned for FREE with any size order or Can be purchased for $20 from me.  

Stampin' Up! Shopping List: 


Template Designed by creativeworkerbee