Tuesday, June 30, 2020

Hand-Drawn Blooms Thank You Card for The Spot Challenge #117

Hello and welcome to my blog; today I am going to share with you the card that I designed for this week's sketch challenge over at The Spot.  If you have never heard of the Spot we are a group of creatives that have teamed up to bring you a weekly papercrafting challenge.  One week it may be a technique challenge, a themed challenge, a color challenge or as in this week we have a sketch challenge.  The challenges are pretty open to your creative needs as you can see with my card today.  


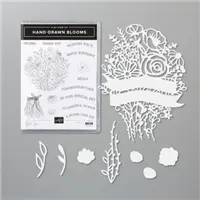
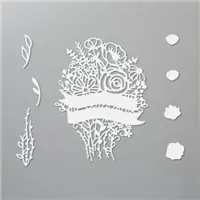
For my card today I picked the Hand-Drawn Blooms Stamp Set and Dies as my main focus on my card.  But I wanted to share it in just a little bit of a different way then what's in the stamp set.  I chose to use just the top part of the stamp and the supporting flowers in the set instead of the top and bottom parts of the stamped images.  The flower bouquet in the hand-drawn bloom stamp set is actually two different stamps put together to make it.  I wanted to use just the small top part today.  

image by Stampin' Up! 

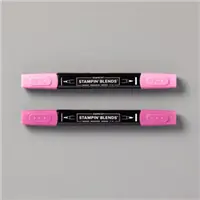
You can see what I am talking about in the image above.  You can see that there are two images that make up the bouquet.  I went with just the top part on my card today.  I stamped this image onto a piece of Thick Whisper White cardstock in Tuxedo Memento Black Ink.  I knew I wanted to use a few of my Stampin' Blends to color the image.  I used Magenta Madness, Mango Melody, and Granny Apple Green Blends on my card today.  


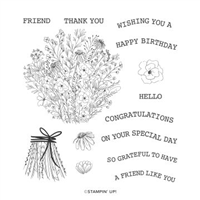
I also stamped the small supporting flowers from the stamp set to add just a few more flowers to my card.  I mean why not have a nice bouquet of flowers right.  I colored them in the same color theme but on some I changed up the color combinations a little.  


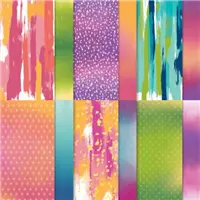
Once the coloring was complete I took two pieces of the Artistry Blooms Designer Series Paper and cut them at the same diagonal points.  This way I could just attach them to my Magenta Madness Mat without having to do weird things to make it fit.  Actually there are no weird things that would make it fit once you flipped it over to the other side it's going in the wrong direction.  But, by cutting the two at the same time I now have paper cut for another card.  


After adding the DSP to the card I attached everything to my card base using the Stampin' Seal adhesive.  Which by the way I love.  I then used a stitched squares in the Stitched Shapes Dies and cut out my bouquet top.  I then cut out the extra flowers the the matching dies from the Banner Blooms Dies and popped them up with either regular Dimensionals or Mini Dimensionals.  I added the thank you to a strip of scrap cardstock and made a fish tail banner and popped it on the card.  I layered the stitched square unto a square I cut out from Magenta Madness Cardstock and popped it up on the card front.  

Here's the Sketch that inspired my card today.  I hope that you will take time and play along with us this week.  You can check out what the other design team members created to inspire you this week by clicking here.  Thank you for dropping by today.  If you need (ha ha who I am I kidding we all need everything) or want any of the supplies you have seen me use today you will find them all listed below in my online shopping link.  

Happy Stampin' 
Rick Adkins 

Stampin' Up! Shopping List: 

Sunday, June 28, 2020

Know that You Are Loved - Celebrate Sunflowers Stamp Set

Hello and welcome to my blog; today I am going to share the card I shared with my Team during my online team meeting last month.  I shared this card with them to show them how to hold a Mystery Stamping Event.  So I gave them a list of items they needed to have ready to do the event and walked them through the steps how to create the card.  This was the finished product.  Here's a look at my card.  


Tips & Tricks: 

As I mentioned I shared this on the my team online meeting last month as a training tool to help them learn to hold a mystery stamping event.  I gave them clues on what to do and walked them through how to create the card.  I told them to pick one stamp set, a punch or die set, a ribbon, and two ink colors, and gave them the card measurements.  If you have not seen a mystery stamping event they are super fun and a load of laughs.  Next time I do one which will be coming up soon make sure you follow me to know know when it is you will love it.  But back to the card.  I picked to focus on two of the new In Colors for my project.  I used Bumblebee and Cinnamon Cider as my two main colors.  

\
My card base for my card was Cinnamon Cider and it was cut at 5 1/2 x 8 1/2 scored at 4 1/4.  I added a piece of Bumblebee cardstock for a mat layer.  Then added a piece of the Flowers for Every Season DSP to the front.  Next I gave them the option to either stamp, emboss, or just add the three 1" strips of Cardstock or they could have used a coordinating DSP.  I chose to use just the cardstock strips.  The more I've looked at my card design I think if I made this card again I would stamp on the three strips to add a little more interest and texture to the card.  


I then stamped the small sunflower onto my whisper white layer in Bumblebee Classic Ink and stamped the sentiment in Early Espresso Classic Ink.  I punched this out with a 2" circle punch and added it to the card front with a couple Dimensionals.  I then finished off the card by adding a bow made with the Bumblebee Ribbon.  Thanks for dropping by today I hope you have a wonderful and safe Sunday.  If you need any of the supplies you have seen today you can pick them up in my online store.  


Happy Stampin' 
Rick Adkins 

Stampin' Up! Shopping List: 


Saturday, June 27, 2020

Happy Birthday - Zanny Zebra

Hello and welcome to my blog; I have another cute little zebra card for you today using the Zany Zebra Stamp Set.  This time I created a birthday card to share.  I created a one layer ish card for you using a little ink blending a little masking, and a little stamping.  If you read my post yesterday you know how cute I think the Zany Zebra Stamp Set from Stampin' Up! is.  I adore these little guys and it was one of my most haves from the new catalog.  Here's a look at my card.  


Tips & Tricks: 

I started out my design with a 4 1/4 x 5 1/2" piece of Thick Whisper White Cardstock.  I knew I wanted this to be a one layerish type of card.  So I stamped the party hats that I wanted on the my little zebras first with Memento Tuxedo Black Ink.  Then I stamped them again on masking paper.  I used Avery Removable labels for my masking paper. Once I had the masks cut I placed them over the party hats and I could stamped my Zebras from the Zany Zebra Stamp Set in Memento Tuxedo Black Ink.  I then created masks for both of the Zebras and cut them out.  I placed the masks over them (and left the masks for the party hats in place), because I knew I wanted to do a little ink blending for my background.  


I started out ink blending with Sahara Sand Classic Ink for the ground.  Ink blending takes a little time to do and if you give up before it looks correct you will not be happy.  You have to take your time with it and do a couple layers.  I also suggest that before you add ink to paper that you tap off some of the ink from your blending tool.  This way you don't have a heavy amount of ink on your tool before you go to the paper and shouldn't get any strange marks.  After ink blending the ground about a 1/4th of the way up the card I then added my sky.  I used Balmy Blue for the lighter area (always start with your lightest color and work darker).  To avoid getting a lot of blue in the ground I came in from the sides.  


Once I had all the Balmy Blue blended out to the top of my card panel I came back and added just a little Pacific Point Classic Ink to darken it up just a little.  After the ink blending was done I came back and stamped the palm trees from the Dino Days Stamp Set.  I stamped the base of the palm trees frist with Soft Suede Classic Ink.  Before stamping I did put the card front into my Stampartas because I figured I would have to stamp the palm trees a couple times to get them dark enough.  So I stamped each of the base of the palm trees twice to get them dark enough.  I then stamped the tops of the palm trees.  For the tops I stamped them in Pretty Peacock and some in Shaded Spruce Classic Inks.  


After I had everything stamped I removed the masks and used my Stampin' Blends to color the remaining images plus I added a little more details to the palm trees.  On the branches I added a little Granny Apple Green, Shaded Spruce, and Pretty Peacock to each one to make them look fuller.  I colored the Zebra's strips with my Dark Smoky Slate Blend, and added the shadows with the Light Smoky Slate Stampin' Blend markers.  I then added the card front to a Thick Whisper White card base that was cut at 4 1/4 x 11 and scored at 5 1/2.  I used a scrap of Basic Black Cardstock and heat embossed my Happy Birthday Sentiment in White Stampin' Emboss Powder.  I made a little banner with the Basic Black sentiment strip and popped it up on Stampin' Dimensionals to finish off my card.
   

Thanks for dropping by today.  I hope that you have a wonderful weekend, and remember that if you need any of the supplies you have seen today you can pick them up in my online store by clicking on the items in the shopping list below.  


Happy Stampin' 
Rick Adkins 


Stampin' Up! Shopping List:

Stamparatus
[146276]
$49.00

Template Designed by creativeworkerbee