Friday, June 26, 2020

How to make a Zany Zebra Slimline Card Tutorial

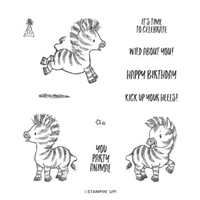
Hello and welcome to my blog; today I am going to share with you how to make a Slimline Card using the Zany Zebra Stamp Set.  The Zany Zebra Stamp Set is one of my favorite new stamp sets in both the Beginners Brochure and the 2020-2021 Stampin' Up! Annual Catalog.  I think the little Zebras are fun playful and would make anyone smile no matter their age.  Here's a look at my card.  

Tips & Tricks: 

Slimline cards are really popular right now and I wanted to share with you how to create one.  They really are not hard to make it's just the paper size is a little bit different.  For a landscape slimline card you need a piece of cardstock that's cut at 8 1/2 x 7".  You are going to score that at 3 1/2", and fold it and burnish the score line.  Here I used Misty Moonlight Cardstock for my card base.  Super simple right!  


My mat for my card is in Crumb Cake Cardstock and it's cut at 3 1/4" x 8 1/4".  I layered that onto my card base.  My next layer is the Whisper White which is what I will be stamping my Zebras and sentiment on.  The Whisper White layer on the outside is 3" x 8".  I stamped the Zebras in Tuxedo Black ink and colored their strips with my Neutral and 2020-2022 Stampin' Write Markers.  I used Misty Moonlight, Crumb Cake and Mossy Meadow.  I wanted there to be just a little hint of the colors from the design and not all black.  


I stamped my sentiment in Misty Moonlight Classic Ink in the center of the two Zebras facing each other.  And then just layered everything up using Multipurpose Liquid Glue.  I keep the card simple so that a new crafter could easily recreate it if they wanted to.  

Video Tutorial: 


If you are viewing this post by email you may not be able to see the embedded video.  If so you will need to click here to view the video.  Thanks for dropping by I hope that you have a wonderful day.  If you are not subscribed to my blog feed please do so.  You will find the follow by email button on the right-hand side of my blog.  If you need any of the supplies you have seen today you can pick them up in my online store in the Shopping List below.  

Happy Stampin' 
Rick Adkins 


Use the Host Code on any order of $50 (before taxes & shipping) or more during the month and receive a gift from me in June as a Thank You. If your order is $150 or more, please do not use the host code.  You will forfeit your Stampin' Rewards if you do; and I want you to get those rewards.


If you place any size order with me during the month of June, you will receive the June Creative Stampers Tutorial Bundle from me as a little thank you.  This month's tutorial bundle features twelve Masculine themed projects.  All the products used can be found in the new 2020-2021 Stampin' Up! Annual Catalog.  The Creative Stampers Tutorial Bundle can either be earned for FREE with any size order or Can be purchased for $20 from me.

Stampin' Up! Shopping List: 

Wednesday, June 24, 2020

Playful Pets Trifold Window Card Tutorial

Hello and welcome to my blog; I have tried to edit my photos for today's post three times and have finally got them edited.  It has been one of those days already.  I would get to the last picture and Photoshop would crash.  Anyway, I have a super cute card for you today featuring the products from the Playful Pets Suite.   The Playful Pets suite has been one of the most popular suites in the new Annual Catalog.  I am going to share with you a Designer Series Paper card base card today.  If you saw my Facebook Live last week this is the card that I made.  Here's a look at the card.  


Tips & Tricks: 

This is a super great card design to do because especially for those that have a hard time picking which side of the Designer Series Paper to use.  This DSP card design allows you to see both sides of the beautiful fun paper.  The card base was made with a 5 1/2 x 12 piece of Playful Pets Designer Series Paper that was scored at 4 1/4 and 8 1/2.  I stamped the cat on today's card in Tuxedo Black ink and colored it with Cinnamon Cider and Smoky Slate Stampin' Blends.  I then used the matching dies to cut her out. I placed a piece of 3 x 4 Playful Pets Designer Series Paper onto a 3 1/4 x 4 1/4 piece of Real Red Cardstock.  I then put my little kitty on the front with Stampin' Dimensionals.  I added my sentiment onto a scrap of Whisper White cardstock stamped in Real Red, and also popped it up on Stampin' Dimensionals.  


I placed a 3 3/4 x 5 piece of Whisper White Cardstock onto a 4 x 5 1/4 piece of Real Red Cardstock and put it in the center of the card base.  I then used a 2" Circle Punch to punch out the window on the inside flap.  I then closed the flap and stamped my sentiment and little images on the inside of the window.  This allows for perfect placement so that they can be seen in the opening.  Don't think that you can stamp first and then line the opening up it doesn't work very well.  Ask me how I know.  


I colored the images in the opening with a few more Stampin' Blends.  I used Real Red, and Flirty Flamingo for the coloring on the inside.  I love that you can see both sides of the designer series paper.  If you are a pet owner you totally can understand why this piece has cat hair on it.  This just made me giggle when I saw it.  No matter how hard you try to keep the hair up you will always find some somewhere.  

Video Tutorial: 


If you are viewing this post by email you may have to click here to see the video.  Not all mail servers will show the embedded video.  


Thank you for dropping by I hope that you enjoy today's card.  I just love this card design.  If you need any of the supplies you have seen today you can pick them up in my online store in the shopping list below.  

Happy Stampin' 
Rick Adkins 


Use the Host Code on any order of $50 (before taxes & shipping) or more during the month and receive a gift from me in June as a Thank You. If your order is $150 or more, please do not use the host code.  You will forfeit your Stampin' Rewards if you do; and I want you to get those rewards.


If you place any size order with me during the month of June, you will receive the June Creative Stampers Tutorial Bundle from me as a little thank you.  This month's tutorial bundle features twelve Masculine themed projects.  All the products used can be found in the new 2020-2021 Stampin' Up! Annual Catalog.  The Creative Stampers Tutorial Bundle can either be earned for FREE with any size order or Can be purchased for $20 from me.

Product List

Tuesday, June 23, 2020

Love And Thanks - Prized Peony The Spot Color Challenge #116

Hello and welcome to my blog; today I am going to share with you the card I designed for this week's color challenge over at The Spot.  I used the Prized Peony Stamp Set and did a little stamping, a little masking, and coloring to create my card.  The Prized Peony Stamp Set features different size Peony blooms and some great sentiments.  The outline images are great to color the flowers in using your favorite color media.  Here's a look at my card.  


Here's a look at this weeks color challenge image that I got my color scheme from.  I used all the colors in the challenge but you only have to pick three.  You can click here to join this weeks challenge or on the challenge image below.  

Tips & Tricks: 

To start off doing this type of card design you need to use a good quality paper.  I picked Thicked Whisper White cardstock to do my stamping and coloring on.  I have found that when I color with my blends on Thick Whisper White I get a brighter colored image.  I am sure that this is because the alcohol in the markers don't soak through the thick cardstock as much as the regular so more of the ink sits on top.  But, I started with the flowers I wanted to be in the front first and stamped that one.  Then I cut a mask and masked over that flower.  


After stamping and masking all the flowers I wanted in the front I moved on to the next set of flowers.  I repeated the process of stamping and masking till I had all the background covered.  I stamped additional leaves in the background as well.  At this point with all the stamping complete I could remove all the masks and start coloring.  I used a mixture of my Stampin' Write Markers and my Stampin' Blends to get the color saturation that I wanted.  I used the Pear Pizzazz Stampin' Write Marker to color the background.  


I colored most of the flowers with my Stampin' Blends first and then came back after the ink dried and added flicks of the same colors using my Stampin' Write markers in the darkest areas.  I colored all the centers with my Bumblebee Stampin' Write Marker and came back in with my dark Crumb Cake Stampin' Blend to add a little texture and shadow.  Once I flicked in the color with the stampin' write markers and the ink dried I came back with my lightest stampin blend that matched the color of each flower and leaves and went back over it to seal in the color.  


Thanks for dropping by today, you will find a full list of the supplies I used in the shopping list below.  If you need any of the supplies you can order them in my online store there.  I hope that you will take time this week and share your projects using this weeks color challenge with us over at the Spot.  


Happy Stampin' 
Rick Adkins 

Stampin' Up! Shopping List: 


Template Designed by creativeworkerbee