
Hello and welcome to my blog; I have another cute little zebra card for you today using the Zany Zebra Stamp Set. This time I created a birthday card to share. I created a one layer ish card for you using a little ink blending a little masking, and a little stamping. If you read my post yesterday you know how cute I think the Zany Zebra Stamp Set from Stampin' Up! is. I adore these little guys and it was one of my most haves from the new catalog. Here's a look at my card.

Tips & Tricks:
I started out my design with a 4 1/4 x 5 1/2" piece of Thick Whisper White Cardstock. I knew I wanted this to be a one layerish type of card. So I stamped the party hats that I wanted on the my little zebras first with Memento Tuxedo Black Ink. Then I stamped them again on masking paper. I used Avery Removable labels for my masking paper. Once I had the masks cut I placed them over the party hats and I could stamped my Zebras from the Zany Zebra Stamp Set in Memento Tuxedo Black Ink. I then created masks for both of the Zebras and cut them out. I placed the masks over them (and left the masks for the party hats in place), because I knew I wanted to do a little ink blending for my background.
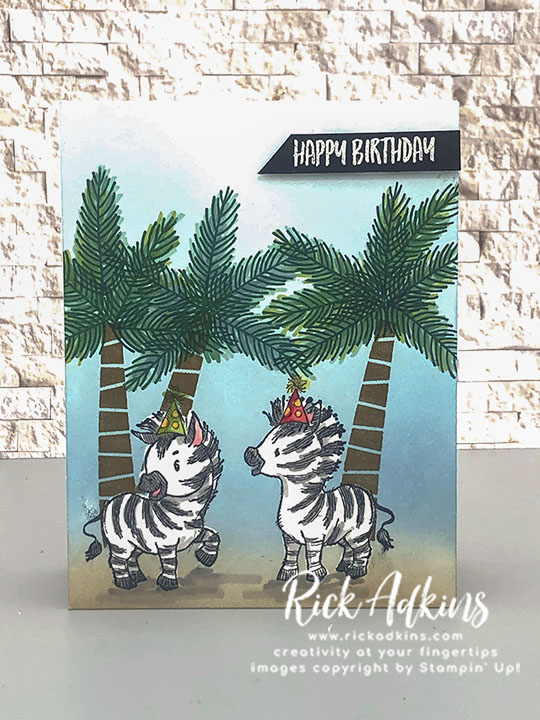
I started out ink blending with Sahara Sand Classic Ink for the ground. Ink blending takes a little time to do and if you give up before it looks correct you will not be happy. You have to take your time with it and do a couple layers. I also suggest that before you add ink to paper that you tap off some of the ink from your blending tool. This way you don't have a heavy amount of ink on your tool before you go to the paper and shouldn't get any strange marks. After ink blending the ground about a 1/4th of the way up the card I then added my sky. I used Balmy Blue for the lighter area (always start with your lightest color and work darker). To avoid getting a lot of blue in the ground I came in from the sides.

Once I had all the Balmy Blue blended out to the top of my card panel I came back and added just a little Pacific Point Classic Ink to darken it up just a little. After the ink blending was done I came back and stamped the palm trees from the Dino Days Stamp Set. I stamped the base of the palm trees frist with Soft Suede Classic Ink. Before stamping I did put the card front into my Stampartas because I figured I would have to stamp the palm trees a couple times to get them dark enough. So I stamped each of the base of the palm trees twice to get them dark enough. I then stamped the tops of the palm trees. For the tops I stamped them in Pretty Peacock and some in Shaded Spruce Classic Inks.

After I had everything stamped I removed the masks and used my Stampin' Blends to color the remaining images plus I added a little more details to the palm trees. On the branches I added a little Granny Apple Green, Shaded Spruce, and Pretty Peacock to each one to make them look fuller. I colored the Zebra's strips with my Dark Smoky Slate Blend, and added the shadows with the Light Smoky Slate Stampin' Blend markers. I then added the card front to a Thick Whisper White card base that was cut at 4 1/4 x 11 and scored at 5 1/2. I used a scrap of Basic Black Cardstock and heat embossed my Happy Birthday Sentiment in White Stampin' Emboss Powder. I made a little banner with the Basic Black sentiment strip and popped it up on Stampin' Dimensionals to finish off my card.

Thanks for dropping by today. I hope that you have a wonderful weekend, and remember that if you need any of the supplies you have seen today you can pick them up in my online store by clicking on the items in the shopping list below.

Happy Stampin'
Rick Adkins
 |  | ||
 | |||
 |  | ") | |
 |  |  |


0 Comments:
Post a Comment
Thanks for taking the time to leave a comment.
Much Love,
Rick