Showing posts with label the spot challenge blog. Show all posts

Tuesday, May 19, 2020

Birds & Branches for The Spot Sketch Challenge #111

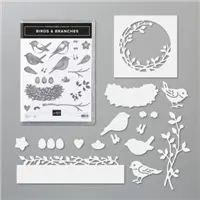
Hello and welcome to my blog; today I am going to share with you my cute card that I made for this week’s sketch challenge over at The Spot!  Since I am featuring the new 2020-2022 In Colors this week, I picked one of them to focus on today. I also picked the new Birds and Branches Bundle to showcase on my project.  I think this stamp set and die bundle is super cute and it was so easy to work with I was hugely impressed.  Here is a look at my card.  

Birds & Branches Bundle, Misty Moonlight, Bumblebee, Tasteful Textile 3d embossing folder, Rick Adkins, Stampin' Up!

I started off my card design today by picking the colors I wanted to use.  I knew I wanted to feature Misty Moonlight on my card, so I picked two coordinating colors to go along with it.  I chose Crumb Cake, and Mossy Meadow.  Both play nicely with the soft denim hue of Misty Moonlight.  I also through in Bumblebee with these three colors just for a little fun.  

Birds & Branches Bundle, Misty Moonlight, Bumblebee, Tasteful Textile 3d embossing folder, Rick Adkins, Stampin' Up!

Next, I took my 3 7/8” x 3 7/8” piece of Crumb Cake Cardstock and used the Tasteful Textile 3D Embossing Folder to add some incredibly beautiful texture to my card.  The Tasteful Textile 3D Embossing Folder lets you cozy up to your crafting projects with the added look of a warm, luxurious fabric.  The embossing folder adds a rich texture on feminine and masculine projects alike.  Embossing folders make it so easy to make a great impression and they are so easy to work with.  All you need to do is place your flat cardstock in the embossing folder, run it through a die-cutting and embossing machine, and out comes cardstock with a bold texture design.  3D embossing folders take embossing to a whole new level, with deeper, more detailed impressions than standard embossing folders.  

Birds & Branches Bundle, Misty Moonlight, Bumblebee, Tasteful Textile 3d embossing folder, Rick Adkins, Stampin' Up!

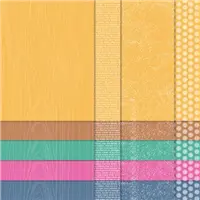
After embossing the Crumb Cake Cardstock, I added it to a Mossy Meadow layer that was cut at 4” x 4”.  I then took a piece of Misty Moonlight Cardstock and cut out the circle image with the branches and leaves.  I then used my largest scalloped circle and cut it out completely.  The branch circle die cut is the same size as the largest circle die in the Layering Circle Dies.  Before adding the circle-die cut to my card, I added two pieces of 2020-2022 In Color Designer Series Paper.  One was in Bumblebee and has the polka dot pattern.  The second is a wood grain pattern in Misty Moonlight.  Both pieces were cut at 1” x 3 7/8”.  

Birds & Branches Bundle, Misty Moonlight, Bumblebee, Tasteful Textile 3d embossing folder, Rick Adkins, Stampin' Up!

I then stamped one of the bird images from the stamp set.  This is a layering (two step) set with a watercolor look.  I started out by stamping the silhouette image in Daffodil Delight Classic Ink.  And then stamped the detailed layer in Crumb Cake Classic Ink. I added the wing in Basic Gray Classic Ink over the other stamped layers.  This creates a progressively darker color with each layer you stamp.  I then stamped the bird’s little feet before taking the matching dies to cut both images out.  I layered them together with a little liquid glue.  Before placing it on my card front. 
 
Birds & Branches Bundle, Misty Moonlight, Bumblebee, Tasteful Textile 3d embossing folder, Rick Adkins, Stampin' Up!

Next, I stamped the flower image in Daffodil Delight Classic Ink on Bumblebee Cardstock.  I stamped the other image onto Mossy Meadow cardstock in matching ink.  I then cut them both out with their matching dies.  I added the mossy meadow leaves to the circle image; and popped the flowers up on Dimensionals.  I stamped the sentiment in Crumb Cake Classic Ink on a strip of Crumb Cake Cardstock.  I added it to the card front with Multipurpose Liquid Glue.  

Birds & Branches Bundle, Misty Moonlight, Bumblebee, Tasteful Textile 3d embossing folder, Rick Adkins, Stampin' Up!

I then added the card front to a piece of Misty Moonlight Cardstock cut at 8 ½ x 4 ¼ scored at 4 ¼.  I finished off my card by adding a 4 x 4 piece of Whisper White Cardstock to the inside of the card with the nest and bird stamped on the inside.  I then added a few of the Misty Moonlight Enamel Dots to the center of each flower.  


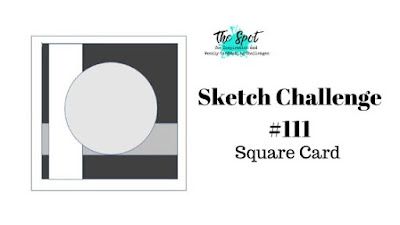
Here is a look at the sketch that inspired my card today. Thank you for dropping by I hope that you take time this week and play along with use over at The Spot Creative Challenge.  The new products that I have showcased today will be available on June 3, 2020.  If you want to get your hands on these items early you can join my team and add them to your starter kit.  Which, by the way is the best deal in the catalog!  You will find all the items to add to your shopping list and shopping carts in the shopping list below.  
Happy Stampin' 
Rick Adkins 


Use the Host Code on any order of $50 (before taxes & shipping) or more during the month and receive a gift from me in May as a Thank You. If your order is $150 or more, please do not use the host code.  You will forfeit your Stampin' Rewards if you do; and I want you to get those rewards.


If you place any size order with me during the month of May, you will receive the May Creative Stampers Tutorial Bundle from me as a little thank you.  This month's tutorial bundle features Birthday Bonanza Suite of Products from the January-June Mini Catalog.  The Creative Stampers Tutorial Bundle can either be earned for FREE with any size order or Can be purchased for $20 from me.

Stampin' Up! Shopping List: 

Tuesday, April 14, 2020

Positive Thoughts The Spot Color Challenge #106

Hello and welcome to my blog; today I am going to share with you the card that I made for this week's color challenge over at The Spot.  The color challenge this month features Petal Pink, Gray Granite and at least one or more metallic Color.  I chose to use copper as my metallic, and I used the Positive Thoughts stamp set from the January-June Mini Catalog on my card today.  I did a fun little technique that's been around for a while on my card. I used the triple stamping technique to create a fun and actually quick card.  Here's a look at my card.  


Here's the challenge image that inspired today's card.  You can click on the image below to check out what the other design team members created and play along with us this week. 

Tips & Tricks: 

The triple stamping technique is really quite easy.  All you have to do is have three pieces of cardstock that are cut two sizes smaller than the base layer.  You want to leave room for the three mats that you are going to add.  Add a little removable adhesive to the cardstock and stack them all up at one time.  Stamp the images you are going to use.  In my case I stamped all the images from the Positive Thoughts stamp set in Versamark ink and then covered them all in Copper Stampin' Embossing Powder heat set each layer and then added them to my copper foil mats.  


I attached everything together with Multipurpose Liquid Glue.  You do have to make sure that when you are lining the layers back up on the layer on top you have to line the images up so that they look as if they fit back together correctly.  You do have a little wiggle room but not alot.  I love the look of how the stamping looks endless.  I chose to alternate the colors of my cardstock between Petal Pink and Gray Granite between each copper foil layer.  I started out with my Petal Pink card base then did a copper foil layer then a gray granite layer then the copper the petal pink and so on and so forth.  


Before adding the layered card front to the card base I added some of the Petal Pink Organdy Ribbon to the front and tied a simple knot to one side.  I then used the Stitched Shapes Dies and cut out a stitched circle from some Petal Pink Cardstock and stamped the flower from the sent in the middle with Petal Pink ink.  I did stamp off once to get a lighter shade of Petal Pink for the flower.  I then stamped the sentiment in Versamark and covered with it copper embossing powder and then heat set it.  I added the stitched circle to a scalloped circle that I die cut from some copper foil.  The sentiment piece was then popped up over the ribbon with a couple stampin' dimensionals.  To finish off the card I added a few champagne rhinestones.  I thought they complimented the copper foil really nicely.  


For the inside of my card I stamped one of the sentiments in Gray Granite ink and stamped the feather a few times around the inside of the card.  Thanks for dropping by today.  I hope that you will take a little time this week and play along with us at The Spot for this week's color challenge.  I know that you will find this to be a super fun challenge and it will really spark your creative juices.  If you need any of the supplies that you have seen used today you can order them from my online store by clicking on the items in the shopping list below.  

Happy Stampin' 
Rick Adkins 

Stampin' Up! Shopping List: 


Supply List


Use the April Host Code on any order of $50 (before taxes & shipping) or more during the month and receive a gift from me in May as a Thank You.  If your order is $150 or more, please don't use the host code.  You will forfeit your Stampin' Rewards if you do; and I want you to get those rewards.


If you place any size order with me during the month of April, you will receive the April Creative Stampers Tutorial Bundle from me as a little thank you.  This month's tutorial bundle features eleven tutorials that use the outgoing 2018-2020 In Colors.  The Creative Stampers Tutorial Bundle can either be earned for FREE with any size order or Can be purchased for $20 from me.


Order $50 (before shipping and taxes) of products from the Ornate Garden Suite of Products in my Online Store in April using the Host Code:  ZPBUDHR7 and I will send you’re the Ornate Garden Mega Tutorial Bundle for FREE as a thank you gift.  That’s 90 tutorials featuring products from the Ornate Garden Suite (a $21 value) free for purchasing products from the Ornate Garden Suite from me this month free.  

Don’t want to order but still would like to get the Ornate Garden Mega Tutorial Bundle featuring 90 projects with both metric and Imperial measurements for each project!  You can purchase it from me for $21.00 US any where in the world in my online store by clicking here.  

Template Designed by creativeworkerbee