Showing posts with label ink blending. Show all posts

Wednesday, November 6, 2019

Night Before Christmas Santa Sleigh Card

Hello and welcome to my blog; today I am going to share a card with you that features the products in the Night Before Christmas Suite.   This is a super fun suite and just screams Christmas.  My design is based on this weeks Paper Craft Crew Sketch Challenge this week.  The Sketch challenge this week is a two weeks challenge.  Here's a look at my card.  

Here's a look at the sketch that inspired my card for today.

Tips & Tricks: 

For the main focal image on the card I used a piece of Pretty Peacock cardstock that I did a little ink blending at the top in matching ink.  I did this to enhance the top portion of the cardstock to make it appear more of an ombre' look.  Once I had the ink blending dried I flicked on some Frost White Shimmer Paint.  After the Shimmer Paint dried I added a few white dots with a white gel pen, this added a little more to the background of the card that can give the look of snow or stars.  I added that to a piece of the Night Before Christmas Designer Series Paper.  I also added two strips going up the side in different widths.  
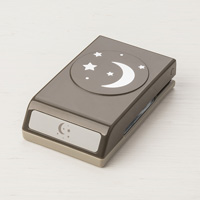
Once I had the background done, I added a moon and a few stars punched out of Sparkle Glimmer Paper using the Twinkle Builder Punch.  I attached the moon with mini dimensionals and the stars where attached with a little liquid glue.  
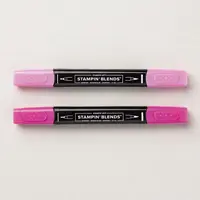
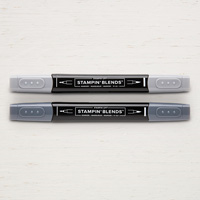
After getting the moon and stars attached to the card I then die cut Santa and the Sleigh four different times.  Once out of Basic Black cardstock and three other times out of scraps.  I then layered the scrap pieces together and then layered the basic black one on top.  I then added Wink a Stella on top of the entire piece to add a little shimmer.  I then popped it up with dimensionals.  On the last reindeer I added a red rhinestone to make him Rudolph.  
  I finished my card by adding the sentiment to the bottom of the card in Tuxedo Black ink.  This way I tied in the basic black to the card.  I hope that you have enjoyed my little card today as much as I had fun creating it.  
Happy Stampin' 
Rick Adkins 


If you live in the US.  I would love you to choose me as your demonstrator.  If you would like to purchase any of these products you can click on the Shop Now Button or by clicking on any of the images below.  Alternatively, you can also contact me by email to place your order.  Please be sure to use the monthly host code and I’ll send a little something out to you the following month to say Thank You!  


November HOST CODE:  QU2TJBJN
1.     Spend any amount with me this month and receive the Creative Stampers Tutorial Bundle.  Plus get a gift from me in December.
Please remember that if you use the host code you cannot use that order towards my KCRP’s (Kinmon Crafty Reward Points) that would be double dipping and is not allowed.  For more information on KCRP’s click here.  


Three main reasons to Join!  
1.     You Get at least a 20% discount on all your orders while you are a demo.   
2.     You get to join my fun Kinsmon Crafters Team and Private Facebook Group.
3.     Access to directions to all my online classes 

Stampin' Up! Shopping List: 

Monday, October 21, 2019

Hello Floral Card-To A Wild Rose

Hello and welcome to my blog; today I am going to share with you a card that I made yesterday using the To A Wild Rose Stamp Set and some of my Stampin' Blends.  To A Wild Rose is a great layering stamp set that actually is a Million Dollar Sales Achiever Set that is currently in the Stampin' Up! Annual Catalog.  I love this card that I created it just makes me happy.  Here's a look at my card.

For my card today I stamped the outline of the rose from the stamp set three times using Tuxedo black ink and the leaves cluster three times and a couple other times so that I could have some extra leaves.  Once the ink dried I started the coloring process.  All the leaves where colored with Soft Suede light & dark Stampin' Blends.  I then colored the flowers next.  For the lighter pink flower I colored with my Flirty Flamingo and Lovely Lipstick combo blends.  The darkest areas were done with the Dark Lovely Lipstick and blended out until I got to the lightest area.
The two darkest roses were colored with just the Lovely Lipstick light and dark blends.  Once I had everything colored I colored in the centers of the roses with my dark Daffodil Delight.  I then took a white gel pen and added some little white dots to the centers.
Once all the coloring was done it was time to use the matching dies to cut out the roses and leaves.  The leaves that I stamped that was just the the single leaf I cut out with my paper snips.  I laid out my arrangement onto the card and then used press and seal to hold it into place while I worked on my card base.
I used the Decorative Mask Stencils and did a little ink blending in Flirty Flamingo ink on the area that the flowers were going to be at.  I then flicked on some Flirty Flamingo and Lovely Lipstick ink.  Once the ink had dried I added a little liquid glue behind the leaves and flowers that was facing up on the press and seal.  I then placed the cluster of flowers (still on the press and seal) onto the card base.  I then pulled the press and seal back up with the remaining flower and a couple leaves up and added a few Stampin' Dimensionals behind them.  I then placed that flower and leaf back onto the arrangement.
I stamped my sentiment in Tuxedo Black ink in the bottom third of the card base.  I then added a few sequins to finish off the arrangement.  I trimmed off the leaves that were over hanging off the card.
Thanks for dropping by today, I hope that you have enjoyed my little card for today.

Happy Stampin' 
Rick Adkins 

If you live in the US.  I would love you to choose me as your demonstrator.  If you would like to purchase any of these products you can click on the Shop Now Button or by clicking on any of the images below.  Alternatively, you can also contact me by email to place your order.  Please be sure to use the monthly host code and I’ll send a little something out to you the following month to say Thank You!  

October HOST CODE:  SQ2WWJZN
1.     Spend any amount with me this month and receive the Creative Stampers Tutorial Bundle featuring Fall & Halloween Projects.  Plus get a gift from me in November.
Please remember that if you use the host code you cannot use that order towards my KCRP’s (Kinmon Crafty Reward Points) that would be double dipping and is not allowed.  For more information on KCRP’s click here.  


Three main reasons to Join!  
1.     You Get at least a 20% discount on all your orders while you are a demo.   
2.     You get to join my fun Kinsmon Crafters Team and Private Facebook Group.
3.     Access to directions to all my online classes 

Stampin' Up! Shopping List: 

Friday, October 11, 2019

Playful Penguins Sunset Silhouette Card

Hello and welcome to my blog:  Today I am going to share with you a fun technique that will stretch your stamp collection and allow you to make some fun unexpected cards as well.  Sometimes there's nothing more attractive then a sunset on a cold winter day.  Then you add to that a bold graphic figure in silhouette and your heart will start to go pitter pat.  There's just something about those beautiful bold colors in the sky either as the sun is raising or starting to set paired with the dark image in front of it that is just so very striking.   That's exactly what I did for my card today, I brought both of these wonderful things into my card today.  Let's have a look at my project shall we.

Tips & Tricks: 

Creating this look isn't as hard as you may think; as long as you have the right mind set and tools to create it.  Anytime I create one of these types of cards I always start with Masking off anything that needs to be the white of the paper.  Next comes my sunset area.  Because, it's one of the main draws to the card and one of the most crucial parts.  If you don't have your sky right people will be drawn to it.  The trick to ink blending is to just keep going until you're happy with the way it looks.  Sometimes it may take up to 30 minutes or longer to get the ink to blend jsut right.  But, if you keep going back and forth between the colors it will start to blend out.  My go to sunset colors are Crushed Curry, Pumpkin Pie, Rich Razzleberry, and either a little Blackberry Bliss or Night of Navy.  
After the sky is nice and blended I can peel off my snow mound masks and start stamping my silhouette images.  The most common way of stamping these images are with solid image stamps, but you can do it the way I did today with regular plain stamps.  It just adds in an extra step, but what's one more step to getting a beautiful card, right? 
Once I had the penguins stamped out on the card front I then came back and simply colored them in with my Basic Black Stampin' Blends.  Yep, that was all I had to do to get these bold images to appear they were in silhouette.  So, What stamps do you already own can you do this technique with to get a new look from your stamp collection?  I bet you can think of about 10 sets you haven't touched in a long time.  I highly encourage you to give both of these techniques a try and breath a little new life into your stamp collection.  Thanks for dropping by today, I hope that you have a great day and I will see you again tomorrow with this week's episode of Rick's Saturday Simple Stamping.  Until then Happy Stampin'!
Happy Stampin' 
Rick Adkins 
If you live in the US.  I would love you to choose me as your demonstrator.  If you would like to purchase any of these products you can click on the Shop Now Button or by clicking on any of the images below.  Alternatively, you can also contact me by email to place your order.  Please be sure to use the monthly host code and I’ll send a little something out to you the following month to say Thank You!  

October HOST CODE:  SQ2WWJZN

  1. Spend any amount with me this month and receive the Creative Stampers Tutorial Bundle featuring Fall & Halloween Projects.  Plus get a gift from me in November. 


Please remember that if you use the host code you cannot use that order towards my KCRP’s (Kinmon Crafty Reward Points) that would be double dipping and is not allowed.  For more information on KCRP’s click here.  


Three main reasons to Join!  

1.     You Get at least a 20% discount on all your orders while you are a demo.   
2.     You get to join my fun Kinsmon Crafters Team and Private Facebook Group.
3.     Access to directions to all my online classes 

I All Ready Know I Want to Join!  Sign Me UP!

Stampin' Up! Shopping List: 


Template Designed by creativeworkerbee