Showing posts with label Night Before Christmas. Show all posts

Saturday, November 16, 2019

Holiday Owl - Hoot Hoot Hooray Christmas Note Card

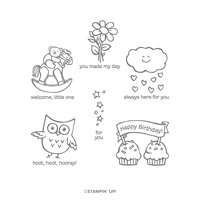
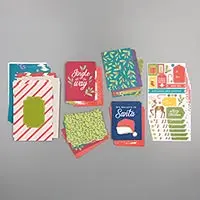
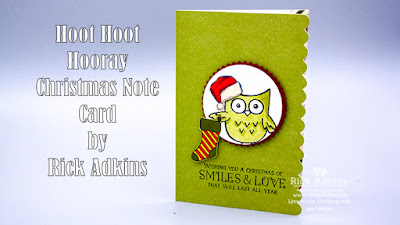
Hello and welcome to my blog; today I am actually at OnStage in Atlanta getting ready to see some of the great new products that will be coming out in the 2020 Occasions Catalog and Saleabration brochure, but I have a super cute project for you today.  I used the Hoot Hoot Hooray stamp set from the Beginner Brochure along with some of the Night Before Christmas Designers Series Paper for my card today.  Here's a look at my card.


Tips & Tricks: 

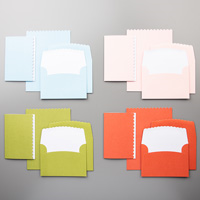
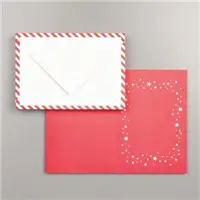
For my card I used the one of the Scalloped Edge Note Cards from the Annual Catalog.  These cute little note cards some with matching envelopes and the cute little scallop edge.  The Scalloped Edge Note Cards and Envelopes come in four colors.  The four colors you get in each pack are Balmy Blue, Old Olive, light pink (Powder Pink retired) and Terracotta Tile.  One of the great things about the scalloped edge is that you can add a strip of designer series paper to the inside and when closed you can see it from the outside with the scalloped edge.  For the insert I used a strip of the Night Before Christmas Designer Series Paper.  

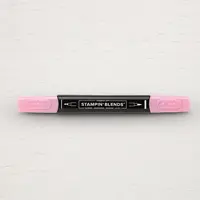
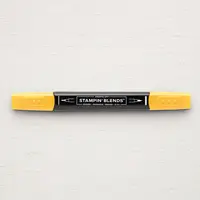
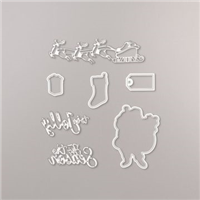
To decorate the outside of the note card I stamped the owl from Hoot Hoot Hooray on a piece of Whisper White cardstock and punched it out with a 2" circle punch.  I then colored it with my Old Olive stampin blends.  I then punched out a starburst using my starburst punch and some Cherry Cobbler Cardstock I added the colored owl to the starburst with snail and then popped it up on my card.  I then cut out one of Santa's hat and stocking from the Night Before Christmas Designer Series Paper and added it my owl.  I placed the hat on his head and put the stocking on his hand.  I added a mini dimensional under the stocking to make it level.  
The sentiment for my card came from the host set Greatest Part of Christmas.  Which can be earned with Stampin' Rewards.  

Video Tutorial: 

If you are viewing this post by email you will have to click here or the image below to view the video.  


Here is a image that you can save to pinterest to remind you what I used.  
Thanks for dropping by today.  I hope that you have enjoyed my little video tutorial.  
Happy Stampin' 
Rick Adkins 


If you live in the US.  I would love you to choose me as your demonstrator.  If you would like to purchase any of these products you can click on the Shop Now Button or by clicking on any of the images below.  Alternatively, you can also contact me by email to place your order.  Please be sure to use the monthly host code and I’ll send a little something out to you the following month to say Thank You!  

November HOST CODE:  QU2TJBJN
1.     Spend any amount with me this month and receive the Creative Stampers Tutorial Bundle.  Plus get a gift from me in December.
Please remember that if you use the host code you cannot use that order towards my KCRP’s (Kinmon Crafty Reward Points) that would be double dipping and is not allowed.  For more information on KCRP’s click here.  


Three main reasons to Join!  
1.     You Get at least a 20% discount on all your orders while you are a demo.   
2.     You get to join my fun Kinsmon Crafters Team and Private Facebook Group.
3.     Access to directions to all my online classes 
I All Ready Know I Want to Join!  Sign Me UP! 

Stampin' Up! Shopping List: 


Price: $10.00

Sunday, November 10, 2019

Case the Catalog - Night Before Christmas Memory & More Card

Hello and welcome to my blog; today I am going to share with you another Case the Catalog project.  For today's project I am going to share with you; a card from the Holiday Catalog.  The card that I am going to share was CASEd from one of the projects on page 25.  The project that I am going to CASE today features the Night Before Christmas Memory and More Card pack and the Night Before Christmas Memories & More Card and Envelopes.  If this is your first time here welcome and if you are returning welcome back.  If you are new to my blog and crafting; you may not know what the term CASE means.  CASE is a term that card makers use to learn by copying a project.  CASE stands for Copy and Share Everything or Copy and Selectively Edit.  By doing this you can learn new skills or techniques.  Here's a look at my card.  

Tips & Tricks: 

I always love the Memory and More card packs and the matching cards and envelopes that we offer in our catalogs.  The holiday catalog has a lovely pack of Memory and More cards and matching Night Before Christmas Memory and More Cards and Envelopes.  Both of these items match the Night Before Christmas Suite.  The Memory and More card pack includes 54 double sided cards 6 each of 9 designs in 3" x 4" and 4" x 6" size along with 6 sticker sheets.  This card pack is also designed for a Holiday Memory Book (which was I offered as one of my online classes last month).  
To use the Night Before Christmas Memory & More Card Packs and the Night Before Christmas Memory & More Cards and Envelopes together to create cards is really really easy.  All you have to do is simply adhere cards from the card pack to the cards.  With just these products you can make 20 cards and coordinating envelopes.  
For this card I took the card that said To Santa and used some scrap Crumb Cake Cardstock and punched out a 1/2 circle using my 1/2 Circle Punch.  I attached that with a little liquid glue to the card from the Card pack.  I then took a hand held punch (retired) and punched a hole in the center of the crumb cake piece through the card.  I added some of the Cherry Cobbler 3/8" Diagonal Stripped Ribbon through the hole and tied it into a bow.  I then attached this to the card with a few Stampin' Dimensionals.  
And just like that you have a complete card all done.  Really and truly it's just that quick to create tons of cards just using these products.  Thanks for dropping by today.  I am glad that you are here.  I am preparing as I type this blog post to get ready to attend the OnStage Local in Atlanta next weekend, so be on the watch out on my Social Media channels for little sneak peeks of upcoming products from the 2020 Occasions Catalog and Saleabration Brochure.  
Happy Stampin' 
Rick Adkins 


If you live in the US.  I would love you to choose me as your demonstrator.  If you would like to purchase any of these products you can click on the Shop Now Button or by clicking on any of the images below.  Alternatively, you can also contact me by email to place your order.  Please be sure to use the monthly host code and I’ll send a little something out to you the following month to say Thank You!  

November HOST CODE:  QU2TJBJN
1.     Spend any amount with me this month and receive the Creative Stampers Tutorial Bundle.  Plus get a gift from me in December.
Please remember that if you use the host code you cannot use that order towards my KCRP’s (Kinmon Crafty Reward Points) that would be double dipping and is not allowed.  For more information on KCRP’s click here.  


Three main reasons to Join!  
1.     You Get at least a 20% discount on all your orders while you are a demo.   
2.     You get to join my fun Kinsmon Crafters Team and Private Facebook Group.
3.     Access to directions to all my online classes 
I All Ready Know I Want to Join!  Sign Me UP!

Stampin' Up! Shopping List 

Thursday, November 7, 2019

Cup of Christmas & Night Before Christmas Online Holiday Card Classes Preorder Open


I have two fun Holiday Online classes for you this month.  I have designed these classes to help you save a little time during this busy Holiday Season.  By taking this month’s holiday classes you can take a little time out of your busy schedule and make some of your Christmas cards or change the sentiments and make some fabulously fun All Occasions Cards ready to send during the Holidays. 


Cup of Christmas Online Class
Time: Your Convenience
Location:  Comfort of Your Own home
RSVP Due: 11/16/19
Date:  11/22/19
Cost:  $66.00

Details:
I have a super fun Online Class for you this month featuring the Cup of Christmas Bundle.  In this class you will make 6 cards (2 each of 3 designs) featuring the Cup of Christmas stamp and die set.  Included in the cost of the class are:
  • ·         the Card kit for each of the designs
  • ·         Envelopes for your cards
  • ·         Video and PDF printable tutorial
  • ·         And the Cup of Christmas Bundle (FREE as my Gift)

After you have placed your order for the class, I will order all the supplies and have them shipped to me and cut and repackage them and send them out to you.  

Night Before Christmas Online Class
Time: Your Convenience
Location:  Comfort of Your Own home
RSVP Due: 11/16/19
Date:  11/22/19
Cost:  $41.00

Details:
In this class you will make six cards (2 each of three designs) featuring the Holly Jolly Bundle (not included in class fee).  You can add on the bundle if you would like or use a stamp set you already own.  Included in the Class Fee is:
  • ·         1 pack of the Night Before Christmas Designer Series Paper
  • ·         1 bolt of Cherry Cobbler 3/8” Diagonal Striped Ribbon
  • ·         1 pack of Toile Tidings Glitter Enamel Dots
  • ·         Video and PDF printable Tutorial (as my gift to you)
  • ·         Envelopes for your cards (Also my gift to you)
  • ·         Precut card kits to create your projects (GIFT to you)

After you have placed your order for the class, I will order all the supplies and have them shipped to me and cut and repackage them and send them out to you.  

 Add On Option: 


If you would like to add on the Holly Jolly Bundle you can do so with an additional $49.50 fee.  That’s a 19% discounted savings to you.  Just mention it in the registration email. 

 Registration Open Now: 


You can also save a little more if you want to take both classes.  I will combine shipping if you sign up for both classes.  If you are local, you can pick up the class from me and save on shipping as well. 
To register for either, or both classes you can email me and I will send you the registration link. 


Tis the Season

Hello and welcome to my blog; I hope that you are having a wonderful day!  I am going to share with you the card that I did last night during my Facebook Live.  I have a weekly Facebook Live mini Class every Wednesday night at 8 pm CST.  I also share that project and and tutorial the next day here and on my YouTube Channel.  Last night I used products from the Night Before Christmas Suite in the 2019 Holiday Catalog.  Here's a look at my card.


Tips & Tricks: 

I created this card with some scraps from my stash.  Well the designer series paper and the stamped and die cut images are from scraps any way.  I used my layering circle dies and my 2 1/4" punch to cut out punch the circles.  You can pick any of the designer series paper from the Night Before Christmas Designer Series Paper 6 x 6 paper to create this card.  Any of the designs in this pack of DSP will work for this card.  The background piece of cardstock in Old Olive and I embossed it with the Winter Knit 3d embossing folder, before attaching it to the Very Vanilla Card base.  
Once I had the embossed background and the circles attached to the card base; I then stamped the little poinsettia image from Cup of Christmas and colored it with my Real Red light and dark stampin blends and the Flirty Flamingo Dark blend dark mango melody stampin' blend.  I ran it through my die cutting machine with the matching embossing folder and attached it with a Stampin' Dimensionals.  The Cup of Christmas set isn't part of this suite of products but I am featuring both of these sets in two of my online Classes this month.  If you are interested in either of these classes you can email me and I will send you the registration link.  If you want to take both of these classes at the same time please mention that in the email because you will save on shipping costs.  
Once the poinsettia was colored and cut out and attached to the card front.  I worked on the sentiment for my card; I took a scrap of Very Vanilla cardstock and colored it with the Flirty Flamingo dark, Real Red light and dark blends and blended the colors together to make an ombre' look and then used the Tis the Season die and cut it out on my die cutting machine.  After all that I attached it to the card front with a little liquid glue.  To finish off the card I added  a few Red Rhinestones to the front of the card.  

Video Tutorial: 


If you are viewing this post by email you may have to click here or the image below to view the video tutorial.  Some email servers will not show the embedded video.  

Thanks for dropping by today, and I hope that you have enjoyed this little tutorial on how I made my Tis the Season Card.  I will see you again tomorrow with a new project.  
Happy Stampin' 
Rick Adkins 

If you live in the US.  I would love you to choose me as your demonstrator.  If you would like to purchase any of these products you can click on the Shop Now Button or by clicking on any of the images below.  Alternatively, you can also contact me by email to place your order.  Please be sure to use the monthly host code and I’ll send a little something out to you the following month to say Thank You!  

November HOST CODE:  QU2TJBJN
1.     Spend any amount with me this month and receive the Creative Stampers Tutorial Bundle.  Plus get a gift from me in December.
Please remember that if you use the host code you cannot use that order towards my KCRP’s (Kinmon Crafty Reward Points) that would be double dipping and is not allowed.  For more information on KCRP’s click here.  


Three main reasons to Join!  
1.     You Get at least a 20% discount on all your orders while you are a demo.   
2.     You get to join my fun Kinsmon Crafters Team and Private Facebook Group.
3.     Access to directions to all my online classes 
I All Ready Know I Want to Join!  Sign Me UP!

Stampin' Up! Shopping List: 


Template Designed by creativeworkerbee