Showing posts with label alternative projects. Show all posts

Thursday, May 27, 2021

May 2021 Paper Pumpkin Alternative Projects

 Hello and welcome to my blog; today I am going to share with you two projects using the May Paper Pumpkin Kit.   Todays projects are alternative projects for the May 2021 Paper Pumpkin Kit Batters Up!.  


Thursday, February 27, 2020

A Paper Pumpkin Thing Blog Hop Lovely Day

Hello and welcome to my blog; today I am going to share with you two alternative projects with the February Paper Pumpkin Lovely Day Kit.  I came up with a super cute card for my card project and I decided to do something a little different for my 3d project.  I decided to make a Junk Journal which I have been seeing more and more of lately.  So I thought I would give it a go.  Here's a look at my projects.
Before we really get into what I did for my alternatives I wanted to share with you a little look at what came in this month's kit and the intended projects.  This month's kit was packed full of some really neat items.  I am in love with these top folding envelopes with the half circle flap.  I really would like to have more  of these.  

This month's kit made 9 cards with coordinating envelopes.  This has been one of the best kits that I've seen recently.  I know I said that last month too; well, it's just because they just keep getting better and better.  

Alternative Card:  

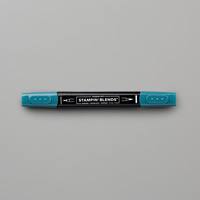
For my alternative card this month' I took inspiration from the die cut flower that came in this month's kit.  I took the stamp set from the set and stamped five of the flower images in tuxedo black ink on the top and right-hand side of a piece of whisper white.  Once the ink dried I used my Stampin' Blends in Rich Razzleberry, Rococo Rose, and So Saffron to color all the flowers.  I also added a faux layer on this panel with a few other blends.  You will see the list below of all the colors that I used.  Once the coloring was done I then took the card panel and added it to a mat that I made from one of the card bases from this month's kit.  I then added it to a Whisper White Thick Card base cut at 4 1/4 x 11 scored at 5 1/2.  Once that was done I stamped my sentiment on one of my labels from the kit and added it to the card base.  I then added the foam foil word die cut sticker to the front of the card.  I actually put a dimensionals under the L & Y so that everything was balanced.  

Junk Journal: 

Junk journals are surprisingly easy.  All you have to do is take some of your collection and make book pages, and pockets for your album.  A Junk journal is a handmade book made up of recycled items such as papers from magazines, brochures, patterned paper, music sheets, envelopes, packaging, brown paper bags, maps, greeting cards, post cards, doilies, to name a few. The book covers can be made from cereal boxes, old book covers or any hard card boards.  Basically anything that you can find including the kitchen sink.  

I used some of the card bases, envelopes, (from the kit) and additional DSP and cardstock to make mine 

All I had to do was fold everything up and arrange it into how I wanted the signature to be.  Which by the way are the sections of pages in your journal or book.  Once all the signatures are lined up and the way you want it it's time to do a little piercing of the paper to make the holes for your ribbon, twine, or book rings to go through to hold everything together.  I choose to use ribbon to secure my book close.   I used the stripped Organdy Ribbon for this purpose.  For some of my signatures I used the Woven Thread DSP from the Annual Catalog.  

I even made pull out pockets to write a little note or something that I want to remember or use sooner.  Here are a few pictures of the inside pages.  


As you can see I have places for pictures, keepsakes, and memory keeping all throughout.  Thanks for dropping by today, I hope that you have a wonderful day.  If you are viewing this post on my word press site you will need to click here to view the blog roll.  Thanks for dropping by.  

Blog Roll: 


Happy Stampin' 
Rick


Tuesday, December 31, 2019

Paper Pumpkin December 2019 Alternative Projects

Hello and welcome to my blog; today I am going to share with you a couple alternative projects for the December Paper Pumpkin kit Something for Everything.  Each month I love to create a few alternative projects to stretch the contents of my Paper Pumpkin kits.  By creating alternative projects you can not only stretch your kits to make more projects and more cards using some additional cardstock and other supplies along with creating sometimes even doubling the contents of the kits.  Here's a look at two alternatives that I came up with so far.


This month I used almost everything from this month's kit to create these two alternatives with the addition of two pieces of cardstock.  I used a piece of Terracotta Tile and Crushed Curry Cardstock to create these two cards.  Since you get two card bases from one sheet of cardstock I could have easily created two cards of the same design.  I used one of the card bases from the December kit on my cards today.  Well, two and a 2 1/4 of the cards in the kit.
For my first alternative card I cut a piece of Crushed Curry Cardstock in half at 4 1/4 x 11".  I then cut the Green striped card base from the kit down.  I started by cutting the front apart and cut the card front down to 2" x 4" and the back green piece of the card base down to 4 1/4 x 2 1/4".  I then layered the two pieces together.  I used the little flower image from this months stamp set all around the bottom of the card base in Crushed Curry Ink.  I stamped in both 1st and 2nd generation stamping.  I wrapped some whisper white baker's twine around my card base and tied a bow.  I then added the crushed curry polka dot hexagon sticker from the kit on to the front of the card base.  I added one of the gold foil stickers to the center of the hexagon, and stamped my sentiment on one of the banners.  I popped the banner up on Stampin' dimensionals.  I finished off this card by adding a Whisper White inside (4 x 5 1/4) and a few of the rhinestones that came in the December Kit.
For my second card I used a Terracotta Tile card base cut at 5 1/2 x 8 1/2 and layered the remaining striped card base to the front.  I then took one of the flowery card bases and cut a tag using the tag die from the Bonanza Dies (new in the January - June Mini Catalog).  I added the gold foil swirl onto the tag and then stamped the sentiment onto one of the banners and added it to the card front.  I added some of the flower stickers to the card front along with some of the leaves.  I added a couple of the small flowers to the card front and placed a few rhinestones to the center of them.  I added a 4 x 5 1/4 piece of whisper white to the inside of the card.

Video Tutorial: 

 If you are viewing this post by email you may have to click here or the image below to view the video.  Some mail servers will not play the embedded video.

Thanks for dropping by today; I hope that you have enjoyed my alternative projects for today.  Make sure to join me on Thursday I have two more alternative projects for you for this months A Paper Pumpkin Thing Blog Hop.
Happy Stampin' 
Rick Adkins 
Independent Stampin' Up! Demonstrator 


Product List:

Bonanza Dies
[151566]
$26.00

Thursday, November 28, 2019

A Paper Pumpkin Thing Blog Hop: Winter Gifts


Hello and welcome to my blog; today I am going to share with you two alternative projects for the November Paper Pumpkin Kit Winter Gifts.  My post is also part of this month's A Paper Pumpkin Thing Blog Hop.  Each month we come up with a couple alternative projects using that month's kit.  This month I created both a card and a 3d project as my alternative projects.  Here's a look at my projects.

Tips & Tricks: 

For my 3d project I created a tall milk carton.  I started out by stamping my 8 1/2 x 8 1/2 Shaded Spruce cardstock with the holly image from this months exclusive stamp set.  I stamped it all over the background cardstock to create my own designer series paper of sorts.  Once it was stamped I used my Simply Score to score the cardstock.  I scored it at 2, 4, 6, and 8 on one side.  Next I turned it on the other side and scored at 2" then I flipped it around and over and scored at 1/2".  Once all the scoring was done it was time to fold and burnish all the score lines.  I cut up the 2" score lines at the bottom and took off the two very small rectangles.  You are going to secure the carton together with tear and tape.  I used my crop a dile to punch holes in the top to weave ribbon through the holes to secure close.  I stamped a sentiment on one of the banners and added it to the poppy parade circle.  I then tucked some of the holly die cuts behind the sentiment and added some red rhinestones as the berries and to add a little bling.  
For the card I used a piece of Real Red Cardstock cut at 5 1/2 x 8 1/2 scored at 4 1/4.  I stamped the little snowflakes from the set onto my whisper white cardstock ( 3 3/4 x 5) all over the background.  I layered this piece onto a Real Red mat (3 7/8 x 5 1/8) which was placed on a 5 1/4 x 4 Early Espresso mat.  I then stamped the sentiment onto a one of the banners and added one of the pool party banners behind that one.  I added one of the sleds to the card front along with the sentiment.  I wanted to add just a little more bling to the card.  But how to do it, there are so many choices but I wanted to have a snow effect.  I decided to add some dots of the fine tip glue all over the background and then use my Dazzling Diamond glitter and sprinkle it over the glue.  

Video Tutorial: 

If you are viewing this post by email you may have to click here or on the image below to view the video.  
If you are viewing this post on my wordpress site you will have to click here to view the blog roll.  

Blog Roll: 


Happy Stampin' 
Rick Adkins 

If you live in the US.  I would love you to choose me as your demonstrator.  If you would like to purchase any of these products you can click on the Shop Now Button or by clicking on any of the images below.  Alternatively, you can also contact me by email to place your order.  Please be sure to use the monthly host code and I’ll send a little something out to you the following month to say Thank You!  


December HOST CODE:  CEUXJX6R
  1. Spend any amount with me this month and receive the Creative Stampers Tutorial Bundle.  Plus get a gift from me in January.
Please remember that if you use the host code you cannot use that order towards my KCRP’s (Kinmon Crafty Reward Points) that would be double dipping and is not allowed.  For more information on KCRP’s click here.  


Three main reasons to Join!  
1.     You Get at least a 20% discount on all your orders while you are a demo.   
2.     You get to join my fun Kinsmon Crafters Team and Private Facebook Group.
3.     Access to directions to all my online classes 

Stampin' Up! Shopping List: 

Price: $10.00

Template Designed by creativeworkerbee