Showing posts with label alternative projects. Show all posts

Thursday, October 31, 2019

A Paper Pumpkin Thing Blog Hop: Winter Woods October Kit 2019

Hello and welcome back to my blog today; this is my second post for today, but I am back with you to share my alternative projects for this month's Paper Pumpkin Kit (Winter Woods).  I had so much fun playing with this month's kit.  Here's a look at my Projects.
For my alternative projects this month I created a bag/box with a card and alternative card that's just super simple to do.  So we are going to jump into the card first.  Let's have a closer look at the card shall we.
For my alternative card I used a 4 1/4 x 11 piece of Thick Whisper White Cardstock for my card base.  I simply scored it in half at 5 1/2".   Next, I took the left over part of the tree die cut that came in this month's kit and laid it onto my card base.  I taped it down to my desk and started doing some ink blending.  I started with Balmy Blue ink.  I untaped it and then shifted it over just a little and retaped it back to the desk and did a little more ink blending for a second row of trees with Night of Navy Ink.  I then removed the home made makeshift stencil and took the original die cut piece that came out from the opening and stamped my sentiment at the bottom and added it to the card base to create my third layer of trees.  With the ink blending I also got a second mound of snow in the background.  Bonus!  I finished off the card by adding just a single cardinal die cut to the front.
For my 3d project I created a smaller version of the Bag/box & Card combo that I made last year.  I wanted to create a smaller version of that project and the items in this months Paper Pumpkin Kit was just perfect.  I started out with two pieces of 6 x 6 cardstock and scored each piece on three sides at 1" on my New Stampin' Up! Trimmer.  Once I had all the scoring down I cut up the scorelines for the two smaller squares and notched them in just a little, glued everything up.  Once dried I glued both parts together using a liquid glue (you could use tear & tape but I wanted a little more wiggle room with the glue).
For the card on the front of the box/bag I used a piece of 3 1/2 x 8 Night of Navy cardstock and scored it in half at 4".  I added a piece of whisper white cardstock to the front and inside of the card that measures 3 1/4 x 3 3/4".  I took one of the cards from this month's kit and cut it down to 3 x 3 1/2" for the front of the card.  I added my sentiment to one of the banners from the kit with dimensionals.  I fished it off with one of the cardinals.  I did stamp my sentiment and some of the large snowflakes from this months Paper Pumpkin exclusive stamp set on the piece of whisper white that went on the inside of the card.  Before adding it to the bag/box I took some Poppy Parade texture ribbon wrapped it around the box and tied it into a pretty knot on one side.  I then took the card and added it to the front of the bag/box with a few Stampin' Dimensionals.  The final measurements of the bag/box once complete is 4" w x 5" h x 1" d.

Video Tutorial:


If you are viewing this post by email you will need to click here to view the video tutorial.  

If you are viewing this post on my wordpress site you will have to click here to view the blog roll. 

Blog Roll: 


 Happy Stampin' 
Rick Adkins 


If you live in the US.  I would love you to choose me as your demonstrator.  If you would like to purchase any of these products you can click on the Shop Now Button or by clicking on any of the images below.  Alternatively, you can also contact me by email to place your order.  Please be sure to use the monthly host code and I’ll send a little something out to you the following month to say Thank You!  

November HOST CODE:  QU2TJBJN
1.     Spend any amount with me this month and receive the Creative Stampers Tutorial Bundle.  Plus get a gift from me in December.
Please remember that if you use the host code you cannot use that order towards my KCRP’s (Kinmon Crafty Reward Points) that would be double dipping and is not allowed.  For more information on KCRP’s click here.  


Three main reasons to Join!  
1.     You Get at least a 20% discount on all your orders while you are a demo.   
2.     You get to join my fun Kinsmon Crafters Team and Private Facebook Group.
3.     Access to directions to all my online classes 

Stampin' Up! Shopping List: 

Thursday, August 29, 2019

A Paper Pumpkin Thing Blog Hop: Gift of Fall


Hello and welcome to my blog for my second blog post for today.  This month's kit was a super cute kit that featured Fall themed gift bags and tags.  We also had the option of purchasing a matching add on kit also.  This months Paper Pumpkin Kit was titled Gift of Fall.  I shared earlier this kit and the projects from that kit earlier today you can click here to see that post.  For my alternative projects this month I came up with three super cute projects.  Here's a look at my projects.
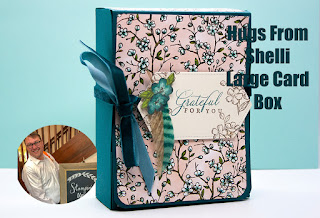
I came up with three cards and a super cute little box using additional products along with products from this month's kit.  The first card I came up with was the Pretty Peacock card here.
I started out with a piece of Pretty Peacock Cardstock (4 1/4 x 11 scored at 5 1/2).  I stamped the leaf image from this month's stamp set all around the card base in Pretty Peacock ink.

Next I added one of the white tags in the center of the card.  I then added the crushed curry circle from this month's kit to the center of the banner with a few stampin' dimensionals.  I then added two of the vellum leaves one of the pretty peacock striped leaf and one of the craft leaf.  I added all the leaves with mini glue dots tucked under the crushed curry circle with the multicolored branches on it.

I then stamped my sentiment on one of the banners in Merry Merlot and added that to the center of the circle using stampin' dimensionals.  I then added a few of the gold self adhesive sequins to the card front.  I added some of the crushed curry seam binding ribbon that I made into a bow and attached with a mini glue dot.

To finish off my card I added a piece of whisper white cardstock that I stamped the branch on the left hand side in pretty peacock ink.  This finished off my first card.
Next I created the little box using some Rich Razzleberry cardstock and the Perfect Parcel dies.  It took one piece of cardstock to create this box.  Once I had everything cut out I used the Golden Glitz Delicata ink and stamped the branch around the side of the box.

Once I had the pieces cut out stamped and the ink dried I added some tear and tape and put the box together.  Once it was together I created my tag for the box.  I used one of the crushed curry circles for the main part of the tag along with one of the labels.  I stamped my sentiment on the tag and added it to the circle using stampin' dimensionals.  I then added some of the Crushed Curry Seam binding to around the box and tied it in a pretty bow.  I added the tag to the top of the box with dimensionals attached to the ribbon that way I could slide the tag and ribbon off without having to untie it.

I finished this project off by adding a few of the gold self adhesive sequins to the tag and around the circle.

For the third project today I created another card that matched my little box.  I used a piece of Merry Merlot cardstock (5 1/2 x 8 1/2 scored at 4 1/4).
I stamped the branch in the Golden Glitz Delicata Ink going up the left hand side of the card base and then I added the multicolored banner to the card base one of the Merry Merlot circles and a little of the twine.  Next I stamped the sentiment in the same Delicata ink on one of the die cuts and added this to the circle with Stampin' Dimensionals.  I then added one of the vellum leafs.  These leafs are so pretty they have a watercolor look to them but I didn't have to do any of the work to create them.  I then added some of the Blackberry bliss leaves and the crumb cake leaves.  
I finished off the card by adding a piece of whisper white to the inside and a few of the sequins to the card front.  
I hope that you have enjoyed my little projects for this month's Paper Pumpkin Thing Blog Hop.  If you are viewing this post on my Wordpress site you will need to click here to view the Blog Roll.  Thanks for dropping by.  
Happy Stampin' 
Rick 

Blog Roll: 


Thursday, May 30, 2019

A Paper Pumpkin Thing Blog Hop: Hugs From Shelli Kit

Hello and welcome to my blog; today I am going to share a few alternative projects using the May 2019 Paper Pumpkin kit Hugs from Shelli.  I am super excited to play with this kit which was designed with Shelli Gardner Stampin' Up!'s Co-Fonder.  This was a super fun kit to play with and I may have been a little over zealous with my alternatives this month.  So let's jump into them right now.
 So for my projects this month I created not one card but five different designs and did two of each design plus created a large gift box that would hold all ten card, envelopes and with a little room for more.  This was super fun today. I kept my cards on the simple side.  I used five pieces of cardstock to create each card plus the note cards that came in this month's kit.  I did throw in a couple scraps of whisper white cardstock to finish off my sentiments.  Here's a look at my cards.


,For two of the card designs I had to cut the note cards in half to have enough to make all 10 cards.  So once I had these all made I needed someplace to put them so I created a large gift box that will hold all 10 cards plus envelopes for each.  This makes for a super quick and easy gift.  Here's my gift box.
I used a couple pieces of cardstock to make the box and a little designer series paper.  The designer Series paper you see comes from the Bird Ballard Designer Series Paper Stack (new in the 2019-2020 Annual Catalog).  From this month's kit I used some of the die cut elements and the Pretty Peacock Velvet ribbon.  This box is super easy to make as you will see in my video tutorial.
If you are viewing this post via email you will need to click the image below to see the video.
Thanks for dropping bye today; I hope that you have enjoyed my alternative projects this month and that you will take the time to hop all the way along the blog hop. We have some special guests with us this month so I know you will want to check them out.  If you are viewing this post on my wordpress site you will need to click here to view the blog roll.  

Happy Stampin' 
Rick Adkins 

Blog Roll: 


Supply List:


Product List

Template Designed by creativeworkerbee