Showing posts with label CASE the Catalog. Show all posts

Friday, January 21, 2022

It's Birthday Time - Awesome Otters

Hello and welcome to my blog; today I am going to share a fun card idea that I got from the 2022 Sale-A-Bration Brochure.  I CASEd the card because I loved it so much and thought it was super fun.  Here's a look at the card.  

It's Birthday Time no matter when you birth month is when you use the Awesome Otters Stamp Set to CASE the catalog and Sale-A-Bration Brochure.

Thursday, August 12, 2021

Penguin Place - Catalog CASE

Hello and welcome back to my Blog today; I have a super cute little project to share with you that I CASED from the 2021 Sale-A-Bration Brochure.  I wanted to share with you a few tips and tricks on recreating this project and give you a little insight on where I find inspiration.  Here's a look at this adorable card using the Penguin Place Bundle.  

Check out this cute Catalog Case featuring the Penguin Place Bundle from Stampin' Up!

This super cute sample can be found in the current August-September Sale-A-Bration Brochure on page 5.  

Tuesday, June 29, 2021

Feel Better Friend Card - Hand Penned Petals

 Hello and welcome to my blog; today I am going to share a card that I made using the Hand Penned Petals Bundle from Stampin' Up! in the 2021-2022 Stampin' Up! Annual Catalog.  I actually CASEd this card based on a fun little gift box from the catalog.  

Check out my card that I cased from the Catalog using inspiration from a box created using the Hand Penned Petals Suite from Stampin' Up! Click here

Sunday, March 29, 2020

CASE the Catalog - Parisian Beauty

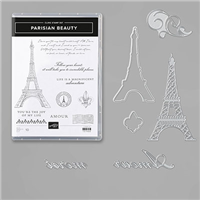
Hello and welcome to my blog; today I am going to share with you another CASE the Catalog Card.  This week I am going to share with you a card that was made with products form the Parisian Blossoms Suite from the January-June Mini Catalog.  I received this card as part of a CASE the catalog swap that I took part in with some friends from Arkansas.  I am not sure which one made this card because there was no name on the back of the card.  Whomever made it did a fabulous job CASEing the catalog.  If you are not sure what I am talking about when I say CASEing it means to Copy And Share Everything or to Copy And Selectively Edit depending on who you are speaking.  But, no matter what CASEing is a great way to learn new skills and techniques.  Which is what I hope this series every Sunday has been helping you accomplish.  You can find ideas to CASE everywhere:  Right here on my blog, from the Stampin' Catalogs (which is a great source) and Pinterest.  Here's a look at today's card.

 Tips & Tricks: 

  • This card was CASEd from a card that was designed by one of the Designers at Stampin' Up! and can be found on page 17 of the January-June Mini Catalog.  The elegant motifs in the Parisian Beauty Stamp Set evoke images of Paris in the spring. You can use these stamps for travel projects, collages, greeting cards, and more.  The Parisian Beauty Stamp Set features ten Cling stamps that will give you the the perfect impression.  Today's card started out with a Petal Pink Card base cut at 5 1/2 x 8 1/2 scored at 4 1/4.  
  • And, then you will take and cut another piece of Petal Pink Cardstock and cut it down to 3 3/4 x 5 and use the Parisian Flourish 3D Embossing Folder to dry emboss this piece of cardstock.  The Parisian Flourish 3D Embossing Folder allows you to create projects with a fun and elegant flourish pattern. Use it to add a little texture to your projects. It’s great for card backgrounds and other elements for paper projects.  This piece was then attached to the card base with a strong adhesive.  I would suggest using Multipurpose Liquid Glue for this; since once dry it provides the strong bond your embossed images will need and it will go into all the debossed areas as well as the embossed ones to provide a more complete coverage.  

  • Next you are going to add three strips of the Parisian Blossoms Speciality Designer Series Paper to the card front using liquid glue.  You are going to slightly turn these pieces a little to make them not straight on the card.   
  • Stamp the eiffel tower image onto a piece of whisper white cardstock in Early Espresso Classic Ink and cut it out using the matching die from the Parisian Label Dies.  Imagine you’re in Paris as you create your own die-cut Eiffel Tower and the words “Merci” and “Amour” for handmade cards, scrapbooks, and other fun paper crafts using the Parisian Dies. Pair the dies with the coordinating Parisian Beauty Stamp Set to quickly cut out stamped images from the set.  The Parisian Label Dies features six dies some matches the outline of the images and others are there to help you build your perfect Parisian Card.  
  • Pop the tower up on your card front using both regular Stampin' Dimensionals and the Mini Dimensionals.  


  • Now for the finishing touches!  You will need a scrap of Early Espresso Cardstock.  And you are going to stamp the sentiment in Versamark ink and cover that with White Stampin' Emboss Powder.  Heat Set it until it's smooth and melted.  Make sure to treat the cardstock first with your Embossing Buddy to prevent any unnecessary embossing powder sticking to places you don't want it.  
  • Once set you are going to attach it the tower with dimensionals.  
  • Tie a little bow with the Petal Pink Metallic Edged Ribbon and attach under the sentiment and next to the tower with a Mini Glue Dot.  


Just a reminder that there is only 3 days left of Sale-a-bration!  Have you gotten all the free items you wanted from this years selection? 


Happy Stampin' 
Rick Adkins 

If you live in the US.  I would love you to choose me as your demonstrator.  If you would like to purchase any of these products you can click on the Shop Now or by clicking on any of the images below.  Alternatively, you can also contact me by email to place your order.  Please be sure to use the monthly host code and I’ll send a little something out to you the following month to say Thank You!


Use the March Host Code on any order of $50 (before taxes & shipping) or more during the month and receive a gift from me in April as a Thank You.  If your order is $150 or more, please don't use the host code.  You will forfeit your Stampin' Rewards if you do; and I want you to get those rewards.


If you place any size order with me during the month of March, you will receive the March Creative Stampers Tutorial Bundle from me as a little thank you.  This month's tutorial bundle features fourteen floral themed tutorials.  The Creative Stampers Tutorial Bundle can either be earned for FREE with any size order or Can be purchased for $20 from me.

Stampin' Up! Shopping List: 


Sunday, March 22, 2020

Forever Blossoms CASE the Catalog

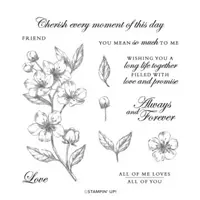
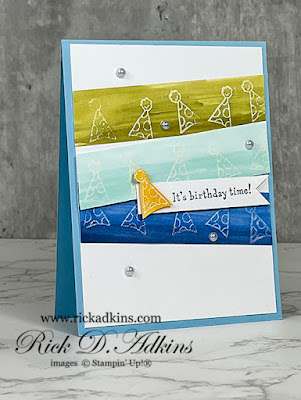
Hello and welcome to my blog; today I am going to share with you another CASE the Catalog Card.  Today we are going to use the Forever Blossoms Stamp Set and do a little watercoloring.  The greetings in the Forever Blossoms Stamp Set are designed for weddings, anniversaries, friendships, and more. Its detailed floral images can be used to make greeting cards for any occasion. This stamp set is also available in French. This is a Distinktive** stamp set; it has a special texture that gives added depth and dimension in a single step, creating photo-realistic images. **Patent pending

Here's a look at today's card.  

Tips & Tricks: 

Casing means to Copy And Share Everything or to Copy And Selectively Edit.  Casing is a great way to learn something new or something you want to try, and the Stampin' Up! catalogs are not only a shopping list but a inspirational idea book; where you can find new techniques and card ideas to try.  I received today's card as part of a CASE the Catalog Swap I took part in.  So let's get into the card shall we.  The floral image from the Forever Blossoms Stamp Set was stamped in Stazon Ink on Shimmery White Cardstock.  This is a perfect base because you can do a little watercoloring on.  The Shimmery White Cardstock is smooth enough that you can get a very nice stamped impression but also strong enough to let you add a lot of water when watercoloring.  Which actually was not the case with this card, the amount of water I mean.  


The stamped images were then watercolored with a little ink.  I usually use a few drops of a ink refill to watercolor with in a little white watercolor tray; which can be picked up at any box store in the craft section.  The Aqua painter is a perfect choice for adding the color.  Remember the more water you add the lighter the color.  It's better when watercoloring to add multiple lighter layers and build up the colors after each layer dry.  The colors used were Petal Pink and Old Olive.  Once dry this layer was added to a Pool Party Card Base cut at 5 1/2 x 8 1/2 (scored at 4 1/4).  The sentiment was then stamped on Whisper White Cardstock and then cut out using the Stitched Nested Label Dies.  There was also a couple of the stitched labels in the next size down from the Parisian Blossoms Speciality Designer Series Paper.  


The stitched labels where then attached together.  You can take the one DSP label and cut in half to place behind the sentiment.  Then you can add some of the Poppy Parade Twine from the Country Club Twine Combo Pack in a couple loops and then the sentiment put on top with a few Stampin' Dimensionals.  That finishes the card.  I hope that you will give watercoloring with ink refills a try if you haven't before.  Thank you for dropping by today.  If you need any of the supplies that you have seen used today you can pick them up in my online store.  
Rick Adkins


Use the March Host Code on any order of $50 (before taxes & shipping) or more during the month and receive a gift from me in April as a Thank You.  If your order is $150 or more, please don't use the host code.  You will forfeit your Stampin' Rewards if you do; and I want you to get those rewards.


If you place any size order with me during the month of March, you will receive the March Creative Stampers Tutorial Bundle from me as a little thank you.  This month's tutorial bundle features fourteen floral themed tutorials.  The Creative Stampers Tutorial Bundle can either be earned for FREE with any size order or Can be purchased for $20 from me.

Stampin' Up! Shopping List: 


Template Designed by creativeworkerbee