Hello and welcome back to my blog today; this is my second post for today, but I am back with you to share my alternative projects for this month's Paper Pumpkin Kit (Winter Woods). I had so much fun playing with this month's kit. Here's a look at my Projects.
For my alternative projects this month I created a bag/box with a card and alternative card that's just super simple to do. So we are going to jump into the card first. Let's have a closer look at the card shall we.
For my alternative card I used a 4 1/4 x 11 piece of Thick Whisper White Cardstock for my card base. I simply scored it in half at 5 1/2". Next, I took the left over part of the tree die cut that came in this month's kit and laid it onto my card base. I taped it down to my desk and started doing some ink blending. I started with Balmy Blue ink. I untaped it and then shifted it over just a little and retaped it back to the desk and did a little more ink blending for a second row of trees with Night of Navy Ink. I then removed the home made makeshift stencil and took the original die cut piece that came out from the opening and stamped my sentiment at the bottom and added it to the card base to create my third layer of trees. With the ink blending I also got a second mound of snow in the background. Bonus! I finished off the card by adding just a single cardinal die cut to the front.
For my 3d project I created a smaller version of the Bag/box & Card combo that I made last year. I wanted to create a smaller version of that project and the items in this months Paper Pumpkin Kit was just perfect. I started out with two pieces of 6 x 6 cardstock and scored each piece on three sides at 1" on my New Stampin' Up! Trimmer. Once I had all the scoring down I cut up the scorelines for the two smaller squares and notched them in just a little, glued everything up. Once dried I glued both parts together using a liquid glue (you could use tear & tape but I wanted a little more wiggle room with the glue).
For the card on the front of the box/bag I used a piece of 3 1/2 x 8 Night of Navy cardstock and scored it in half at 4". I added a piece of whisper white cardstock to the front and inside of the card that measures 3 1/4 x 3 3/4". I took one of the cards from this month's kit and cut it down to 3 x 3 1/2" for the front of the card. I added my sentiment to one of the banners from the kit with dimensionals. I fished it off with one of the cardinals. I did stamp my sentiment and some of the large snowflakes from this months Paper Pumpkin exclusive stamp set on the piece of whisper white that went on the inside of the card. Before adding it to the bag/box I took some Poppy Parade texture ribbon wrapped it around the box and tied it into a pretty knot on one side. I then took the card and added it to the front of the bag/box with a few Stampin' Dimensionals. The final measurements of the bag/box once complete is 4" w x 5" h x 1" d.
Video Tutorial:
If you are viewing this post by email you will need to click here to view the video tutorial.
If you are viewing this post on my wordpress site you will have to click here to view the blog roll.
Blog Roll:
Happy Stampin'
Rick Adkins
If you live in the
US. I would love you to choose me as your demonstrator. If you
would like to purchase any of these products you can click on the Shop Now
Button or by clicking on any of the images below. Alternatively, you can
also contact me by email to place your order. Please be sure to use the
monthly host code and I’ll send a little something out to you the following
month to say Thank You!
November HOST CODE: QU2TJBJN
1.Spend any
amount with me this month and receive the Creative Stampers Tutorial
Bundle. Plus get a gift from me in December.
Please remember that if you use the host code you cannot use that
order towards my KCRP’s (Kinmon Crafty Reward Points) that would be double
dipping and is not allowed. For more information on KCRP’s click here.
Three
main reasons to Join!
1.You Get at least a 20% discount
on all your orders while you are a demo.
2.You get to join my fun Kinsmon
Crafters Team and Private Facebook Group.
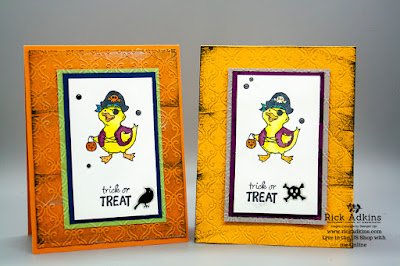
Hello and welcome to my blog; today is Halloween and I am going to share with you a quick walk through of all the cards I've made using this year's Halloween Products from the 2019 Stampin' Up! Holiday Catalog. Halloween is one of my favorite holidays; I love the colors and dressing up and not to mention the chocolate. But as an adult one of my favorite things is handing out treats to kids and seeing all the fun they have in their wonderful little costumes. We don't have a lot of Trick or treaters each year, but the ones that do come by are always so cute. As I am typing this I am sitting here drinking my second cup of coffee out of my Snoopy Halloween mug, so yes, I do enjoy the holiday, I know some of you may not but that's okay too. Let's get started with the card parade shall we. Oh, by the way I have tired to link the cards that have coordinating blog posts with them, so you can click on the picture and read more about that card, some do not have blog posts.
No Coordinating Blog Posts:
These cards have not coordinating Blog Posts associated with them.
That concludes all the Halloween cards and projects that I have created using this years Halloween products from the 2019 Stampin' Up! Holiday Catalog. I hope that you have enjoyed my little walk through of this years Halloween projects. I also hope that you have a fun and safe Halloween today.
Hello and welcome back to my blog today; Papercrafting begins with a beautiful first cut, which means having the right tool for the job is kind of a big deal. Well, do I have the tool for you! Get your hands on the new Paper Trimmer. I wanted to take a little time and talk to you about the new Stampin' Up! Trimmer that will be available starting November 1, 2019. Yes, it will be available in time to wrap and put under the Christmas Tree. I have been playing with this new trimmer all month long (one of the perks of being a demonstrator); and I am loving it. I have used the blade that came with it all month long and haven't had to change it one time. And, believe me I cut a lot of cardstock, glimmer paper, and window sheets with it over the last month. I've tried my best to give it a good work out before I would even share any real information with you. I know if you have followed me you have seen it used in my Facebook Lives, and other videos. But, like I said I haven't really talked about it because I wanted to give it a good once over before I did. Here's a look at the trimmer a little closer up.
image by Stampin' Up!
Product Details:
Our new Paper Trimmer is lightweight, portable, and perfect for making stable and straight cuts!
Paper Trimmer
Item: 152392 | $25.00 usd
15-3/8 x 8 x 1/2” (39 x 20.3 x 1.3 cm)
Includes 1 cutting blade and 1 scoring blade.
Includes imperial and metric measurements.
Ruler and grid protected by durable plastic cover.
Point on cutting handle for precise measuring.
Right-side grid for cutting thin strips.
image by Stampin' Up!
Click here to see the cute promotional video. It's quite entertaining.
image by Stampin' Up!
I hope that you have found my little post about the New Stampin' Up! Trimmer helpful. I have been extremely pleased with it since I've gotten mine. And even more pleased that I have not had to change the blade once this entire month and it's still cutting just as it did on day one. If you have a one of the old trimmers and some blades use those up until you need a new trimmer and I am happy to help you get one of the new ones at that time. But If you are in the market for a new trimmer or want to have one under the Christmas tree let me know and I am happy to help you get one on November 1st. The trimmer will be available November 1st, but Stampin' Up! is holding off on releasing the blade replacements until later on. No there's not anything wrong with them, they just sold better than they expected during the demonstrator preorder. So, Stampin' Up! wants to hold off until they have a large enough supply built up to accommodate the orders that may come in later on. But as I mentioned above I've been on the same blade all month and it's still going strong.
Thanks for dropping by I will see you again in the morning for a fun Halloween post.
Happy Stampin'
Rick Adkins
If you live in the
US. I would love you to choose me as your demonstrator. If you
would like to purchase any of these products you can click on the Shop Now
Button or by clicking on any of the images below. Alternatively, you can
also contact me by email to place your order. Please be sure to use the
monthly host code and I’ll send a little something out to you the following
month to say Thank You!
November HOST CODE: QU2TJBJN
1.Spend any
amount with me this month and receive the Creative Stampers Tutorial
Bundle. Plus get a gift from me in December.
Please remember that if you use the host code you cannot use that
order towards my KCRP’s (Kinmon Crafty Reward Points) that would be double
dipping and is not allowed. For more information on KCRP’s click here.
Three
main reasons to Join!
1.You Get at least a 20% discount
on all your orders while you are a demo.
2.You get to join my fun Kinsmon
Crafters Team and Private Facebook Group.