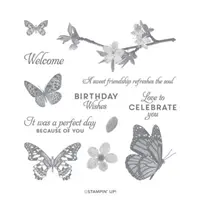
Hello and welcome to my blog; today I am going to share with you my card for this weeks Paper Craft Crew Themed Challenge. This week we have a very summery theme for you to play along. I will share the inspiration photo shortly. I picked the Butterfly Wishes Stamp Set to create my card for today. This Cling stamp set features photorealistic Butterflies that could take flight any moment.
Here's a look at my card.
Here's a look at the inspiration photo that inspired my card today. You can click on the image below and be flutter away to the Paper Craft Crew site and see what the other design team members have created.
Tips & Tricks:
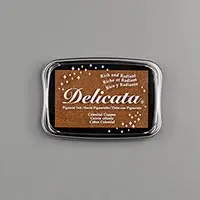
Since the inspiration image featured butterflies and blooms it was pretty easy to figure what stamp set to use. I picked the Butterfly Wishes stamp set which features deep etched images so you can get superior stamped images each time. Once the stamp set was picked it was just a matter of figuring out the colors. I picked Soft Sea Foam for my main color. And, then Cajun Craze, Merry Merlot, and Granny Apple Green for supporting colors. I also threw in a little delicata copper ink to the card front and to the sentiment.
Once I stamped the sentiment on Soft Sea Foam Cardstock I added copper embossing powder and heat seat it. I used my Rectangle Stitched Dies to cut out some of the cardstock. Once I put everything together with just a little adhesive.
Thanks for dropping by today, I hope that you will take time and play along, with us this week.
Hello and welcome to my blog; today I am going to share with you a little sneak peek at some of the products in the 2019 Holiday Catalog. I am using one of my favorite stamp sets from the Holiday/Fall Winter Catalog in today's project. If you read the title you know that it's Birds of A Feather. This is a great all around stamp set, it has images and sentiments for four different holidays. With this one stamp set you can cover Halloween, Thanksgiving, Christmas and Valentine's Day; which is a super thing. This is just one of the stamps sets in the Holiday Catalog that does this very same thing. I also used one of the new embossing folders as well as the new Delicata Metallic Inks on my card today. Here's a look at my card.
I am sharing a look at both cards that I created. The one on the left is the one that I created for the video tutorial; the one on the right was my original design. After creating the original card I decided that the card needed one additional layer instead of the embossing and distressing the front of the card base. I also changed up the colors slightly to show you two different variations.
Original Concept:
As I mentioned above this was my original design for today's card but I decided it needed an additional layer. One because here in the South it was so humid yesterday that after all the embossing and distressing with the ink the card base started to buckle and sway. So the additional layer added more stability to the card. Here's a closer look at the original card.
You can see in this picture after all I put the card base through it started to bend in places. This was after creating the card and then taking it outside to sit it up and look at. I always do this when I am designing and creating a new project. I will take it and go to my front porch sit it up and sit in the swing a little bit away from the design. And, then I study it. I see what works, what's not working, and this also allows me to get a fresh perspective on the project. Because once I sit the card down I turn around and walk to the swing; when I turn back around and sit down my eyes have changed focus and my mind has had a little break from the project. I learned this in college in many of my studio classes; so it's carried over in my card making as well. And, let me just tell you it's paid off. Because with that little break you can see things totally different. I can find design issues much quicker by doing this. So as I was sitting there studying the card I noticed the humidity was starting to effect the distressed card base. So my solution was to add an additional layer that would contain all the distress work.
Complete Version:
You can see in the image above that the extra layer fixed the problem with just distressing the card base. There's no strange bends or anything else. So once that was solved the card went together super quick. I did distress the layer above by first streaking tuxedo black ink across the cardstock and then I added layers of each of the three new Delicata inks in the same way. I also added some to the embossing folder before running it through my die cutting/embossing machine. This direct to paper technique did two things it added more detail when embossing plus added just a little extra of the metallic ink to the card. You can see how I did that in the video.
Once all the distress work was done it was time to color the cute little duckie all dressed up in his Pirate outfit. I used my Stampin' blends to do that, you can find a full list of the colors I used in the shopping list below. Once I had him all colored It was time to layer everything up. Since I did a lot of distress work I added everything with the Multipurpose Liquid Glue. Embossed images need a nice strong glue any way and I prefer the liquid glue over others because it gets down in the debossed areas as well and covers more surface. I added a few of the Monster Bash Enamel Shapes to finish off the card.
Video Tutorial:
If you are viewing this post by email you may not be able to see the embedded video. You will need to click here to see the video.
Thanks for dropping by I hope that you have enjoyed this little sneak peek of Birds of A Feather Stamp Set and my super cute little pirate duck card today. Remember that all the Holiday Catalog products are available starting September 4, 2019 for customers. But Demonstrators can order now. If you would like to get your hands on these products early there's still time to take advantage of the Extra Extra Joining Promotion; and pick out a $155 of new products from either the holiday or annual catalogs for only $99. I would love to have you as part of my Kinsmon Crafters family.
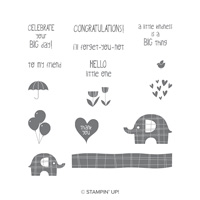
Hello and welcome to my blog; today I am going to share with you my card for this month's Stamper's Showcase Blog Hop. This month the theme was Babies and Kids so everyone came up with projects that represent that theme. For my project I created a super cute card using one of my favorite Babies & Kids stamp set from the Annual Catalog. I loved this stamp set since it came out like I said it's one of my favorite sets and in reality it can be used for more than just babies and kids. I am talking about the Little Elephant Stamp Set. Here's a look at my card before we talk a little more about this stamp set.
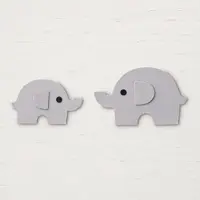
With the Little Elephant Stamp Set you have little Elephants, tulips, balloons, and more fun sentiments and other little images to complete fun cards for any age. I started out my card today with a piece of whisper white and I used my Stampin' Write Markers in Poppy Parade, So Saffron, and Shaded Spruce to stamp the tulips around the bottom 1/3. I then added a 1" x 5 1/4 piece of designer series paper from the Subtles Paper Pack. I then stamped the two elephants in Gray Granite and used the Elephant Builder Punch to punch them both out. I popped them up on the what will be the card front using a couple dimensionals. But before I added the small elephant I stamped the balloons from the stamp set using the Stampin' Write markers that I used before but added a Mint Macaron one also.
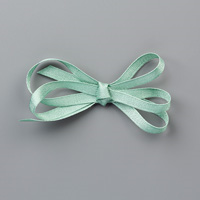
I then added the card front to a piece of Shaded Spruce Cardstock just slightly larger than the card base. I then added a little Mint Macaron Textured Ribbon to the card and then popped it up on my So Saffron Card base. I added a simple knot to the ribbon for more added interest. I stamped my Hello Little One sentiment on a scrap of Whisper White and punched it out with a 1" circle punch. I then used the 1 1/8" scalloped circle punch to punch out a piece of so saffron cardstock. I then layered the two together with dimensionals and then popped it up on the card front with one more.
I added a piece of whisper white to the inside along with a 1/2" x 4 piece of matching designer series paper to tie everything together. Next it was time to decorate the envelope to match the card. I started out by using a matching piece of Mint Macaron Designer Series Paper. I placed this on the envelope flap and cut it out. I just added adhesive all around the flap and then added the paper, and again just cut around it. Next I stamped a row of the elephants along the bottom of the envelope.
Thanks for dropping by today, I hope that you have a wonderful day hopping along. You can click on the next bottom to go to the next blog. You will find a full list of supplies below the next button.