Showing posts with label Birds of a Feather Stamp Set. Show all posts

Wednesday, November 13, 2019

Enjoy the Season - Stampin' Up! Birds of A Feather Stamp Set

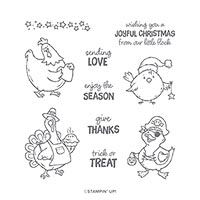
Hello and welcome to my blog; today I am going to share with you a super cute Holiday card using one of my favorite stamp sets, and the cutest chubby little bird you will ever see.  If you follow me at all you know that I am in love with the Birds of a Feather Stamp Set and it's one of my favorite sets from the Holiday Catalog so I couldn't help but use it on my card today.  Here's a look at my card.

Tips & Tricks: 

I started my card by using a half sheet of Cherry Cobbler cardstock cut at 4 1/4 x 11 scored at 5 1/2.  I stamped the stars from the set in matching Cherry Cobbler ink in a diagonal pattern on the card base.  Once I had the background stamped I moved onto the focal image.  To start I used a piece of Whisper White cardstock and stamped the little cute chubby bird in the Santa hat in tuxedo black ink in the middle.  
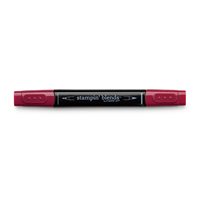
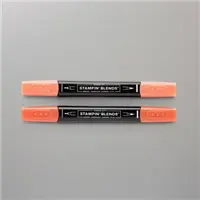
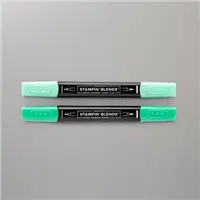
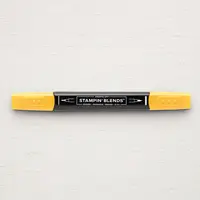
I then stamped the stars across the top of the Whisper White cardstock also in tuxedo black ink.  I then colored the stars and my little bird in the following colors; Cherry Cobbler (Santa Hat), Pool Party light & dark (bird), and Daffodil Delight light & dark (for the stars and beak).  I then stamped the greeting in Cherry Cobbler ink.  
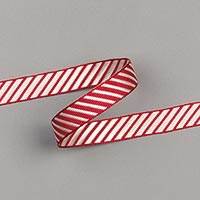
I added my colored image to a piece of Pool Party Cardstock and then to a piece of Gray Granite Cardstock.  I then attached some of the Cherry Cobbler diagonal striped ribbon and added a knot.  I popped up this piece on to the card base to finish off the card.  
Thanks for dropping by today I hope that you like my little card and you will give it a try for a quick little Christmas Card.  
Happy Stampin' 
Rick Adkins 

If you live in the US.  I would love you to choose me as your demonstrator.  If you would like to purchase any of these products you can click on the Shop Now Button or by clicking on any of the images below.  Alternatively, you can also contact me by email to place your order.  Please be sure to use the monthly host code and I’ll send a little something out to you the following month to say Thank You!  


November HOST CODE:  QU2TJBJN
  1. Spend any amount with me this month and receive the Creative Stampers Tutorial Bundle.  Plus get a gift from me in December.
Please remember that if you use the host code you cannot use that order towards my KCRP’s (Kinmon Crafty Reward Points) that would be double dipping and is not allowed.  For more information on KCRP’s click here.  


Three main reasons to Join!  
1.     You Get at least a 20% discount on all your orders while you are a demo.   
2.     You get to join my fun Kinsmon Crafters Team and Private Facebook Group.
3.     Access to directions to all my online classes 

Stampin' Up! Shopping List: 


Monday, November 4, 2019

Give Thanks - Birds Of A Feather Stampin' Up!

Hello and welcome to my blog; today I am going to share with you a fun Thanksgiving card.  Not necessarily a Thanksgiving Day card but a Thanksgiving card.  I used one of my favorite stamp sets from the Holiday Catalog for this card which you may have guessed is Birds of A Feather.  Here's a look at my card.  

Tips & Tricks: 

I started out my stamping the sentiment all over the Soft Suede card base in matching ink.  I then stamped the turkey from the stamp set on a piece of whisper white cardstock and colored it with a few stampin' blends.  Then I layered it up on a piece of Crushed Curry and Shaded Spruce.  I popped that up on a few dimensionals.  

I used the Gather Leaves Dies and cut out leaves in Crushed Curry, Cajun Craze, Merry Merlot, Soft Suede, Early Espresso and Mint Macaron.  I added these around the card.  Some I popped up some I didn't and some I only popped up certain parts of the leaves.  I hope that you have enjoyed my little look at my card today, and I am grateful that you have stopped by today.
Happy Stampin' 
Rick Adkins 

If you live in the US.  I would love you to choose me as your demonstrator.  If you would like to purchase any of these products you can click on the Shop Now Button or by clicking on any of the images below.  Alternatively, you can also contact me by email to place your order.  Please be sure to use the monthly host code and I’ll send a little something out to you the following month to say Thank You!  

November HOST CODE:  QU2TJBJN
1.     Spend any amount with me this month and receive the Creative Stampers Tutorial Bundle.  Plus get a gift from me in December.
Please remember that if you use the host code you cannot use that order towards my KCRP’s (Kinmon Crafty Reward Points) that would be double dipping and is not allowed.  For more information on KCRP’s click here.  

Three main reasons to Join!  
1.     You Get at least a 20% discount on all your orders while you are a demo.   
2.     You get to join my fun Kinsmon Crafters Team and Private Facebook Group.
3.     Access to directions to all my online classes 

Tuesday, August 27, 2019

Holiday Catalog Sneak Peak: Birds of a Feather - Pirate Duckie Trick or Treat Card

Hello and welcome to my blog; today I am going to share with you a little sneak peek at some of the products in the 2019 Holiday Catalog.  I am using one of my favorite stamp sets from the Holiday/Fall Winter Catalog in today's project.  If you read the title you know that it's Birds of A Feather.  This is a great all around stamp set, it has images and sentiments for four different holidays.  With this one stamp set you can cover Halloween, Thanksgiving, Christmas and Valentine's Day; which is a super thing.  This is just one of the stamps sets in the Holiday Catalog that does this very same thing.  I also used one of the new embossing folders as well as the new Delicata Metallic Inks on my card today.  Here's a look at my card.

I am sharing a look at both cards that I created.  The one on the left is the one that I created for the video tutorial; the one on the right was my original design.  After creating the original card I decided that the card needed one additional layer instead of the embossing and distressing the front of the card base.  I also changed up the colors slightly to show you two different variations.

Original Concept:  

As I mentioned above this was my original design for today's card but I decided it needed an additional layer.  One because here in the South it was so humid yesterday that after all the embossing and distressing with the ink the card base started to buckle and sway.  So the additional layer added more stability to the card.  Here's a closer look at the original card.  
You can see in this picture after all I put the card base through it started to bend in places.  This was after creating the card and then taking it outside to sit it up and look at.  I always do this when I am designing and creating a new project.  I will take it and go to my front porch sit it up and sit in the swing a little bit away from the design.  And, then I study it.  I see what works, what's not working, and this also allows me to get a fresh perspective on the project.  Because once I sit the card down I turn around and walk to the swing; when I turn back around and sit down my eyes have changed focus and my mind has had a little break from the project.  I learned this in college in many of my studio classes; so it's carried over in my card making as well.  And, let me just tell you it's paid off.  Because with that little break you can see things totally different.  I can find design issues much quicker by doing this.  So as I was sitting there studying the card I noticed the humidity was starting to effect the distressed card base.  So my solution was to add an additional layer that would contain all the distress work.  

Complete Version: 

 You can see in the image above that the extra layer fixed the problem with just distressing the card base.  There's no strange bends or anything else. So once that was solved the card went together super quick.  I did distress the layer above by first streaking tuxedo black ink across the cardstock and then I added layers of each of the three new Delicata inks in the same way.   I also added some to the embossing folder before running it through my die cutting/embossing machine.  This direct to paper technique did two things it added more detail when embossing plus added just a little extra of the metallic ink to the card.  You can see how I did that in the video.
Once all the distress work was done it was time to color the cute little duckie all dressed up in his Pirate outfit.  I used my Stampin' blends to do that, you can find a full list of the colors I used in the shopping list below.  Once I had him all colored It was time to layer everything up.  Since I did a lot of distress work I added everything with the Multipurpose Liquid Glue.  Embossed images need a nice strong glue any way and I prefer the liquid glue over others because it gets down in the debossed areas as well and covers more surface.   I added a few of the Monster Bash Enamel Shapes to finish off the card.

Video Tutorial: 

If you are viewing this post by email you may not be able to see the embedded video.  You will need to click here to see the video.  

Thanks for dropping by I hope that you have enjoyed this little sneak peek of Birds of A Feather Stamp Set and my super cute little pirate duck card today.  Remember that all the Holiday Catalog products are available starting September 4, 2019 for customers.  But Demonstrators can order now.  If you would like to get your hands on these products early there's still time to take advantage of the  Extra Extra Joining Promotion; and pick out a $155 of new products from either the holiday or annual catalogs for only $99.  I would love to have you as part of my Kinsmon Crafters family.  
Happy Stampin' 
Rick 

Stampin' Up! Shopping List

Template Designed by creativeworkerbee