Hello and welcome to my blog; today I am going to share with you this weeks color inspiration. Every other week I have been sharing color inspiration with you, and where to find your color inspiration. This week I pulled color inspiration from the Wrapped in Plaid Designer Series Paper. Looking at the colors in any pack of designer series paper makes finding colors that work together super easy. Here's a look at my card for today.
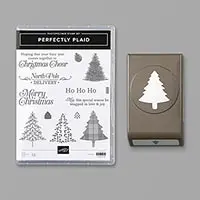
I started designing my card by pulling out the colors I wanted to use. I went with Cherry Cobbler, Shaded Spruce and Gold, all of which came from the designer series paper. Once I picked the pattern I wanted to use I cut my cardstock. For my cardbase I picked a piece of Cherry Cobbler cut at 5 1/2 x 8 1/2. I added my designer series paper to the front of the card. I then stamped three of the pine trees and used the matching punch to punch them out.
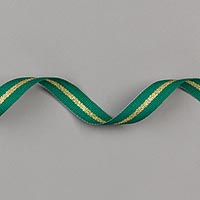
I added some of the Shaded Spruce/gold stripped ribbon to the front of the card. I stamped the sentiment to a piece of whisper white and cut it out using the stitched rectangle dies. To finish off the card I added a bow made out of the same ribbon.
Thanks for dropping by today, I hope that you are finding this bi-weekly series helpful. If you need any of the supplies I used to create my card today you can picked them up in the online store.
Happy Stampin'
Rick Adkins
If you live in the
US. I would love you to choose me as your demonstrator. If you
would like to purchase any of these products you can click on the Shop Now
Button or by clicking on any of the images below. Alternatively, you can
also contact me by email to place your order. Please be sure to use the
monthly host code and I’ll send a little something out to you the following
month to say Thank You!
November HOST CODE: QU2TJBJN
1.Spend any
amount with me this month and receive the Creative Stampers Tutorial
Bundle. Plus get a gift from me in December.
Please remember that if you use the host code you cannot use that
order towards my KCRP’s (Kinmon Crafty Reward Points) that would be double
dipping and is not allowed. For more information on KCRP’s click here.
Three
main reasons to Join!
1.You Get at least a 20% discount
on all your orders while you are a demo.
2.You get to join my fun Kinsmon
Crafters Team and Private Facebook Group.
Hello and welcome to my blog! This week the Paper Craft Crew's weekly challenge is a Tic Tac Toe Challenge. From the challenge image I had to go with sponging and fall as two of the main elements for my card today. I have a love of all the colors in Fall and actually my inspiration for my projects came from my very own front door. I pulled inspiration from the Fall wreath that we have hanging. Here's a look at my card.
Here's the inspiration image for this weeks challenge. You can play along just like the game of tic tac toe we played as kids. I went with the bottom row straight across.
Tips & Tricks:
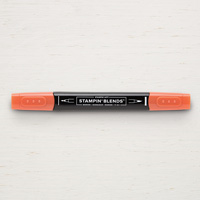
I started off my card with a piece of Thick Very Vanilla Cardstock cut at (You guessed it 4 1/4 x 11 scored at 5 1/2). I used post it tape and my grid paper to mask off lines in different colors in one direction so that I could use my sponge daubers and create the ink blended plaid background. Once I had all the lines in different sizes going in one direction I came back and did it again going to opposite way to create the plaid. I used Pumpkin Pie, Cajun Craze, Old Olive, and Crushed Curry Inks for this.
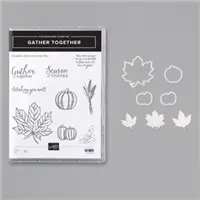
I then stamped three leaves from Gather Together Stamp set and colored them with my colored pencils. I used a little oil painting solvent to blend the color pencils you can also use baby oil. I then let that dry and cut them out using the matching die. While I was die cutting I used the Hand letter Prose dies and cut out the word Fall from some so saffron cardstock. So while I still had my die cutting machine out I cut out the largest stitched nested label die from a scrap of Very Vanilla cardstock and sponged around the edge with some Crumb Cake ink.
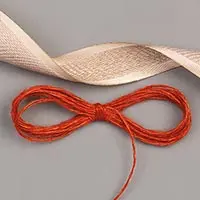
Once everything was cut out I popped up the large stitched nested label on my card and cut off a little that was hanging off the side of the card front. I then added one of the leaves popped up on Stampin' dimensionals and the letters that spelled out Fall. I then tucked the other two leaves under this. To finish off the card I added a double bow made with the Cajun Craze Linen thread from the holiday catalog Come Gather Ribbon Combo Pack and added a few rhinestones I colored using my dark Cajun Craze stampin' blend.
Thanks for dropping by I hope that you like my card today, and that you will give making your own plaid background a try. If you don't you can get the Wrapped in Plaid 6 x 6 Designer Series Paper for your Holiday crafting in my online store.
Happy Stampin'
Rick Adkins
If you live in the
US. I would love you to choose me as your demonstrator. If you
would like to purchase any of these products you can click on the Shop Now
Button or by clicking on any of the images below. Alternatively, you can
also contact me by email to place your order. Please be sure to use the
monthly host code and I’ll send a little something out to you the following
month to say Thank You!
November HOST CODE: QU2TJBJN
1.Spend any
amount with me this month and receive the Creative Stampers Tutorial
Bundle. Plus get a gift from me in December.
Please remember that if you use the host code you cannot use that
order towards my KCRP’s (Kinmon Crafty Reward Points) that would be double
dipping and is not allowed. For more information on KCRP’s click here.
Three
main reasons to Join!
1.You Get at least a 20% discount
on all your orders while you are a demo.
2.You get to join my fun Kinsmon
Crafters Team and Private Facebook Group.
Hello and welcome to my YouTube Channel and Blog: Today I am going to share with you the next Episode of Saturday Simple Stamping. In this Episode I am going to share with you a super quick and easy Christmas Card using the two new Host Stamp Sets from the 2019 Stampin' Up! Holiday Catalog. The stamp sets I am using are Holiday Haul and Greatest Part of Christmas. Both of these again are host sets and must be earned with a qualifying order. You will find a full list of the supplies I used in today's Simple Stamping Episode below. Here's a look at my cards.
In each Episode of Saturday Simple Stamping I share with you a super easy card geared towards beginners. These are easy recreatable cards using stamps ink and paper. Every once in awhile I may throw in a designer series paper, punch, or other embellishment, but meanly I keep it to the basics just stamps ink and paper. If you are a brand new crafter or stamper looking at getting into card making this is the series for you. I have currently 32ish videos or episodes you can find here by searching simple stamping or #simplestamping in the search feature on my site.
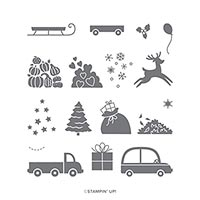
This week I am featuring the two Holiday Catalog Host Stamp Sets Holiday Haul and Greatest Part of Christmas. Each of these sets can only be earned with Stampin' Rewards. Those are points earned for purchasing products in my online store read more about Stampin' Rewards.
The Holiday Haul Stamp Set allows you to combine the images to build a scene for any occasion. I put my images on a slight slant for this card to have a little more visual interest without having to do a log of work. I chose to use a different color ink for each image. I wanted them to each have equal value and visual weight on the card. So by having each in a different color it allowed me to let the images guide the viewer. You will also notice that you see the same colors repeated at least three times on the card. This is a visual element that helps to tie everything together and keeps the viewers eyes moving around the card and not leave the visual plane. Now that I have gotten all technical with you lets just talk like real people shall we. You can pair with your favorite greeting stamp set for even more versatility I paired it today with the Greatest Thing About Christmas stamp set. The greatest part of Christmas is spreading cheer to everyone! No matter what sentiment you want to express for the season, you'll find it with the Greatest Part of Christmas Stamp Set. Pair with any image set for unlimited possibilities.
This is the first version of the card I created for today's episode. I used a ruler and lightly drew off the lines with a pencil so that I would have a guide to keep my images straight and aligned. I used a piece of Cherry Cobbler cardstock cut at 4 1/4 x 11 for my card base and added the whisper white to the front of the card. The Whisper white piece was cut at 4 x 5 1/4 a 1/4" smaller than the card base this allows for a nice equal border around the focal image. I added the strip of the Wrapped in Plaid Speciality Designer Series Paper to add a little more visual interest with the fun plaid pattern in Shaded Spruce, Whisper White, and Gold foil accents.
I did the same thing with the card above but I didn't draw off the lines to follow. I thought that I would be able to stamp the images freehand in a straight line. And I was wrong! If you look at the card above again you will notice some of the images go up slightly or down slightly from the visual straight line that I have on the original version. But, that's okay I mean it's handmade after all and not Hallmark. One of the fun things about creating a handmade card is the fact that you made it with love and it may have impressions and that's okay. It doesn't matter that it's not perfect. Yes, I know there are some of you out there that thinks otherwise but the small things like it being off slightly really doesn't bother me. For me it's more about how the person feels when they get the card I've made, not if it's perfect or not.
I also stamped my envelope with the same images in a line going across the flap. I almost only stamped the reindeer and the slay but decided it needed the other two images to match and to more visually appealing. I think you should always dress your envelopes with something before you send them. It helps to give the person receiving the card a little hint of what my be on the inside. And with our Stampin' Up! products it helps add coordination to it as well, since all our inks, and papers all color coordinates perfectly. That's one of the things that drew me to Stampin' Up! and becoming a demonstrator myself. I hated searching for things at the big box stores that I thought my match only to get home to find out they were close but no cigar!
Video Tutorial:
Here's the Video tutorial of how I created this card step by step. If you are viewing this post by email you may not see the video pop up. Some servers will not show you the embedded videos. So you will have to click the image below to go to my YouTube Channel and watch.
Thanks for dropping by today for another episode of Saturday Simple Stamping. If you are new to stamping or crafting and you are interested in learning more or interested in purchasing some products to help you get started I have the Beginners Experience Creativity Brochure you can download by clicking here. This publication is smaller than our other catalogs and not so overwhelming. It's filled with items that are perfect for someone just starting out.
Happy Stampin'
Rick
If you live in the US. I would love you to choose me as your demonstrator. If you would like to purchase any of these products you can click on the Shop Now Button or by clicking on any of the images below. Alternatively, you can also contact me by email to place your order. Please be sure to use the monthly host code and I’ll send a little something out to you the following month to say Thank You!
Host Code and Free Gift:
September HOST
CODE:SQ2WWJZN
Spend any amount with me this month and receive the Creative
Stampers Tutorial Bundle featuring Fancy Fold or Interactive Projects.Plus get a gift from me in October.
Please
remember that if you use the host code you can not use that order towards my KCRP’s
(Kinmon Crafty Reward Points) that would be double dipping and is not
allowed.For more information on KCRP’s click here.
Are you on my
list to get a NEW 2019 Holiday Catalog?If
you are not a demonstrator or don’t have a demonstrator that you work with in
the US I would love to:
1.Send you a Copy of the 2019 Holiday Catalog and
Idea Book
2.Add You to My mailing list for 10 + PDF tutorials
in my Monthly Newsletter each month
3.Ordering opportunities and my customer Ordering
specials