Sunday, September 1, 2019

We'll Walrus Be Friends CASE the Catalog

Hello and welcome to my blog; today I am going to share with you a card that I CASEd from the 2019 Stampin' Up! Annual Catalog.  CASE means Copy and Share Everything or Copy and Selectively Edit.  Casing a design is a great way to learn new techniques, and skills as well.  Casing is also a great way to improve skills.  The card that I cased came from page 83.  Here's a look at my card.

This is the image I CASEd and was inspired by.
image by Stampin' Up! 


My Version: 

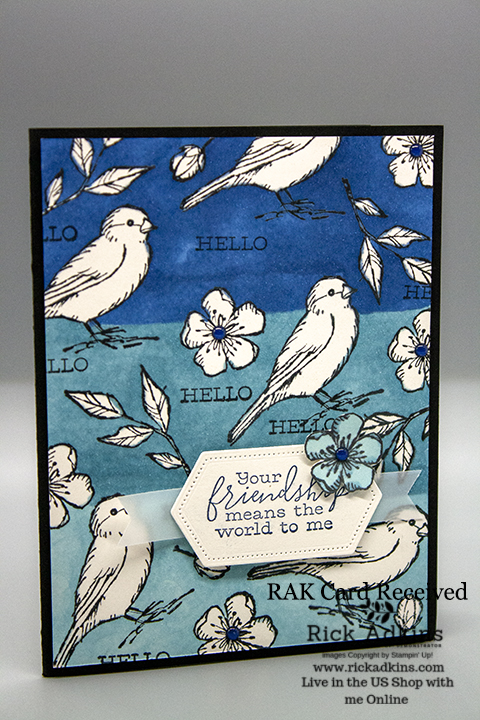
I tried to make my version of this card as close as I could.  I started out with a Smoky Slate card base.  The card base in the picture above is a side folding card 5 1/2 x 8 1/2.  I created mine as a top folding card 4 1/4 x 11 scored at 5 1/2.  
I then took a piece of Pool Party cut at 4 x 5 1/4 and used the High Seas 3D embossing folder and attached it to the card front.  I then used a piece of the Fluid 100 Watercolor paper and the Stitched Rectangle dies to cut out the image that will be placed on front.  I stamped all the images in Stazon Jet Black ink and let it dry.  Once it was dry I could watercolor the images.  I used a aqua painter and water colored the images using Smoky Slate, Balmy blue, Pool Party, Blueberry Bushel, Pumpkin Pie and Poppy Parade.  I just squeezed my ink pads to put ink in the top to use as a pallet.  Once I had everything colored and it had died I wrapped the Poppy Parade twine around and secured to the card front using dimensionals.  I then took about four inches or so of extra twine and tied a knot around the one that I wrapped I let a few inches hang down.  I added a knot on the other end and pulled the twine apart so it was just the threads hanging.  

I added a little of the stripped Washi tape from the Follow your art washi tape collection.  I stamped the sentiment in Basic Gray ink and created a little banner and added it to the card front with dimensionals.  I then added a piece of whisper white to the inside.  

Thanks for dropping by today, I hope that you have a wonderful day.  You can find a full list of all the supplies used in the Shopping List below.  
Happy Stampin' 
Rick 

Host Code and Free Gift:

 September HOST CODE:  VBBR3SCM
  1. Spend any amount with me this month and receive the Creative Stampers Tutorial Bundle featuring Fancy Fold or Interactive Projects.  Plus get a gift from me in October. 

Please remember that if you use the host code you can not use that order towards my KCRP’s (Kinmon Crafty Reward Points) that would be double dipping and is not allowed.  For more information on KCRP’s click here. 

Stampin' Up! Shopping List

Saturday, August 31, 2019

Rick's Saturday Simple Stamping Episode 30: A Simple Fall Birthday Card

Hello and welcome to my blog; today I am going to share with you the next Episode of Rick's Saturday Simple Stamping.  In this Episode I am going to share with you how to create a Fall themed Birthday card using products from the 2019 Stampin' Up! Annual Catalog and the upcoming Holiday Catalog.  I created this card using the Here's A Card Stamp Set (from the Annual Catalog) and Gather Together Stamp Set (from the 2019 Holiday Catalog).  I have given you both the A2 size measurements for the US and Canada and the A4 measurements for everywhere else in the blog post.  Here's a look at my card for today.  

Gather Together Stamp Set, Here's a Card Stamp Set, Fall Birthday Card, Rick Adkins, Stampin' Up!
I started off today's card by cutting a piece of Merry Merlot Cardstock (146979) in half to make a portrait style card (4 1/4 x 11 scored at 5 1/2 the finished size is 5 1/2 x 8 1/2 or 14.9 cm x 21 cm) so cut your cardstock according to your top folding card measurements.  I then stamped the large leaf image from the Gather Together Stamp Set (150589) in Merry Merlot Classic ink (147112) around the card.  Once this was complete, I stamped the pumpkins from the same set on a piece of Whisper White Cardstock (100730) that measured 2 5/8 x 4 1/8 (11.8 cm x 6.3 cm) using Smoky Slate Classic Ink (147113).  I then stamped Happy Birthday from the Here's a Card Cling Stamp Set (149438) in the same Smoky Slate ink close to the bottom.  I added a little of the 1/4" Mint Macaron Textile Ribbon (149480) to this layer at the top and added a knot.  I then adhered this to a Night of Navy Cardstock (100867) mat cut at 2 3/4 x 4 1/4 (12 cm x 6.5 cm).  The Whisper White layer was added to the Night of Navy mat with Multipurpose Liquid Glue (110755).  Once I had everything mounted I added it to the card base on Stampin' Dimensionals (104430).
Gather Together Stamp Set, Here's A Card Stamp Set, Rick Adkins, Fall Birthday Card, Stampin' Up!
To finish off the card I added a piece of Whisper White Cardstock to the inside of the card cut at 4 x 5 1/4 (14.4 cm x 10 cm).  I stamped the large leaf in the bottom corner of the Whisper White layer in Merry Merlot ink and adhered it to the card base.  I then decorated the Whisper White Medium Envelope (107301) flap with the same images on the card with the same two colors.   This allowed everything to tie in.  On front of the envelope I just stamped the pumpkins in the bottom left hand corner with Smoky Slate ink.  That way I have the perfect coordination all the way around the card to give me a perfect presentation when sent to the recipient.
Gather Together Stamp Set, Here's a Card stamp Set, #simplestamping, Fall birthday Card, Rick Adkins, Stampin' Up!

Video Tutorial: 

If you are viewing this post by email you may have to click here to view the video.  Sometimes not all email servers will show the embedded video.  
Thanks for dropping by for another episode of Rick's Saturday Simple Stamping.  I hope that you are finding this series very helpful and it's helping you along your stamping journey.  If you need any of the supplies you can order them in my online store by clicking on the item in the shopping list below.  
Happy Stampin' 
Rick 

Host Code and Free Gift:

 September HOST CODE:  VBBR3SCM
  1. Spend any amount with me this month and receive the Creative Stampers Tutorial Bundle featuring Fancy Fold or Interactive Projects.  Plus get a gift from me in October. 

Please remember that if you use the host code you can not use that order towards my KCRP’s (Kinmon Crafty Reward Points) that would be double dipping and is not allowed.  For more information on KCRP’s click here. 

Stampin' Up! Shopping List:

Friday, August 30, 2019

Bird Ballad RAK Card Received from Victoria Hevener

Hello and welcome to my blog; today I am going to share with you the Random Act of Kindness card I received back in June from Victoria Hevener.  Victoria created this really fabulous card and and sent out.  I was super happy to open this little gift in the mail.  Here's a look at her card. 

I am not quite sure how she created this lovely card but I have my thoughts on how I would create it.  To recreate her card I would first stamp all the images on a piece of whisper white cardstock in Memento Tuxedo Black around the card.  Next I would add a piece of post it tape to the section I wanted the first line.  I would then use my Stampin' Blends to color up to that line and around all the images.  I think the top color is the light Night of Navy blend, and the other two colors was Seaside Spray light and dark.  Going down to the next section the above steps was repeated and then again.  in the lightest color. 
To finish off the card the card front was added to a basic black card base.  The sentiment was stamped on whisper white and then cut out using the stitched label dies.  She cut one of the flowers out either from the designer series paper or after coloring it.  She added a vellum strip made into fish tail banners. 
Thanks for dropping by today.  I hope that you have enjoyed Victoria's card as much as I did. 
Happy Stampin' 
Rick 


Thursday, August 29, 2019

A Paper Pumpkin Thing Blog Hop: Gift of Fall


Hello and welcome to my blog for my second blog post for today.  This month's kit was a super cute kit that featured Fall themed gift bags and tags.  We also had the option of purchasing a matching add on kit also.  This months Paper Pumpkin Kit was titled Gift of Fall.  I shared earlier this kit and the projects from that kit earlier today you can click here to see that post.  For my alternative projects this month I came up with three super cute projects.  Here's a look at my projects.
I came up with three cards and a super cute little box using additional products along with products from this month's kit.  The first card I came up with was the Pretty Peacock card here.
I started out with a piece of Pretty Peacock Cardstock (4 1/4 x 11 scored at 5 1/2).  I stamped the leaf image from this month's stamp set all around the card base in Pretty Peacock ink.

Next I added one of the white tags in the center of the card.  I then added the crushed curry circle from this month's kit to the center of the banner with a few stampin' dimensionals.  I then added two of the vellum leaves one of the pretty peacock striped leaf and one of the craft leaf.  I added all the leaves with mini glue dots tucked under the crushed curry circle with the multicolored branches on it.

I then stamped my sentiment on one of the banners in Merry Merlot and added that to the center of the circle using stampin' dimensionals.  I then added a few of the gold self adhesive sequins to the card front.  I added some of the crushed curry seam binding ribbon that I made into a bow and attached with a mini glue dot.

To finish off my card I added a piece of whisper white cardstock that I stamped the branch on the left hand side in pretty peacock ink.  This finished off my first card.
Next I created the little box using some Rich Razzleberry cardstock and the Perfect Parcel dies.  It took one piece of cardstock to create this box.  Once I had everything cut out I used the Golden Glitz Delicata ink and stamped the branch around the side of the box.

Once I had the pieces cut out stamped and the ink dried I added some tear and tape and put the box together.  Once it was together I created my tag for the box.  I used one of the crushed curry circles for the main part of the tag along with one of the labels.  I stamped my sentiment on the tag and added it to the circle using stampin' dimensionals.  I then added some of the Crushed Curry Seam binding to around the box and tied it in a pretty bow.  I added the tag to the top of the box with dimensionals attached to the ribbon that way I could slide the tag and ribbon off without having to untie it.

I finished this project off by adding a few of the gold self adhesive sequins to the tag and around the circle.

For the third project today I created another card that matched my little box.  I used a piece of Merry Merlot cardstock (5 1/2 x 8 1/2 scored at 4 1/4).
I stamped the branch in the Golden Glitz Delicata Ink going up the left hand side of the card base and then I added the multicolored banner to the card base one of the Merry Merlot circles and a little of the twine.  Next I stamped the sentiment in the same Delicata ink on one of the die cuts and added this to the circle with Stampin' Dimensionals.  I then added one of the vellum leafs.  These leafs are so pretty they have a watercolor look to them but I didn't have to do any of the work to create them.  I then added some of the Blackberry bliss leaves and the crumb cake leaves.  
I finished off the card by adding a piece of whisper white to the inside and a few of the sequins to the card front.  
I hope that you have enjoyed my little projects for this month's Paper Pumpkin Thing Blog Hop.  If you are viewing this post on my Wordpress site you will need to click here to view the Blog Roll.  Thanks for dropping by.  
Happy Stampin' 
Rick 

Blog Roll: 


Template Designed by creativeworkerbee