Showing posts with label Paper Crafting. Show all posts

Monday, March 1, 2021

Just Because - Brushed Blooms Bundle Stampin' Up!

 Hello and welcome to my blog; I am back from my little staycation celebrating my birthday last week.  And, I have a super cute card to share with you today using the Brushed Blooms Bundle from the January-June Stampin' Up! Mini Catalog.  Here's a look at my card.  

Just Because Card using the Brushed Blooms Bundle from the January-June Mini Catalog.  Click here to learn more and download the free tutorial

I think the Brushed Blooms Bundles is probably one of my all time favorite bundles from Stampin' Up! in the last couple years!  Mainly because of the wonderful Beautiful Brushstrokes Dies.  Which creates these beautiful layered die cut roses.  

Tuesday, February 23, 2021

Mini Slimline Card - Woodland Wonder Stamp Set

Hello and welcome to my blog; today I have a super cute card to share with you today.  This is a card design that's super on trend right now.  Plus I used a super cute new stamp set from the January-June Mini Catalog.  This was a stamp set that I have had my eye on since the catalog came out and I got it a couple of weeks ago.  Here's a look at my card.  

Mini Slimline Card using the Woodland Wonder Stamp Set from Stampin' Up!, The Spot Challenge 150 click here to learn more

Thursday, February 18, 2021

Spring Time Joy Easter Card

 Hello and welcome to my blog; today I am going to share with you a card that I colored using my Prismacolor Pencils, a little Baby Oil, Q-Tip, and the Spring filled Spring Time Joy Cling Stamp Set from Stampin' Up!.  Here's a look at my card! 

I have a super cute Easter Card for you today using the Spring Time Joy Cling Stamp Set and Prismacolor Pencils Click here to learn more

Monday, February 15, 2021

Berry Blessings Gift Bag

 Hello and welcome to my blog; after some technical difficulty and having to reshoot the project that was supposed to go up yesterday for Day 7 of Treat Week 2021.  I am happy to be able to share this project with you today.  I CASEd today's project by the fabulous Sam Hammond from the UK.  I loved Sam's project so much that I had to make my own version.  Here's a look at the project. 

Berry Blessings Gift Bag How to by Rick Adkins

Friday, February 12, 2021

Hey Birthday Chick M&M Treat Box - Treat Week 2021 Day 5

 Hello and welcome to my blog; today's Treat Week 2021 project features the Hey Birthday Chick Stamp Set and matching Birthday Chick Dies.  I created this project to hold a regular size pack of M&M candies.  Here's a look at the project:

Treat Week Day 5 project features the Hey Birthday Chick Bundle.  Click here to learn more

Thursday, February 11, 2021

You Are Amazing Paper Blooms Candle Gift Box - Treat Week 2021 Day 4

 Hello and welcome to my blog; today is day four of Treat Week 2021.  And, I have a super cute little project for you featuring the You Are Amazing Stamp Set and the Paper Blooms Designer Series Paper.  The Paper Blooms Designer Series Paper is a free Sale-A-Bration Item currently, and the You Are Amazing Stamp Set coordinates with the You Are Amazing Project Kit.  So, for today's project I created a gift box that will hold one of the jar Candles from Target's Dollar Spot.  Here's a look at my project. 

Treat Week 2021 Day 4 - You Are Amazing Paper Blooms Candle Gift Box Click to learn more!

Wednesday, February 10, 2021

Shark Frenzy Godiva Treat Box - Treat Week 2021 Day 3

 Hello and welcome to my blog; today is day three of Threat Week 2021.  If you are unfamiliar with Treat Week.  Each day this week I will be bringing you a new treat project using new products from the January-June Mini and Sale-a-Bration brochure.  Today's project features the Shark Frenzy Bundle from the January-June Mini Catalog; which can be found on page 46.  Here's a look at today's project.  

Jump in the big crafting waters with this month's online Crafty Corner Bundle class featuring the Shark Frenzy Bundle from Stampin' Up!  Click here

Tuesday, October 27, 2020

Warm Wishes - Poinsettia Petals The Spot Challenge #134

 Hello and welcome to my blog; today I am going to share with you my card for this week's challenge over at The Spot.  This week's challenge is a very fun card sketch.  I picked the Poinsettia Petals Stamp set from the August - December Mini Catalog along with the Poinsettia Place Designer Series Paper to create my card with today.  

I wanted to do something fun and festive with the sketch for this week's challenge, but wasn't quite sure what I wanted to use until I sat down and actually was reorganizing my designer series paper and putting the scraps into sleeves.  I as was doing this I was actually on this pack of designer series paper and it hit me that the scraps on my table was perfect.  Isn't it funny how things just fall into place sometimes.   Here's a look at the card that I created for this week's challenge.  

Easy Layered Card using Poinsettia Petals Stamp Set from Stampin' Up! by Rick Adkins

Monday, October 26, 2020

October 2020 Paper Pumpkin Alternative Card Video

 Hello and welcome to my blog; today I am going to share a cute little alternative card with you that I shared during my YouTube Live on Friday, October 23, 2020.  I also shared in the Live how to put together the two card designs for the Joy to The World October 2020 Paper Pumpkin Kit.  

This month's kit is a great one and so very festive.  I love to make Christmas Cards and I love it when we make Christmas cards with Paper Pumpkin.  Because everything is already cut and ready for you in each kit.  Plus I get a new stamp set each month that's exclusive to the kit.  

I have a super cute little alternative card for you today using the October 2020 Joy to the World Paper Pumpkin Kit.  Click here to learn more!

Friday, October 23, 2020

Santa's Workshop Holiday Stamp Camp

 Santa’s Workshop Holiday Stamp Camp 

Date:  November 21, 2020 

Time:  Your Convenience 

Location: Comfort of your own Home 

RSVP & Prepayment Due:  Early Bird Price due by November 4, 2020 (To have your kits the day of) Order up until November 21, 2020 (Orders after the 4th will not have their kits until after the live event

Cost: Based on Budget Friendly Option you pick

Details: 

Click here to register and read more about my Santa's Workshop Holiday Stamp Camp Deadline November 4, 2020

Monday, September 28, 2020

How To Create a Sunset Card Background - Sending Sunshine Stampin Set Stampin' Up!

 Have you ever wondered how they create certain cards in the Stampin' Up! Catalog or just in general How they do that?  Well, I am going to share with you today how to create a sunset card background and I am going to show you how they made the Sending Sunshine card in the 2020 Stampin' Up! Annual Catalog.  

I am here to answer your questions on how the Stampin' Up! Concept Artists and card makers create certain things in the Catalogs and on the internet.  Like today's card for example I am going to teach you how to create a sunset card bround that you can use on your cards the easy way.  I used the card from the Stampin' Up! 2020 Annual Catalog on page 111 that uses the Sending Sunshine Stamp Set as my inspiration today.  

How to Create a Sunset Card Background using the Stampin' Up! Sending Sunshine Stamp Set and ink Blending.  In this post I will show you how to create the perfect sunset ink blended background for your card making needs!

Tips & Tricks: 

In my post today I am going to share with you how to create the perfect little sunset background that you can recreate on your own projects.  I am going to give you some tips and tricks to make the process easy and so that you can recreate the perfect little sunset to share with others.  This process starts with as always in card making a cute stamp set.  Today, I am using the Sending Sunshine Stamp Set that can be found on page 111 of the Stampin' Up! 2020-2021 Annual Catalog.  

Learn how to create the perfect sunset card background for your card making needs.  Rick Adkins Independent Stampin' Up! Demonstrator

To start off you are going to need a few supplies for this process; you will need the following supplies to recreate this card.  
  • Sending Sunshine Stamp Set
  • Stamparatus
  • Sponge Brayer
  • Ink (I used Daffodil Delight, Calypso Coral, and Terracotta Tile Inks) 
  • Cardstock (Pretty Peacock, Whisper White, and Vellum Cardstock) 
The Sponge Brayer is the key to create this soft warm sunset that you see on my card today.  It applies the right amount of ink to the surface of the Whisper White cardstock.  But I will tell you that you have to watch the amount of pressure you put down.  If you press to hard on the Sponge Brayer you will get ink marks on your project that are impossible to blend out.  So REMEMBER SUPER SOFT TOUCH as you're ink blending the background.  

Learn how to create the perfect sunset card background for your card making needs.  Rick Adkins Independent Stampin' Up! Demonstrator

I started out by stamping the ocean and branch in Tuxedo Black Ink onto my Whisper White Cardstock.  I used my Stamparatus to get the best stamped image.  You don't have to use the Stamparatus but I thought it would be helpful to use and stamp both images at the same time and just in case my images where not black enough I could double stamp them since the magnets held my cardstock in place and there was no shifting of the paper.  

Learn how to create the perfect sunset card background for your card making needs.  Rick Adkins Independent Stampin' Up! Demonstrator

Next I started with the lightest of the three colors (Daffodil Delight) and started where I wanted the darkest part of that color to be.  I brayered the ink in one direction and just came back adding more layers of the same color and blended it down the cardstock into and over the dried black ink.  You will totally understand more as you watch the video tutorial below.  I then moved on to the next color which was Calypso Coral and started that where I wanted the darkest concentration on ink to be and blended the ink downward into the Daffodil Delight.  I repeated the process with the Terracotta Tile Ink, which is a darker shade of the Calypso Coral, until I had the background filled with color.  

Video Tutorial: 


If you are viewing this post by email you may have to click here to view the video.  Not all mail servers will show the embedded video.  


Learn how to create the perfect sunset card background for your card making needs.  Rick Adkins Independent Stampin' Up! Demonstrator

Thanks for dropping by today I hope that this will help you to create the perfect ink blended Sunset that you have been longing to create.  If you need any of the supplies that you have seen today you can pick them up in my Online Store from the Shopping List below by clicking on the items.  

Happy Stampin' 
Rick Adkins 


Host Code Closes on Wednesday, September 30, 2020 

Use the Host Code on any order of $35 (before taxes & shipping) and get the make and takes for my Three Halloween Treat Holders Projects that I did on my Facebook Live on Wednesday as a free gift from me.   Offer ends Tuesday September 8, 2020.  If your order is $150 or more, please do not use the host code.  You will forfeit your Stampin' Rewards if you do; and I want you to get those rewards.  


If you place any size order with me during the month of September, you will receive the September Creative Stampers Tutorial Bundle from me as a little thank you.  This month's tutorial bundle is a Mega Tutorial Bundle featuring projects for both Fall & Halloween.  There are 20 tutorials featured this month.    The Creative Stampers Tutorial Bundle can either be earned for FREE with any size order or Can be purchased for $22 from me.


I am very close to earning the 2021 Stampin' Up! Incentive Trip to Maui and your orders can help me get there.  I am running a few special promotions until the end of September to not only help me earn this trip but to help you save a little cash as well.   

With each $1000 I earn I will be cutting off a chain from my Maui or Bust Countdown Chain. 


Deadline to sign up for my Online Fall Retreat is October 3, 2020!  You still have time to join in on all the holiday fun.  Click here to learn more about my Online Fall Retreat.  Click here to register.  


It's a great time to join my team of Kinsmon Crafters and take advantage of the always great Starter Kit Deal!  The Starter Kit is always at a 20% discount.  Join today!  

Stampin' Up! Shopping List: 


Tuesday, July 14, 2020

Forever Blossoms - The Spot Challenge #119

Hello and welcome to my blog; today I am here to share with you my card for this week’s Creative Challenge over at The Spot.  This week we have a fun little color challenge for you to play along with.  The card that I designed for this week’s color challenge started out as a completely different card than what I ended up with.  I designed a different card to use but the more I thought about my original card today the less I liked it.  So, at the last minute I scrapped my card and created a completely new one and I love what I came up with.  Here is a look at my new card for this week’s challenge. 


On 
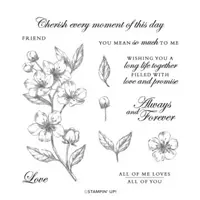
my new card I started out by using my Stamparatus and stamped the floral image from the Forever Blossoms Stamp set in Tuxedo Black ink.  I stamped it twice on the same sheet of Thick 
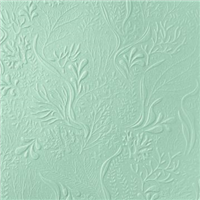
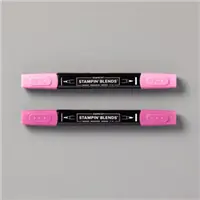
Whisper White Cardstock by turning it around to the other side.  I then took my Stampin’ Blends in Pool Party, Magenta Madness, and Basic Black to do my coloring. 


I debated if I wanted to color each floral image the same way or change it up slightly but ended up deciding that it would be better for my design if they were colored the same.  Once all my color was complete, I put my stamped images back into my Stamparatus and stamped the images again in Versamark Ink.  I made sure to leave my stamp in the same position as when I first stamped it so that it would be easier to line everything back up. 
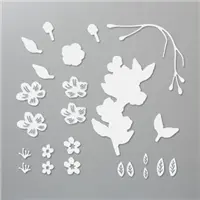

Once I had the images stamped again, I added some Gold Stampin’ Emboss Powder and heat set them.  One the melted powder had cooled I took them out and used the matching dies to cut each image out.  At this point I cut a piece of Basic Black Cardstock to 4 x 5 ¼ and used the Parisian Flourish 3D Embossing Folder and embossed it.  I then added this to a Magenta Madness layer that was cut to 4 1/8 x 5 3/8. 


Next, I stamped my sentiment in Versamark and used the same embossing powder and heat set that.  I used the Layering Circles Dies to cut it and a scalloped circle from Pool Party Cardstock out.  I layered them together and added them to the front of the card with Stampin’ Dimensionals.  I then added the flowers with Stampin’ Dimensionals as well around the sentiment.  To finish off my card I added a few of the Gold 
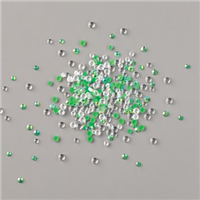
Metallic Pearls sprinkled around the card. 


Here is a look at the challenge image that inspired my color pallet today.  I hope that you will take time and play along with us this week over at The Spot.  You can check out what the other design team members came up with using this color combo by clicking here. 


Thanks for dropping by.  If you need any of the supplies you have seen today you can pick them up in my online store in the shopping list below. 


Happy Stampin' 
Rick Adkins 


Use the Host Code on any order of $50 (before taxes & shipping) or more during the month and receive a gift from me in June as a Thank You. If your order is $150 or more, please do not use the host code.  You will forfeit your Stampin' Rewards if you do; and I want you to get those rewards.


If you place any size order with me during the month of July, you will receive the July Creative Stampers Tutorial Bundle from me as a little thank you.  This month's tutorial bundle has ten project tutorials that feature our favorite new products from the 2020-2021 Stampin’ Up! Annual Catalog.  The Creative Stampers Tutorial Bundle can either be earned for FREE with any size order or Can be purchased for $22 from me.


Don't forget about Bonus Days are going on now!  You get reward for shopping now with every $50 qualifying order. and you get to spend the $5.00 coupon codes when you shop in August.  

Join me on Tuesday July 20th for a fun crafting night together.  Bring a Stampin' Up! Kit and let's beat the summer heat with a little indoor crafting in my Zoom Craftroom.  


Join me in my July Monthly Card Class.  It's $25 or free with qualifying order  of $35 (before shipping and taxes) in my online store with this month's host Code  Deadline to get in is July 17th.  


Last day to join the july Card Club is July 17th.  Click on the Club Tab at the top to join.  

The deadline for my Christmas in July Card Class is coming up soon not miss out.  


Stampin' Up! Shopping List: 

Template Designed by creativeworkerbee