Showing posts with label A Paper Pumpkin Thing Blog Hop. Show all posts

Thursday, April 25, 2019

A Paper Pumpkin Thing Blog Hop: Sentimental Rose


Hello and welcome to this month's Paper Pumpkin Thing Blog hop.  This month's kit is super cute and beautiful and features a wonderful set of cards and gift box.  Plus the bonus perk of this month's kit was that it featured our very first distinktive stamp set.  For my Alternative projects I created a fun card and gift packaging.  Here's a look at my projects.
Here's a look at this month's intended projects from the kit.

All Wrapped Up!:  

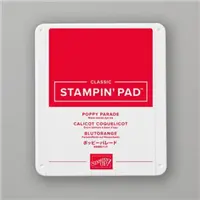
For my gift packaging I used one of the striped gold and filled it with Hershey's kisses.   Folded over the top and added one of the background panels from the kit.  I stamped Fore you of this panel using poppy parade ink.  I then stamped three of the roses from the kit in Flirty Flamingo and one each in So Saffron and Poppy Parade.  I then fussy cut them each out. With the three Flirty Flamingo roses I took different sections from two of them and layered them on the third.  I stamped a few of the leaves from the stamp set in mint macaron and cut them out also.  I then added ribbons in Calypso Coral, Mini striped Poppy Parade Ribbons and a little bakers twine I took from my kit.  I placed the ribbon and twin on the tag that I used the panel for and stapled the ribbon on.  Then I made a double bow with bakers twine and attached over the staple.  
Next i added the flowers onto the tag.  I then added some of the leaves around.  To finish off the tag I added faceted clear gems to the center of each rose.  

My Card: 

 For my card I started out with a piece of whisper white cardstock and stamped two of the roses and leaves in on opposite sides leaving enough room between each so that I would have a nice window.  Next I took a circle and traced around that connecting the roses.  With a craft knife I cut out the center of the circle making sure to cut around each rose and leaf that was in the circle.  I took one of the note cards from the kit and trimmed it down to fit behind the opening.  I then layered this panel onto a Flirty Flamingo card base.  I used the same faceted clear gems on the inside of the roses on the card as I did the gift packaging.  

I added a whisper white panel to the inside with one of the roses stamped on the it.  And, then added my sentiment stamped on one of the banners from the kit and added some baker's twine at the top of the card to finish everything off.  

I hope that you have enjoyed my projects for this month.  If you are viewing this post on my wordpress site you will need to click here to view the blog roll.  If you are viewing on my new blogger website you will find the blog roll below.  Below the blog roll you will find a list of the supplies I used to do both projects.  Thanks for dropping by I hope that you will hop along to the end.  I know everyone have came up with some great projects for you.  
Happy Stampin' 
Rick Adkins 

Blog Roll: 

Stampin' Up! Shopping List: 


Thursday, February 28, 2019

Grown with Kindness A Paper Pumpkin Thing Blog Hop

Hello and welcome to this month's A Paper Pumpkin Thing Blog Hop.  This month's kit Grown with Kindness was a fabulous one.  It was filled with some wonderful cards and supplies that was hard to cut apart to create alternative cards and projects for.  I loved the stamp set this month and the photo realistic succulent paper.   Here's a look at the cards that the kit created.


For my alternative projects this month I wanted to focus on the stamp set.  I know we focus a lot on cutting the supplies up and creating new cards and projects.  But, I thought it would be a great idea to show you how to do alternative projects with the stamp set.  Because let's be real how many actually pick up there stamp set after they have created their cards?  So this was a good way to encourge you to do just that.  Here's a look at my alternative for this month's hop.  

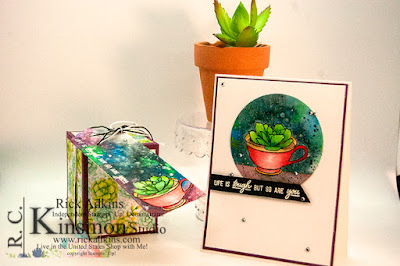
I have also shared 10 other alternative projects earlier this morning on my blog and YouTube channel I will share those with you too.  I will share that with you in just a little while.  But, first let's talk about the projects at hand.  I just adore the tea cup with the succulent inside.  It's by far my favorite stamp from the stamp set.  So I wanted to create my projects to focus around that.  I also wanted to do a little watercoloring.  But the problem was how to do that with a 3d project and a card.  The card was super easy and I thought lets make a box and then make a tag.  By doing a tag also it allowed me to use both the stamp that I wanted and the coloring technique that I wanted.  Let's look at the card shall we.  

So I stamped the image in waterproof ink on a piece of watercolor paper.  I actually stamped the image twice so that I could get a good impression.  I used my Stamparatus to achieve the perfect placement that I would need to stamp the image in the same spot on the watercolor paper.  Once I had it stamped and ready to go I could start my watercoloring.  I used just a really cheap kids watercolor set to do this.  Some that you pick up have really nice paints in them and you wouldn't think about it. I picked this one up on clearance for $1.00.  It was Royal Longnickel paint and I have found that their cheaper versions are just as good as their professional versions.  They sometimes aren't as strong or vibrant but they are differently worth the price to play with.  I painted the stamped image with a couple layers building up the colors between each drying process.  
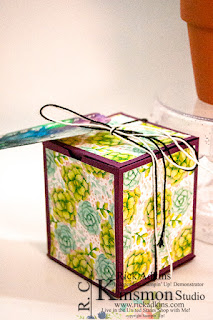
Once I had the image down for the card I then stamped and heat embossed the sentiment onto my tag made from watercolor paper also.  I went through the same process of coloring the image and background until I got the desired effect I wanted.  After the tag was done I set it to the side to dry and then worked on my card.  I used the layering circle framelits and cut out the watercolor piece to place on my card base.  I used a piece of basic black and heat embossed the sentiment.  I made a banner in  the same way as the ones in this month's kit.  Here's a look at the tag that I created as well as the box.  I used the Painted Seasons Designer Series Paper that's a Saleabration item on the top and sides of the box.  I picked the DSP that had the succulents; this allowed me to tie in the succulents from the stamp set in with the designer series paper.  I used a piece of Fresh Fig Cardstock to create the box.  I then used the black and the white baker's twine to tie around the box and to tie the tag on.  


Okay Okay, I promised a look at the other alternatives that I did with this month's kit.  Here's the video that I shared earlier showing 10 alternative projects using supplies from this month's kit.  


I hope that you have enjoyed today's post.   You will find a full list of the supplies that I used for today's card and the alternative projects in the Shopping List below.  Before the shopping list you will find the blog hop list.  I hope that you will take the time to hop around and check out what all the other's have designed with this month's kit.  If you are viewing this post on my wordpress site you will need to click here to view the blog roll.  

Happy Stampin'
Rick 

Blog Roll: 


Stampin' Up! Shopping List: 
Big Shot
[143263]
$110.00
Glue Dots
[103683]
$5.25
Heat Tool
[129053]
$30.00
Stamparatus
[146276]
$49.00

Template Designed by creativeworkerbee