Showing posts with label Stampin' Blends. Show all posts

Tuesday, October 22, 2019

Stampin' Blends Coloring - Christmastime is Here

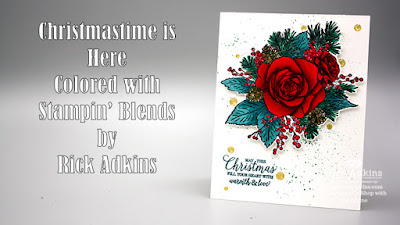
Hello and welcome to my blog; today I am going to share with you a card I made with the upcoming Christmastime Is Here Suite of products that will release for a limited time in November.  The stamp set in this suite is a duo configuration stamp set; meaning you get two stamp sets one is a Cling Mount set and one is a Photopolymer set.  With this configuration you get both styles.  The cling stamp is just the outline image and the photopolymer set is designed to layer the colors into the outline.  I just stamped the outline image and colored it with my stampin' blends.  Here's a look at my card.

I love this stamp set and love the Christmas feel.  As I mentioned this is from a Limited Time Release coming in November.  In the suite that is coming there's the two stamp sets, matching dies, enamel dots, ribbon and designer series paper.  I will share another post next week with all the products from this suite.  I stamped the outline image onto a piece of Thick Whisper White cardstock using my Stamparatus and some Tuxedo Black Ink.  I did this because it's a larger stamp and I wanted to be able to stamp it twice if I didn't get a good impression the first time.
Once I got it stamped out I used my Stampin' Blends to color the image.  I colored the rose first using the light and dark Cherry Cobbler Combo Pack.  I colored the entire rose image with Cherry Cobbler Light first and put down a base color.  I then came back with my dark to add my shadows, and then went back in with my light to blend it out.  I did this on each petal, one at a time.
Next I worked on the leaves and colored them with Pretty Peacock light and dark blends.  This time I did them a little different.  I started with the dark and then came back in with the light.  With both I flicked in the colors and let the ink blend together.  Next I worked on the pine cones.  They were colored with Crumb Cake and Soft Suede stampin blends.  I then colored the pine branches with Shaded Spruce, put both light and dark in not really blending, but picking certain needles to be each color.  This gives the illusion of light and dark needles.  I wanted a different shade berry so I used Poppy Parade to color them.
To embellish my card I did some ink platter on my Whisper White Thick panel with my Shaded Spruce Blends.  And let that dry and then added some of the gold enamel dots in the limited time release suite, and popped the rose bundle up on dimensionals.

Video Tutorial: 

If you are viewing this post by email you will have to click here or click on the image below to view the video.  

Thanks for dropping by by today, I hope that you have enjoyed the little walk through of my card.
Remember that the products in the Christmastime is Here Suite will release on November 1, 2019.  And they are only while supplies last.  I will be back again tomorrow with a new project for you see you then.
Happy Stampin' 
Rick Adkins 


If you live in the US.  I would love you to choose me as your demonstrator.  If you would like to purchase any of these products you can click on the Shop Now Button or by clicking on any of the images below.  Alternatively, you can also contact me by email to place your order.  Please be sure to use the monthly host code and I’ll send a little something out to you the following month to say Thank You!  

October HOST CODE:  SQ2WWJZN
1.     Spend any amount with me this month and receive the Creative Stampers Tutorial Bundle featuring Fall & Halloween Projects.  Plus get a gift from me in November.
Please remember that if you use the host code you cannot use that order towards my KCRP’s (Kinmon Crafty Reward Points) that would be double dipping and is not allowed.  For more information on KCRP’s click here.  


Three main reasons to Join!  
1.     You Get at least a 20% discount on all your orders while you are a demo.   
2.     You get to join my fun Kinsmon Crafters Team and Private Facebook Group.
3.     Access to directions to all my online classes 

Stampin' Up! Shopping List: 

Monday, October 21, 2019

Hello Floral Card-To A Wild Rose

Hello and welcome to my blog; today I am going to share with you a card that I made yesterday using the To A Wild Rose Stamp Set and some of my Stampin' Blends.  To A Wild Rose is a great layering stamp set that actually is a Million Dollar Sales Achiever Set that is currently in the Stampin' Up! Annual Catalog.  I love this card that I created it just makes me happy.  Here's a look at my card.

For my card today I stamped the outline of the rose from the stamp set three times using Tuxedo black ink and the leaves cluster three times and a couple other times so that I could have some extra leaves.  Once the ink dried I started the coloring process.  All the leaves where colored with Soft Suede light & dark Stampin' Blends.  I then colored the flowers next.  For the lighter pink flower I colored with my Flirty Flamingo and Lovely Lipstick combo blends.  The darkest areas were done with the Dark Lovely Lipstick and blended out until I got to the lightest area.
The two darkest roses were colored with just the Lovely Lipstick light and dark blends.  Once I had everything colored I colored in the centers of the roses with my dark Daffodil Delight.  I then took a white gel pen and added some little white dots to the centers.
Once all the coloring was done it was time to use the matching dies to cut out the roses and leaves.  The leaves that I stamped that was just the the single leaf I cut out with my paper snips.  I laid out my arrangement onto the card and then used press and seal to hold it into place while I worked on my card base.
I used the Decorative Mask Stencils and did a little ink blending in Flirty Flamingo ink on the area that the flowers were going to be at.  I then flicked on some Flirty Flamingo and Lovely Lipstick ink.  Once the ink had dried I added a little liquid glue behind the leaves and flowers that was facing up on the press and seal.  I then placed the cluster of flowers (still on the press and seal) onto the card base.  I then pulled the press and seal back up with the remaining flower and a couple leaves up and added a few Stampin' Dimensionals behind them.  I then placed that flower and leaf back onto the arrangement.
I stamped my sentiment in Tuxedo Black ink in the bottom third of the card base.  I then added a few sequins to finish off the arrangement.  I trimmed off the leaves that were over hanging off the card.
Thanks for dropping by today, I hope that you have enjoyed my little card for today.

Happy Stampin' 
Rick Adkins 

If you live in the US.  I would love you to choose me as your demonstrator.  If you would like to purchase any of these products you can click on the Shop Now Button or by clicking on any of the images below.  Alternatively, you can also contact me by email to place your order.  Please be sure to use the monthly host code and I’ll send a little something out to you the following month to say Thank You!  

October HOST CODE:  SQ2WWJZN
1.     Spend any amount with me this month and receive the Creative Stampers Tutorial Bundle featuring Fall & Halloween Projects.  Plus get a gift from me in November.
Please remember that if you use the host code you cannot use that order towards my KCRP’s (Kinmon Crafty Reward Points) that would be double dipping and is not allowed.  For more information on KCRP’s click here.  


Three main reasons to Join!  
1.     You Get at least a 20% discount on all your orders while you are a demo.   
2.     You get to join my fun Kinsmon Crafters Team and Private Facebook Group.
3.     Access to directions to all my online classes 

Stampin' Up! Shopping List: 

Wednesday, October 9, 2019

Harvest Hello Jack-o-lantern and a Night Scene Card for #PCC354 Rick Adkins

Hello and welcome to my blog; today I am going to share with you a card i created for this weeks Paper Craft Crew Challenge.  This weeks challenge is all about Halloween and Haunting.  One of the things that I think of when someone mentions Halloween is Jack-o-lanterns.  The other thing I think of is fall leaves and the crisp cool night air.  So, for my card I wanted to come up with something that embodied all those elements.  I think I came up with a super cute card for you all today.  Here's a look at my card.

I created a card with a fun little jack-o-lantern in a pile of Fall leaves at night.  Here's the image that inspired my card.  I have linked the inspiration image below to the Paper Craft Crew website.  You can click on the image to play along and to check out what all the other design team members came up with.  

 Tips & Tricks: 

I started my card by stamping the jack-o-lantern face in Pineapple Punch Ink and then masked it off.  I then stamped the pumpkin from Harvest Hello in Tuxedo Black ink, because I knew I was going to color it with my stampin' blends.  But before coloring I needed to create my night sky.  
To start that process I masked off the pumpkin and stem with some masking paper.  Then I stamped the some of the leaves in front of the pumpkin.  After that was done I began with some ink blending.  I did this really light starting in the center around the pumpkin.  I started out with Pineapple Punch, then moved to Mango Melody, and Pumpkin Pie.  And finally moving into Rich Razzleberry.  Then I repeated the process again blending all the colors together.  Once I had everything blended I came back in with a little tuxedo black just around the edges.  
After everything was blended the way I wanted it.  I flipped on some water from my stampin' spritzers and let it sit for just a little bit then pressed a paper towel on that.  I then dried the ink with a heat tool.  Then I removed the masks from the pumpkin.  With the ink blending and the masks in place; I had a white ring around the stem and the pumpkin.  So, how to handle that.  I made both into  part of the jack-o-lantern.  I colored the jack-o-lantern with a combination of Mango Melody, Pumpkin Pie, and a little Pineapple Punch.  I also added a little dark soft suede around the edge and the stem.  When I have so many colors on the same image I like to color from lightest to darkest, then come back with darkest to lightest.  
After the coloring was done on the pumpkin I came back in with my stampin' blends but added in the same colors I used before but added in a little Cherry Cobbler and Rich Razzleberry as well.  Once That was all done I came back in with a journaling pen and outlined the pumpkin, the face, and the leaves.  I then came back in with the dark soft suede blend and added some shadows around the outside of the leaves around the pumpkin leaving the center free to give the look of a glow from the jack-o-lantern.  I finished off my card by heating embossing my sentiments on Early Espresso Cardstock.  My sentiments came from Harvest Hellos and Wonderfully Wicked.  I matted my focal image on a Early Espresso mat and then placed everything on a Pineapple Punch card base.  
Thanks for dropping by today, I hope that you have enjoyed my little card that I came up for you.
Happy Stampin' 
Rick Adkins 

  If you live in the US.  I would love you to choose me as your demonstrator.  If you would like to purchase any of these products you can click on the Shop Now Button or by clicking on any of the images below.  Alternatively, you can also contact me by email to place your order.  Please be sure to use the monthly host code and I’ll send a little something out to you the following month to say Thank You!  

Stampin' Up! Shopping List

Template Designed by creativeworkerbee