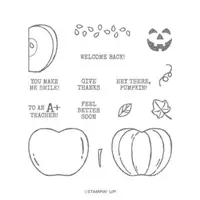
Hello and welcome to my blog; today I am going to share with you another project for my 12 days of FALL series. If you are just visiting my blog for the first time welcome, if you are returning welcome back. Today, I am sharing a card made using the Harvest Hello Stamp Set (#150581) from the 2019 Stampin' Up! Holiday Catalog. This is a super cute stamp set that allows you to create apples, pumpkins, and jack-o-lanterns. And, it has a matching apple builder punch, hello that's a great thing to have. You can use it for back to school projects as well as Fall. My card today features a Fall themed card that's very clean and simple.
I have started a little series celebrating the joy and colorful splendor of Fall one of my favorite seasons. As each morning is getting cooler and as the leaves start to change color I wanted to share some Fall themed projects with you.
If you noticed we have missed a few days in this series I had a few computer issues over the weekend. So, I had to do a little work on my laptop and it took longer than expected Saturday. Which means I didn't get my weekend posts up, so they will be moved to later in the week. Which is okay let's get into today's card shall we.
I stamped my pumpkin on a piece of scrap
Whisper White Cardstock (#100730) using
Memento Tuxedo Black Ink (#132708). I picked this ink be I knew I wanted to use my Stampin' Blends to do a little coloring. Once I had the pumpkin, stem, and the pumpkin leaf stamped out I set them aside to dry just for a little bit. I have a very juicy Memento Black pad so it was better to let the ink dry a little then to go right in gun ho and start coloring. I didn't want to smear my either of the images and that could have happened if I started coloring to soon. So in the meantime I needed to find the other elements of my card.
For my designer series paper elements I picked the
Monster Bash Designer Series Paper (#150447) I know strange right. Yes, this beautiful damask pattern comes from this years Halloween designer series paper. It's a beautiful pattern and if your not into Halloween there's always the reverse side of the paper that has a more subtle pattern on it. I thought this one was just screaming to be used. There's also a pattern similar to this one but in Basic Gray in this pack. I attached my little strip of designer series paper to my
Crushed Curry (#131199) card base. My card base measured 5 1/2 x 8 1/2 scored at 4 1/4, and my strip of designer series paper was cut at 2 x 5 1/2. Once I had those decisions made prepped and ready to go I could work on the coloring.
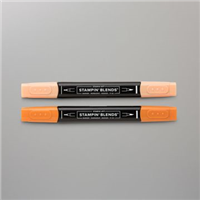
For my coloring I started out with a layer of
Light Daffodil Delight (#144586) and colored the entire pumpkin and leaf with that color to get a nice base color down. I wanted the pumpkin and leaf to have a little bit of light in them so that's why I went with that color. Next I added a little of the
Dark Daffodil Delight Stampin' Blend (#144585) to start building in my Shadows on the pumpkin. All of the dark colors were put in where the shadows would naturally be on the curves of the pumpkin; where one section met the next. I colored this way to give it a feeling a roundness. I also colored in the shape of the pumpkin, meaning because it has a more rounded shape I followed the lines of the image and colored up to down and not side to side. This allowed for a more rounded look than if I had just colored it in with a side to side motion. I know you've seen images that have been colored before and thought something's not right and just couldn't figure out what it maybe. Well, chances are it was how it was colored in and the direction they colored.
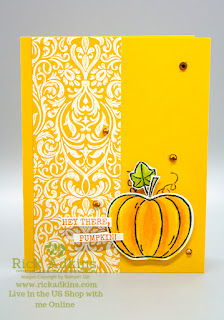
Once I had the dark starting to take shape it was time to start adding in more colors, so I went with the next logical choice
Light Pumpkin Pie (#144578) and colored in the same way. Then I moved to the
Dark Pumpkin Pie (#144577) filling in my darkest shadows. After that I reversed the process and started blending my colors. I started with the dark pumpkin pie blend in the same areas as before and blended it out with the light pumpkin pie. That was blended with the dark daffodil, and the dark daffodil was blended with the light. I did this on each section of the pumpkin until everything was smooth and blended. I then colored the leaf starting with my dark daffodil delight and then used my
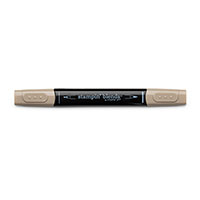
Light Old Olive Stampin' Blend (#144574) and my
Dark Old Olive Stampin' Blend (#144573). There's not as much coloring real estate on the leaf so it wasn't a lot of blending. I colored the stem in with a
Dark Crumb Cake Stampin' Blend (144581) and just did two layers so it looked like there was a little color variation.
Once all the coloring was done it was time to punch the pumpkin out with the
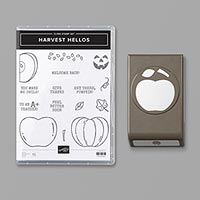
Apple Builder Punch (#150663) which again matches the Harvest Hello Stamp Set. And, you can save 10% on both the stamp set and punch when you buy them as part of the
Harvest Hello Bundle (#153037). The punch will punch out the stem but it will not punch out this particular leaf. I had to do a little fussy cutting, but it was really easy to do. Once I had my little pumpkin cut out it was time to start finishing the card.
) figured out the placement of the pumpkin and stamped the little curly cues you see sometimes on pumpkins in a little
Early Espresso Ink (#147114) and I actually need to reink my pad but it was actually what I was looking for when I stamped so I went with it. I then layered the stem and the leaf on to my pumpkin. I did this with a little liquid glue and then added a
Mini dimensional behind the leaf and a regular dimensional where it would hold the stem and the pumpkin together. I then added a few more around the pumpkin to make sure everything was popped up. I peeled off the backings and added the pumpkin where I wanted it. Next I stamped my sentiment on a scrap of Whisper White. I picked the sentiment Hey There, Pumpkin (it made me laugh) in
Pumpkin Pie Ink (#147086) and then used my
Paper Snips (#103579) to cut it out and make two small little banners. Well, now I had to figure out how I was going to attach these little banners to the card. I could have just glued them with my liquid glue but it just didn't feel right. They needed to be popped up also. The sentiment was two small for mini dimensionals since I cut them apart. So my solution was to use the
Foam Adhesive Strips (#141825) they were the perfect size to fit behind the little strips.
To finish off the card I added some of the Pumpkin Pie rhinestones from the
Holiday Rhinestone Basic Jewels (#150457). I love these little rhinestones from the Holiday Catalog because they come in Cherry Cobbler, Coastal Cabana, Night of Navy, Pumpkin Pie and Shaded Spruce. The perfect little embellishment for the holiday season.
Thanks for dropping by today, I hope that you have enjoyed my little Pumpkin Card as much as I had fun making it. If you need any of the supplies you have seen here today you can pick them up in my online store, by clicking on the image in the shopping list below.
Happy Stampin'
Rick
September HOST
CODE: VBBR3SCM
- Spend any amount with me this month and receive the Creative
Stampers Tutorial Bundle featuring Fancy Fold or Interactive Projects. Plus get a gift from me in October.
Please
remember that if you use the host code you can not use that order towards my KCRP’s
(Kinmon Crafty Reward Points) that would be double dipping and is not
allowed.
For more information on KCRP’s
click here.
Stampin' Up! Shopping List: