Showing posts with label 2019 Christmas card. Show all posts

Sunday, November 24, 2019

Case the Catalog - God's Peace

Hello and welcome to my blog; today I am going to share with you another project in my CASE the Catalog bi-weekly series.  Today, I am sharing with you a card from the Holiday Catalog.  The card I am CASEing (Copy and Share Everything or Copy and Selectively Edit) is on page 29 of the 2019 Stampin' Up! Holiday Catalog.  I didn't have everything just like the card in the catalog but I came up with an alternative that works just as well.  Here's a look at my card.

Here's a look at the card from the catalog that inspired my card.
image by Stampin' Up! 
You can see a few differences in my card and the card in the catalog.  For example the major difference between my card and catalog card is the card in the catalog uses the Pine bough dies.  I don't have that bundle so I used the Frosted Frames dies instead.  I used the single die in the set to cut out the branches and leaves using Garden Green Cardstock.  I also have the torn edge but mine is just a little bit more than the card in the catalog.  I am thinking that the catalog card instead of having a torn edge has just a roughed up edge with snips, but I like the torn look.  You can see what I am talking about in the image below.
I have the same heat embossing as the catalog card, but I colored the image in from underneath instead of on top.  I wanted a little more a subtle coloring then what was in the catalog.  I love the candle and the poinsettia.  And wanted a little more attention on the gold embossing.  The sentiment was stamped in versamark ink and covered in white stampin' emboss powder before heat setting.
I stamped the words on the background whisper white piece before layering the vellum image over. I secured this with a little tear & tape.  I also ran my smoky slate ink pad along the torn edge to give a more pronounced edge.  I layered everything up on a Smoky Slate mat and then put it on my Cherry Cobbler Card base.  I hope that I have inspired you a little to try to CASE one of your favorite card designs from the Catalog.

Happy Stampin' 
Rick Adkins 


If you live in the US.  I would love you to choose me as your demonstrator.  If you would like to purchase any of these products you can click on the Shop Now Button or by clicking on any of the images below.  Alternatively, you can also contact me by email to place your order.  Please be sure to use the monthly host code and I’ll send a little something out to you the following month to say Thank You!  


November HOST CODE:  QU2TJBJN
  1. Spend any amount with me this month and receive the Creative Stampers Tutorial Bundle.  Plus get a gift from me in December.
Please remember that if you use the host code you cannot use that order towards my KCRP’s (Kinmon Crafty Reward Points) that would be double dipping and is not allowed.  For more information on KCRP’s click here.  


Three main reasons to Join!  
1.     You Get at least a 20% discount on all your orders while you are a demo.   
2.     You get to join my fun Kinsmon Crafters Team and Private Facebook Group.
3.     Access to directions to all my online classes 

Stampin' Up! Shopping List: 


Price: $10.00

Thursday, November 21, 2019

Hand Painted Holly Card with Watercolor Pencils Video Tutorial

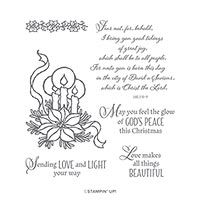
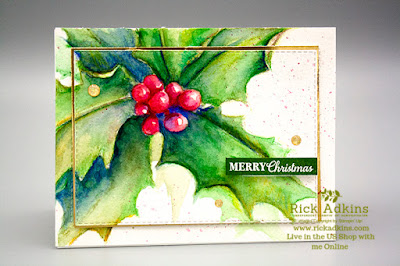
Hello and welcome to my blog; today I am gong to share with you the card that I made last night during my Facebook Live.  This card is also for my 25 Days of Christmas Holiday Card Series 2019.  I created this card using our two sets of watercolor pencils and some watercolor paper.  Here's a look at the card I created.


You may think that creating your own watercolor painting is hard? Or that you have no talent to draw or paint.  I am here to tell you that you couldn't be any further from the truth.  Creating your own hand drawn and painted watercolor holly card is as simple as knowing what shapes to break your image down into and how much pressure to use on your pencils.  The viewer's eyes will read the image as you have intended it to be.  That is one of the reasons you can create images by hand look as you intended.  The biggest thing you have to remember as I mentioned above is breaking images you want to draw down into the basic shapes that comprise the image.  By breaking each berry and leaf down into different shapes you see helps to make the drawing process easier.  
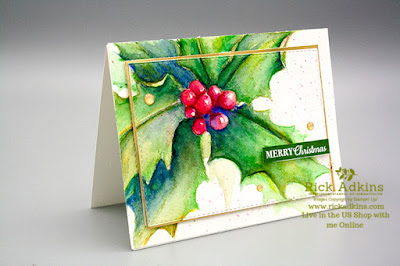
The berries on my card are basic circular shapes.  So by drawing them this way and coloring them in with both real red and cherry cobbler watercolor pencils allows the eye to read them as holly berries.  Our mind knows that holly leaves have spikes on them so they have a pointed end, by drawing them with this pointed triangular end our eyes read them as the actual holly leaf shape.  Drawing is all about putting what shapes you see down on the paper.  But, by adding the colors that our mind knows that these images are helps the viewers mind to read the drawn and painted images as holly leaves and berries.  By adding in the colors that make up the green hue of the holly leaves (blues and yellows) you are creating a move living green hue that will help the eye read as lights and shadows all depending on where you place these colors helping the eyes and mind to read each stroke of the pencil and aqua painter as the actual holly leaf.  
Watercolor pencils are a great medium to achieve the look of not only watercolors but will allow you to break down the image you are trying to create without any hard lines of a graphite pencil.  Watercolor pencils are way more forgiving, once the pencil marks are activated with water the lead becomes pigment that will flow with the water on the paper.  Another tip with using watercolor pencils is the amount of pressure you place on the pencil to the paper.  The heavier you press on the pencil the more pigment you are putting down which means the more pigment you are placing on the paper.  Which also means the darker the color will appear.  If you want a lighter color chock back on the pencil so you have less pressure on it.  Then when you add your water you will have a lighter value of color, because you have less pigment that has been applied to the paper.  
By putting all these little tips together you can create any image that you would like.  Painting and drawing is all about breaking things down to basic shapes, knowing how much pigment to place on the paper, what colors to add together to create different hues and values, and remembering that when something is laying on top of another there is always a shadow and highlight.  These little rules if you remember them will change your painting forever.  

Video Tutorial: 


If you are viewing this post by email you my have to click here or on the image below to view the video.  Not all mail servers will play the embedded video.  
Thanks for dropping by today I hope that you have found my little tips and tricks helpful when you sit down to create your own watercolor painted holly card.  If you haven't tried watercolor pencils yet I would encourage you to do so.  They are a wonderful coloring media that can be used in so many different ways.  
Happy Stampin' 
Rick Adkins 

If you live in the US.  I would love you to choose me as your demonstrator.  If you would like to purchase any of these products you can click on the Shop Now Button or by clicking on any of the images below.  Alternatively, you can also contact me by email to place your order.  Please be sure to use the monthly host code and I’ll send a little something out to you the following month to say Thank You!  

November HOST CODE:  QU2TJBJN
  1. Spend any amount with me this month and receive the Creative Stampers Tutorial Bundle.  Plus get a gift from me in December.
Please remember that if you use the host code you cannot use that order towards my KCRP’s (Kinmon Crafty Reward Points) that would be double dipping and is not allowed.  For more information on KCRP’s click here.  

Three main reasons to Join!  
1.     You Get at least a 20% discount on all your orders while you are a demo.   
2.     You get to join my fun Kinsmon Crafters Team and Private Facebook Group.
3.     Access to directions to all my online classes 
I All Ready Know I Want to Join!  Sign Me UP!

Stampin' Up! Shopping List: 


Sunday, November 17, 2019

Christmas Rose Color Inspiration by Rick Adkins

Hello and welcome to my blog; I am going to share with you another post for my bi-weekly series on Color Inspiration.  You are reading this post as I am returning from OnStage having just gotten my first look at some of the products from the 2020 Occasions Catalog and Saleabration Brochure.  Exciting I know to think about getting a look at some of the new Spring Summer products that will be coming out soon, but I will share more on that as it gets closer.  As I mentioned today's post is all about color inspiration.  Here's a look at the card I made using this weeks inspiration.

Tips & Tricks: 

One of the ways that I find the colors for my cards and projects is from the designer series paper.  I picked my colors based on the Christmastime is Here Speciality Designer Series Paper.  For my card I pulled Cherry Cobbler, Mossy Meadow, Gold and Whisper White from the paper but added in Crumb Cake, and Smoky Slate just for fun.  See that's the great thing about designing you can use whatever color you pick.  
One thing to make your cards tied together just by color use is by repeating the colors at least three times.  As for example here you will see Mossy Meadow used at least five times.  Which acts as my tie in color for everything else.  I used white three times, and the reds three times.  Gold, Crumb Cake and Smoky Slate are supporting colors.  These three colors help add interest to the color scheme.  
By picking colors from designer series paper it makes it super easy to come up with colors to use in your projects.  Once you pick out at least a couple colors from the designer series paper you can either add a few other colors from the paper.  But, you can also add colors that you know from experience that coordinate with the other colors you have picked.   
I do have to mention that the products in the Christmastime is Here suite are only available for a limited time, or while supplies last.  If I don't mention this fact again each time I share these projects this month then I am not doing my job or doing justice to you.  
Happy Stampin' 
Rick Adkins 

If you live in the US.  I would love you to choose me as your demonstrator.  If you would like to purchase any of these products you can click on the Shop Now Button or by clicking on any of the images below.  Alternatively, you can also contact me by email to place your order.  Please be sure to use the monthly host code and I’ll send a little something out to you the following month to say Thank You!  

November HOST CODE:  QU2TJBJN
1.     Spend any amount with me this month and receive the Creative Stampers Tutorial Bundle.  Plus get a gift from me in December.
Please remember that if you use the host code you cannot use that order towards my KCRP’s (Kinmon Crafty Reward Points) that would be double dipping and is not allowed.  For more information on KCRP’s click here.  


Three main reasons to Join!  
1.     You Get at least a 20% discount on all your orders while you are a demo.   
2.     You get to join my fun Kinsmon Crafters Team and Private Facebook Group.
3.     Access to directions to all my online classes 

Stampin' Up! Shopping List: 


Template Designed by creativeworkerbee