Thursday, February 13, 2020

OSAT February Blog Hop: Sixteen Candles

Hello and welcome to my blog; today I am going to share with you may projects for the February 2020 One Stamp At a Time Blog Hop; this month our theme was Sixteen Candles.  So I came up with a super cute birthday card and gift box for you.  I used the Forever Blossoms Bundle and other products from the Parisian Blossoms Suite from the Stampin' Up! January through June Mini Catalog.  I created a Double Hidden Magnetic Closure Flip Top Box for my 3D project and a super cute card.  Here's a look at my project. 

Happy Birthday Card: 

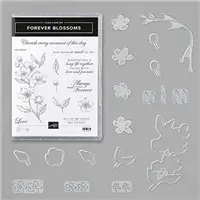
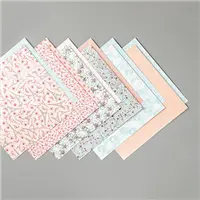
I started out by designing the card for my project first.  I wanted to use the designer series paper but I also wanted the floral branch to be dominate on my project.  So I decided on a peek a boo design.  I started out by stamping and coloring two of the cherry blossoms from the Forever Blossoms Bundle.  I used my Crumb Cake, Petal Pink, and Pool Party Stampin' Blends Combo packs to color each of the cherry blossoms.  Once that was done I cut them out with the matching dies.  I also marked off on my designer series paper where I wanted the blossoms to fit and did partial die cutting to have a place to place the blossoms.  My card base is a 4 1/4 x 11 piece of Crumb Cake cardstock that I scored at 5 1/2 to make a A2 size top folding card.  I then added the designer series paper to the top and bottom sections.  After that I popped the two Cherry Blossoms up in place on Dimensionals.  To finish off the card I die cut the words happy and birthday from the Well Said Dies and placed them on the center of the card.  


 Forever Blossoms Double Magnetic Closure Flip Top Box:

For my box I came up with the design based off my card.  I knew that I wanted it to have the same Peek a boo feel, but it was a matter of figuring out just how to do it.  I knew I wanted the designer series paper to be a feature on the card just like I did with the card.  So I came up with the Flip top box.  The base of the box is Crumb Cake cardstock while the top of the box is the Parisian Blossoms Speciality Designer Series Paper.  Once I had the design figured out it was pretty easy as you will see in the video tutorial.  I used one sheet of cardstock for the box.  One cut at 4 1/4 x 11 and the other half I cut down to 5 1/2 x 4 1/4.  Once I assembled the pieces and added the 4 1/4 x 10 piece of DSP I added the magnets and floral accents.  The ribbon around the box is purely decorative.  

Video Tutorial: 

You may have to click here for the video if you are viewing this in your email.  Or click on the image below.  

If you are viewing this post on my word press site you will have to click here to see the blog roll! 

Blog Roll: 


Thanks for dropping by if you need any of the supplies that you have seen today you can pick them up in my online store by clicking on the items in the shopping list below.

Stampin' Up! Shopping List: 

Happy Stampin' 
Rick Adkins 


***Remember, if you put in an order ($40 minimum before taxes and shipping) by 
Monday, February 17th, 2020 at midnight, 
I'll send you all three make and takes for free! 
But, your order MUST be in by Tuesday at midnight!! 
You must use Host/Hostess Code AGA9YBUB.


Join my NEW Online Technique & Fancy Fold Club!  You can find out all the details by clicking here!

Last day to sign up for my Monthly Card Club by February 20, 2020!  Sign up and learn more about Card club by clicking here!  February's featured stamp set is the Morning Star Stamp Set.  Stamps sets are not included in the club but may be purchased using the host code as an add on.  Or you may use something you already own.  


Receive the January Creative Stampers Tutorial Bundle with any size order!  Features 17 projects designed by Stampin' Up! demonstrators from around the world.  This month we all featured a item in the Sale-a-bration Brochure.  

Wednesday, February 12, 2020

Facebook Live Weekly Mini Class - Pedal To the Metal

Hello everyone, it's time for this weeks Facebook Live Mini Class!  This week I am going to share with you three projects featuring the Pedal to the Metal Stamp Set from the  January - June Mini Catalog & a couple products from the 2020 Saleabration Brochure.


Saleabration is Stampin' Up!'s biggest Sale of the year; where you get rewarded with free items based on your orders.  There are two different levels as the last few year.

During this weeks Facebook Live Mini Class I am going to be making three fun high racing masculine themed projects with you.  I decided to use one of my favorite new stamp sets in this mini class.  I just love everything about this stamp set and it's so unlike me.  I get asked all the time about masculine cards so I thought it was only fitting to use the Pedal to the Metal stamp set will give your greeting card wheels. Designed to appeal to a masculine audience, these stamps are perfect for projects for the men in your life.

Image by Stampin' Up! 


 In case you've never joined me for Facebook Live, I go live every week, (typically on Wednesday at 8:00 pm CST) on my Facebook business page with one to three projects.  On the second Wednesday of the month I will be doing my Facebook Live mini Class at 4 pm CST due to scheduling conflict.  Everyone is welcome to join!

If you were unable to join me live I will have uploaded the video here afterwards.  If you are viewing this post by email you may have to click here to see the video.  


This Weeks Projects: 


First we will make this fun little card that features not only the beautiful Parisian Blossoms Speciality Designer Series Paper and some new punches but the Sale-a-bation stamp set Thoughtful Blossom and matching Small Bloom Punch.


  You can check the PDF for the measurements.  


They have all the products I used and measurements for each project.

***Remember, if you put in an order ($40 minimum before taxes and shipping) by 
Monday, February 17th, 2020 at midnight, 
I'll send you all three make and takes for free! 
But, your order MUST be in by Tuesday at midnight!! 
You must use Host/Hostess Code AGA9YBUB.


Join my NEW Online Technique & Fancy Fold Club!  You can find out all the details by clicking here!

Last day to sign up for my Monthly Card Club by February 20, 2020!  Sign up and learn more about Card club by clicking here!  February's featured stamp set is the Morning Star Stamp Set.  Stamps sets are not included in the club but may be purchased using the host code as an add on.  Or you may use something you already own.  


Receive the January Creative Stampers Tutorial Bundle with any size order!  Features 17 projects designed by Stampin' Up! demonstrators from around the world.  This month we all featured a item in the Sale-a-bration Brochure.  


Positive Thoughts Bouquet for #PCC370

Hello and welcome to my blog; today I am going to share with you the card that I created for the Paper Craft Crew Inspirational Challenge this week.  The inspirational piece this week has a very Spring like feel to it, or even could be used for a wedding.  I picked the Positive Thoughts Stamp Set for the main focus of my card.  Positive thoughts are exactly what you get in the Positive Thoughts Stamp Set. Use the images and phrases in these stamps to create a bouquet of affirmation for someone you love.  Here's a look at my project.


Here's a look at this week's inspiration image. You can click here to visit the Paper Crafts Crews Site and check out what the other design team members came up with.

Tips & Tricks: 

I started out my using my Sponge Brayer and inked up the card base made from a 4 1/4 x 11 Thick Whisper White Cardstock.   I didn't do a very heavy coat of the inks that I used because I knew I was going to come back and add the geometric shape from the Pattern Party Decorative Masks and do another layer of ink blending.  I used the following colors on my card and I am going to list what I used for ink blending first then the two greens for the flower bouquet.  Poppy Parade, Pumpkin Pie, Pineapple Punch, (ink blending) Garden Green & Granny Apple Green inks.  

After the ink blending it was time to do a little stamping.  I stamped all the images on Whisper White Cardstock.  I stamped the flowers from the Positive Thoughts Stamp Set first.  I did a little first and second generation stamping for the flowers because I wanted a couple that was just a little lighter than just straight Poppy Parade.  This is a great way to get more mileage from your ink pads.  I then stamped the foliage from the stamp set in Garden Green and Granny Apple Green Inks.  I then stamped the butterfly in Pineapple Punch Ink.  Now I will go ahead and tell you that currently as part of the Coordinating Product Release there are matching dies (Nature's Thoughts Dies) for this stamp set.  Now I do not have these dies because when I ordered the products in the Coordinating Product Release I forgot to order this one set (Head Smack!)  So since I didn't order them I had to fussy cut out each of the stamped images with my Paper Snips.  In reality it really didn't take to long to do, but could have gone much faster with the dies.  


After cutting everything out I started my arranging of all the pieces.  I used a trangliur arrangement to place the flowers and foliage.   I cut some of the foliage smaller and piecemealed them into the arrangement.  Once I had my arrangement set it was time to start gluing things down.  I used a combination of Multipurpose Liquid Glue and Stampin' Dimensionals to attach everything.  I popped two of the flowers up on Dimensionals along with the butterfly.  I also added a dimensional under the end of one of the foliage pieces to add just a little lift them so they were not all just glued down flat.  


To finish off my card I stamped my sentiment onto some Basic Black Cardstock with Versamark ink so that I could add my White Stampin' Embossing Powder before heat setting.  Once I had my sentiment heat set I cut into two pieces so I could add a little more interest to my card.  I then added the finishing touch to the card but didn't want anything to over powering; finally I decided on the Gold Glitter Enamel Dots that was part of the Christmastime is Here Suite that was released in November.  These little glittering golden bits of fun add just the right touch to finish off my card.  They are not to big, not to small, but just right as Goldie Locks said.  

Thanks for dropping by today!  I hope that you will take a little time and play along with this weeks Paper Craft Crew Challenge.  You will find the entire shopping list of supplies that I used listed below.  
Happy Stampin' 
Rick Adkins 


Join my team during Saleabration and you will get the super cute Mini Cutter and the DSP Sampler Pack free in your Starter Kit along with a Free Paper Pumpkin, Business Pack, a FREE Stamp Set of your Choice in addition to the $125 of product of your choice for $99.00 with Free Shipping.  That's $277.75 of products and supplies for only $99.00 (Price includes the Well Said Stamp Set (most expensive in catalog) plus 9% sales tax) 


Receive the February Creative Stampers Tutorial Bundle with any size order!  This month our tutorial bundle has 17 tutorials  featuring projects using Sale-a-bration Items!  

Stampin' Up! Shopping List: 


Template Designed by creativeworkerbee