Showing posts with label box. Show all posts

Tuesday, February 1, 2022

Long Candy Bar Box - Blessings of Home

Hello and welcome to my blog; today I am going to share with you a fun little box.  Well, I say it's small but it's actually a rather larger box.  It will hold a large skinny chocolate bar or six fun-size candy bars.  Here's a look at the box.  

Check out this long candy bar box using the Blessings of Home Bundle and Heart & Home Designer Series Paper.

Wednesday, October 6, 2021

Double Lidded Drapery Fold Butterfly Box - Creative Stampers Blog Hop

Hello and welcome to my blog; today I am sharing my project for this months Creative Stampers Blog Hop.  Each month the Creative Stampers create a project for the Creative Stampers Tutorial Bundle based around a theme, bundle, or suite of products.  Each month we do a blog hop featuring an alternative project for the project that we designed for the tutorial bundle.  Here's a look at my alternative for this month.  

Check out this double lidded drapery fold butterfly box for the October 2021 Creative Stampers Blog Hop

Friday, July 16, 2021

Sweet Strawberry Expolsion Box

Hello and welcome to my blog; today I have a super cute project to share with you using the Sweet Strawberry Stamp Set and matching Strawberry Builder Punch.  I created an expulsion box for you today.  The Strawberry Builder Punch was super poplar that it sold out for awhile and finally Stampin' Up! got more back in stock!  So, I wanted to share this project with you today.  Here's a look at my project.  

Check out this Explosion Box using the Sweet Strawberry Bundle and Pattern Party Host Designer Series Paper from Stampin' Up!

Thursday, March 19, 2020

Peaceful Moments Lidded Poppy Box

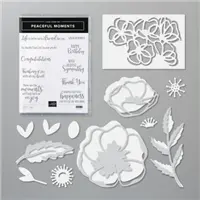
Hello ans welcome to my blog; today I am going to share with you my Lidded Poppy Box, that I made.  I used the Peaceful Moments Bundle for my flower and sentiment and created this super cute little box for you today.  The Peaceful Moments Bundle includes the Peaceful Moments Stamp Set and the Poppy Moments Dies.  Create fancy, layered die-cut poppies, leaves, and more to add beauty and depth to your handmade cards, scrapbooks, journals, and other paper crafts using the Poppy Moments Dies. Pair the dies with the coordinating Peaceful Moments Stamp Set to add heartfelt sentiments to your projects for birthdays, congratulations, sympathy, thank you, and more.  Here's a look at today's project.

Tips & Tricks: 

To created the multi colored flower on the top of my box I used the Peaceful Moment Dies and cut out all the pieces of cardstock.  I used scraps to create the flower.  As far as cardstock goes I used scraps of Daffodil Delight, Mango Melody, for the flower and Mossy Meadow and Old Olive for the leaves.  I did a little sponging of the colors onto the cardstock to create the different values.  I also added a little Whisper White Craft Ink for the highlights.  I used a sponge dauber to get into the areas and sponged on the ink.  Once all the inking was completed and dried I glued everything together with a little liquid glue.  


I then created my box top and base with a little cardstock and put them together with a little Tear & Tap.  The box was a basic box construction so nothing fancy there.  The base was created from a 8 x 8 piece of Daffodil Delight cardstock and the top was made from a 6 x 6 piece of Thick Whisper White Cardstock.  I wrapped a little of the Daffodil Delight Ruched Ribbon around the top and tied it into a pretty little knot so it would stay in place.  You can add a few mini glue dots under the ribbon if you don't want it to move at all.  


Once the box was completed I added the poppy with a few Stampin' Dimensionals.  I then created a double fish tail banner for my sentiment which comes from the Peaceful Moments Stamp Set in Mango Melody Ink.  Greetings, greetings, and more greetings. Whatever the situation, the Peaceful Moments Stamp Set has the words you need to express your thoughts.  I thought this made for a prefect little gift box for someone.  Thanks for dropping by today I hope that you have a wonderful day and stay safe.  If you need any of the supplies you can order them in my online store by clicking on the item below.  
Happy Stampin'
Rick Adkins


Use the March Host Code on any order of $50 (before taxes & shipping) or more during the month and receive a gift from me in April as a Thank You.  If your order is $150 or more, please don't use the host code.  You will forfeit your Stampin' Rewards if you do; and I want you to get those rewards.


If you place any size order with me during the month of March, you will receive the March Creative Stampers Tutorial Bundle from me as a little thank you.  This month's tutorial bundle features fourteen floral themed tutorials.  The Creative Stampers Tutorial Bundle can either be earned for FREE with any size order or Can be purchased for $20 from me.

Stampin' Up! Shopping List: 


Thursday, February 13, 2020

OSAT February Blog Hop: Sixteen Candles

Hello and welcome to my blog; today I am going to share with you may projects for the February 2020 One Stamp At a Time Blog Hop; this month our theme was Sixteen Candles.  So I came up with a super cute birthday card and gift box for you.  I used the Forever Blossoms Bundle and other products from the Parisian Blossoms Suite from the Stampin' Up! January through June Mini Catalog.  I created a Double Hidden Magnetic Closure Flip Top Box for my 3D project and a super cute card.  Here's a look at my project. 

Happy Birthday Card: 

I started out by designing the card for my project first.  I wanted to use the designer series paper but I also wanted the floral branch to be dominate on my project.  So I decided on a peek a boo design.  I started out by stamping and coloring two of the cherry blossoms from the Forever Blossoms Bundle.  I used my Crumb Cake, Petal Pink, and Pool Party Stampin' Blends Combo packs to color each of the cherry blossoms.  Once that was done I cut them out with the matching dies.  I also marked off on my designer series paper where I wanted the blossoms to fit and did partial die cutting to have a place to place the blossoms.  My card base is a 4 1/4 x 11 piece of Crumb Cake cardstock that I scored at 5 1/2 to make a A2 size top folding card.  I then added the designer series paper to the top and bottom sections.  After that I popped the two Cherry Blossoms up in place on Dimensionals.  To finish off the card I die cut the words happy and birthday from the Well Said Dies and placed them on the center of the card.  


 Forever Blossoms Double Magnetic Closure Flip Top Box:

For my box I came up with the design based off my card.  I knew that I wanted it to have the same Peek a boo feel, but it was a matter of figuring out just how to do it.  I knew I wanted the designer series paper to be a feature on the card just like I did with the card.  So I came up with the Flip top box.  The base of the box is Crumb Cake cardstock while the top of the box is the Parisian Blossoms Speciality Designer Series Paper.  Once I had the design figured out it was pretty easy as you will see in the video tutorial.  I used one sheet of cardstock for the box.  One cut at 4 1/4 x 11 and the other half I cut down to 5 1/2 x 4 1/4.  Once I assembled the pieces and added the 4 1/4 x 10 piece of DSP I added the magnets and floral accents.  The ribbon around the box is purely decorative.  

Video Tutorial: 

You may have to click here for the video if you are viewing this in your email.  Or click on the image below.  

If you are viewing this post on my word press site you will have to click here to see the blog roll! 

Blog Roll: 


Thanks for dropping by if you need any of the supplies that you have seen today you can pick them up in my online store by clicking on the items in the shopping list below.

Stampin' Up! Shopping List: 

Happy Stampin' 
Rick Adkins 


***Remember, if you put in an order ($40 minimum before taxes and shipping) by 
Monday, February 17th, 2020 at midnight, 
I'll send you all three make and takes for free! 
But, your order MUST be in by Tuesday at midnight!! 
You must use Host/Hostess Code AGA9YBUB.


Join my NEW Online Technique & Fancy Fold Club!  You can find out all the details by clicking here!

Last day to sign up for my Monthly Card Club by February 20, 2020!  Sign up and learn more about Card club by clicking here!  February's featured stamp set is the Morning Star Stamp Set.  Stamps sets are not included in the club but may be purchased using the host code as an add on.  Or you may use something you already own.  


Receive the January Creative Stampers Tutorial Bundle with any size order!  Features 17 projects designed by Stampin' Up! demonstrators from around the world.  This month we all featured a item in the Sale-a-bration Brochure.  

Template Designed by creativeworkerbee