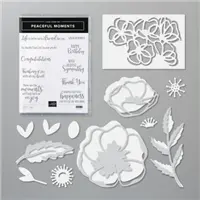
Hello and welcome to my blog; today I have a beautiful sympathy card to share with you. I used the Peaceful Moments Bundle from the January-June Mini Catalog to create my card. I also used the die cut coloring hack that I shared last week to do this card. At the end of this post you will find all the sizes and dimensions for my card as well as the supplies that I used. Sympathy cards are never a fun thing to make but they are something that we have to have. I was asked last week by a follower to share one, and I just had happened to make this card. Here's a look at my card.
Whatever the situation, the Peaceful Moments Stamp Set has the words you need to express your thoughts even Sympathy. Sometimes it's hard to find the perfect sentiment no matter the occasion but the Peaceful Moments Stamp Set has one that's surely perfect for whatever you need. I used the Peaceful Poppies Designer Series Paper for the background of the card. I added a sentiment strip at the bottom of the card and one of the Poppy die cuts from the matching dies.
I used ink and a sponge dauber to add additional color to each element of the Poppy Die cuts. For the base of the poppy I used Very Vanilla cardstock, but for the outline layer I used whisper white cardstock. I inked the center up with daffodil delight ink, and the edges with Whisper White craft ink. The leaves where put together with old olive and pear pizzazz cardstocks.
Sizes & Dimensions:
Thick Whisper White - 4 1/4 x 11 scored at 5 1/2
Whisper White Cardstock - 3 x 3, 1 1/2 x 4
Pear Pizzazz Cardstock - 3 x 5, 4 1/8 x 5 3/8
Old Olive Cardstock - 3 x 5
Very Vanilla Cardstock - 3 x 3
Peaceful Poppies Designer Series Paper 4 x 5 1/4
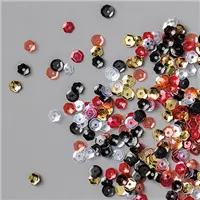
I layered the card front onto a piece of Pear Pizzazz mat and then placed everything onto a Whisper White Thick card base. I added a few of the Poppy Sequins just to add a little sparkle. Thanks for dropping by, if you need any of the supplies I've used today you can pick them up in my online class.
Join my team during Saleabration and you will get the super cute Mini Cutter and the DSP Sampler Pack free in your Starter Kit along with a Free Paper Pumpkin, Business Pack, a FREE Stamp Set of your Choice in addition to the $125 of product of your choice for $99.00 with Free Shipping. That's $277.75 of products and supplies for only $99.00 (Price includes the Well Said Stamp Set (most expensive in catalog) plus 9% sales tax)
Receive the January Creative Stampers Tutorial Bundle with any size order!
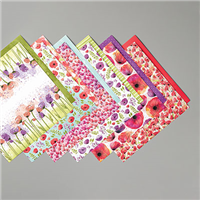
Hello and welcome to my blog; today I am going to share with you a card made with two Saleabration Items from the 2020 Sale-a-bration Brochure. Saleabration is the best time of the year at Stampin' Up!, It's the time of year that you are rewarded for every $50 increment that you purchase before shipping and taxes. I used the Power of Hope stamp set that's part of the Power of Hope Bundle, and the Lily Impressions Designer Series Paper on my card today. In my opinion these are the perfect pair to create with. Here's a look at my card.
The Power of Hope Bundle includes the Power of Hope Cling Stamp Set and Stone 3D Embossing Folder. Pair the stamp set and embossing folder for artistic coordination, or use them separately for even more options. Earn this craft bundle FREE with a qualifying purchase January 3–March 31, 2020, during our Sale-A-Bration promotion! Impressionistic images in rich colors make the Lily Impressions Designer Series Paper an excellent choice for elegant backgrounds and accents on handmade cards and scrapbook pages. Earn this beautiful paper FREE with a qualifying purchase January 3–March 31, 2020, during our Sale-A-Bration promotion!
I picked the colors of my cards from the Lily Impressions Designer Series Paper. There are a ton of wonderful colors in this pack of paper. One of the great things about Stampin' Up!'s designer series paper is that you can then use the colors in it to add the coordinating cardstock, ink and embellishments to your projects without fear that they may not match as with some other companies products. Stampin' Up! is known for their color coordination so you can play with everything that's offered in our catalogs and know without a doubt that they will match. This was a big reason that I decided to join as a demonstrator almost five years ago.
After cutting my designer series paper down to 5 1/4 x 4 I needed to put a layering piece behind it. For my layers on my original card I picked Coastal Cabana. I cut one layer at 4 1/8 x 5 3/8, and cut my scalloped square from a scrap piece using the Layering Square Dies. I also cut a stitched square from Whisper White Cardstock to stamp on.
I repeated these same process for the card that I made in the video but changed up the color and the pattern of the Designer Series Paper. For the second card I used Grapefruit Grove. The stamping was all done the same. I added the Whisper White Crinkled Seam Binding to the card front to add a little more texture.
On the inside of each card I stamped the geisha from the Power of Hope stamp set in the inside as soon as you open the side folding card. I stamped her in Grapefruit Grove on both cards. You can see a little peak of her on the inside with this photo.
Video Tutorial:
If you are viewing this post by email you may not be able to see the embedded video. If so you will need to click here or on the image below to view the video.
Sizes & Dimensions:
Thick Whisper White Cardstock 4 1/4 x 11 scored at 5 1/2
Coastal Cabana or Grapefruit Grove Cardstock - 5 3/8 x 4 1/8, 3 x 3 (for scalloped squares)
Whisper White Cardstock - 3 x 3
Thanks for dropping by today, I hope that you been inspired by my card today. If you order everything that I used to make today's card it will cost you around $131.00 so you could get the Power of Hope bundle as your free Sale-a-bration item. If you add in $19.00 more dollars you will be able to pick the Power of Hope Bundle and the Lily Impressions Designer Series Paper as your Free Saleabration items.
Join my team during Saleabration and you will get the super cute Mini Cutter and the DSP Sampler Pack free in your Starter Kit along with a Free Paper Pumpkin, Business Pack, a FREE Stamp Set of your Choice in addition to the $125 of product of your choice for $99.00 with Free Shipping. That's $277.75 of products and supplies for only $99.00 (Price includes the Well Said Stamp Set (most expensive in catalog) plus 9% sales tax)
Receive the January Creative Stampers Tutorial Bundle with any size order!
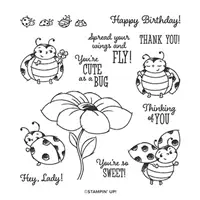
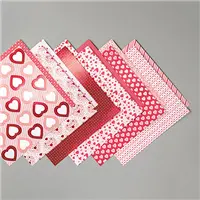
Hello and welcome to my blog; today I am going to share with you the super cute card that I made as my January Thank You Cards. I used the From My Heart Specialty Designer Series Paper and the super cute and fun Little Ladybug Stamp Set to create my cards. The Designer Series Paper features foil accents and the Little Ladybug stamp set is a Saleabration Host Set (which can only be earned with a qualifying order or party of $300 or more. Here's a look at my card.
I started off by cutting all my card bases into 5 1/2 x 8 1/2 and then scored them at 4 1/4 to make a standard A2 card base. Once I had all the card bases done with my Real Red Cardstock I then cut my Designer Series Paper. The Designer Series paper was cut at 4 x 5 1/4 and I attached them to the front of the card bases with a little liquid glue.
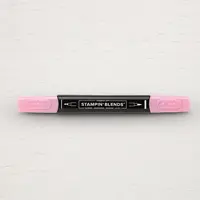
I only made ten of this design because I have found that after that many of the same thing I am bored with that design and ready to move on to something else. So after putting my paper on the card bases I cut out some stitched nested labels and stamped my ladybugs and colored them with Real Red Stampin' Blends.
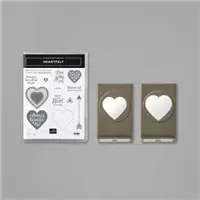
After all the coloring was complete I attached them to the card fronts using Multipurpose Liquid Glue. I then punched out the two different heart designs on the the designer series paper using the Heart Punch Pack which are part of the Heartfelt Bundle. I stamped my sentiment on the scalloped heart in Real Red Ink before punching each one out.
So after all the punching I had enough hearts to do all my cards. So I laid them all out to look at them and see if I needed anything else for my cards.
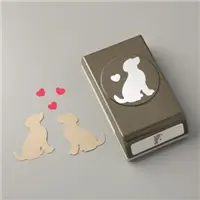
Once I had everything laid out and looked at everything I decided that it needed another heart, but I didn't want a large one. I thought that the smaller heart would work just great and not over power the card but add to it. So I pulled out my Dog Builder Punch and the scraps from the larger hearts and went around and punched out enough of the smaller ones to make my cards. The heart in the dog punch is the perfect size to do the small ones and it almost fit the red little heart in the design above.
After everything was put together I decided that the large hearts needed to be popped up well the scalloped one anyway. So I attached the regular heart with liquid glue and used a couple stampin' dimensionals on the scalloped heart with my sentiment. I attached the small dog punch heart with a mini glue dot.
Thanks for dropping by today I will see you again tomorrow with a new project and video tutorial.


 Crinkled Seam Binding Ribbon")