Thursday, January 16, 2020

Peaceful Moments Thank You Cards

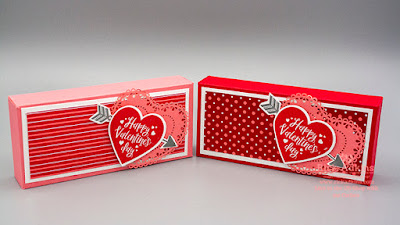
Hello and welcome to my blog; today I am going to share with you the card that I made during last nights Facebook Live.  I go live every Wednesday night at 8 pm CST if you have never joined me.  This week I featured the Peaceful Moments Bundle from Stampin' Up! and showcased a Double Dry Embossed Technique and a way to coloring hack for die cuts.  Here's a look at my cards.

Tips & Tricks: 

I did the Flirty Flamingo version before the live, and did the Blackberry Bliss version during.  With the coloring hack you can see a lot of different color values.  The thing is all the die cut flower and leaves are one color cardstock.  Well the leaves was done with Old Olive and Pear Pizzazz Cardstocks.  I absolutely love the Poppy Moments Dies and all the wonderful floral creations that can be made with the dies and just some cardstock.  I created the multi-colored look with some ink and my sponge daubers.  For the Blackberry Bliss Poppy I used Blackberry Bliss ink in the center and Whisper White Craft Ink on the outside.  The craft ink makes the cardstock a little lighter so you naturally have a different hue.  
I did the same thing with the Flirty Flamingo version of the card but just used Flirty Flamingo ink in the center.  I also changed up the Designer Series paper and picked a pattern that had the Flirty Flamingo in it.  I used the same packs of Designer Series paper as the other card.  I used the Peaceful Poppies Designer Series Paper from the Mini Catalog; and the Golden Honey Saleabration Speciality Paper as the other.  
As far as the Double Dry Embossing technique it's super easy.  The main thing is that you have to have one that's not as strong of an emboss as the other.  I used the Subtle 3d Embossing Folder first and then used the Country Floral 3d embossing folder next.  

Video Tutorial: 

If you are viewing this post by email you will have to click here or click on the image below to view the video.  
Thanks for dropping by today I hope that you find this video tutorial and project helpful and that you will give it a try.  You can find all the supplies that I used below in the shopping list. 
Happy Stampin' 
Rick Adkins 


Join my NEW Online Technique & Fancy Fold Club!  You can find out all the details by clicking here!

Receive the January Creative Stampers Tutorial Bundle with any size order!


Product List

Tuesday, January 14, 2020

Geared Up Garage - Creative Crafting Uncles Design Team


Hello and welcome to my blog I am excited to share with you my first post as part of the Creative Crafting Uncles Design Team.  Each month we will be bringing you a new challenge on the 15th.  This month the theme was CARS.  There are design team members from all over.  Here's a look at my card.

For my card today I went very minimalistic!  I know very unlike me.  I wanted to do something that was very striking but very graphic at the same time.  So I stamped the car from the Geared Up Garage Stamp Set from Stampin' Up! in Tuxedo black ink onto a piece of Thick Whisper White cardstock cut down to 4 3/4 x 3 1/2".  Once I had the car on there I took a die and draw a circle around the card.  I then used my ruler to add some graphic lines that intersected the circle but didn't go inside.  Once I had the lines done I colored one in black and one in gray.  I decided to leave the third the white of the paper for visual interest. 
I added some black splitters with my Basic Black Stampin' Write marker and then stamped the nuts from the stamp set to add a little triangle design.  I finished off my card by stamping the sentiment in Tuxedo black ink under the car.  I then added my focal piece to a card base with Stampin' Dimensionals to add an additional layer and a little more subtle visual interest to the card.  My card base was made from Thick Whisper White  cut at 4 1/4" x 11" scored at 5 1/2".

I hope that you have fun with this challenge and that you will take a little time and play along.  You can do so by clicking here and visiting the Creative Crating Uncles Blog.  Thanks for dropping by I will see you later.
Happy Stampin' 
Rick Adkins 


Join my NEW Online Technique & Fancy Fold Club!  You can find out all the details by clicking here!

Receive the January Creative Stampers Tutorial Bundle with any size order!

Shopping List: 


From My Heart Be My Valentine Little Debbie Treat Box

Hello and welcome to my blog; today I am going to share with you a project that I think you can totally use especially if you need to make some treats for your child's classroom for Valentine's day or for a view coworkers to show you are thinking about them.  I came up with this super cute inexpensive treat idea using products from the From My Heart Suite from the 2020 January - June Mini Catalog.  And, the best part is the treats that fit inside are little snack cakes from Little Debbie I used the Be My Valentine Cakes.  The super cute little heart shaped snack cakes!  And they have Flirty Flamingo icing on them!  So it was perfect.  And the even better part was they are super easy to make, and you could fold them flat and store them until you need them.  Here's a look at my project.

Tips & Tricks: 

To make this top opening box you will need either a piece of Real Red or Flirty Flamingo Cardstock cut at 7 1/2" x 8 1/2".  On the 7 1/2" (short) side you are going to score at 2 1/2, 3 1/2, 6 & 7.  On the 8 1/2" (long) side you are going to score at 1 /2", 1 1/2", 7, & 8.  The long side of the box is the side that the flaps will open and close.  Once all the score lines are folded and burnished you will do your cutting.    You can watch the video for complete cutting and assembly instructions.  
The box measures when complete 2 1/2" x 1" x 5 1/2".  So it's a nice size box.  You can fit so much more in it then just the little debbie snack cakes if you wanted to.  If you are using the little debbie cakes it will fit one pack of the Be My Valentine Snake Cakes pictured above.  You get 5 or the two packs in a box for a couple bucks.  So really cost effect to give.  It's also a great way to dress up a simple little item.  And really who doesn't like Little Debbies?  I love them and I am almost 46 years old.  
I used the Heartfelt bundle to create the sentiment on the outside of the box, and the From My Heart Specialty Designer Series paper along with the Heart Shape Doilies to dress up the box.  I cut my DSP down to 2 x 5" and matted them on a piece of 2 1/4 x 5 1/4" whisper white cardstock.  I used a scrap piece of whisper white cardstock to stamp the heart in Real Red Ink and punched it out using one of the matching Heart punches from the Bundle.  I stamped the arrow in Basic Gray ink and cut it out by hand.  I added the doily to the front of the box with a little snail adhesive and then added the arrow with mini glue dots.  I popped the heart up on the box with a couple stampin' dimensionals.  

Video Tutorial: 

If you are viewing this post by email you will  have to click here or the image below to view the video.  Not all mail servers will show the embedded video.
 Thanks for dropping by today!  I hope you give this project a try if you need any of the supplies you can order them in my online store by clicking on the item in the shopping list below.  You can also email me your list or text me 1 (256) 393-2795 if you are in the US.
Happy Stampin' 
Rick Adkins 


***Remember, if you put in an order ($35 minimum) by 
Tuesday, January 14th, 2020 at midnight, 
I'll send you all three make and takes from this weeks Facebook Live Mini Class for free! 
But, your order MUST be in by Tuesday at midnight!! 
You must use Host/Hostess Code 3PN3UVRP.


Join my NEW Online Technique & Fancy Fold Club!  You can find out all the details by clicking here!

Receive the January Creative Stampers Tutorial Bundle with any size order!


Product List
Paper Snips
[103579]
$10.00

Template Designed by creativeworkerbee