Monday, January 20, 2020

From My Heart Little Ladybug Card

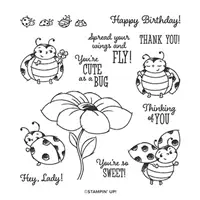
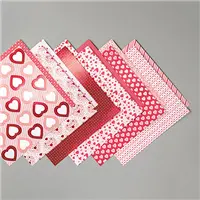
Hello and welcome to my blog; today I am going to share with you the super cute card that I made as my January Thank You Cards.  I used the From My Heart Specialty Designer Series Paper and the super cute and fun Little Ladybug Stamp Set to create my cards.  The Designer Series Paper features foil accents and the Little Ladybug stamp set is a Saleabration Host Set (which can only be earned with a qualifying order or party of $300 or more.  Here's a look at my card.

I started off by cutting all my card bases into 5 1/2 x 8 1/2 and then scored them at 4 1/4 to make a standard A2 card base.  Once I had all the card bases done with my Real Red Cardstock I then cut my Designer Series Paper.  The Designer Series paper was cut at 4 x 5 1/4 and I attached them to the front of the card bases with a little liquid glue.
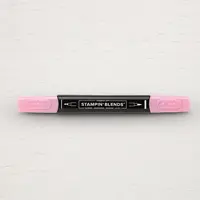
I only made ten of this design because I have found that after that many of the same thing I am bored with that design and ready to move on to something else.  So after putting my paper on the card bases I cut out some stitched nested labels and stamped my ladybugs and colored them with Real Red Stampin' Blends.
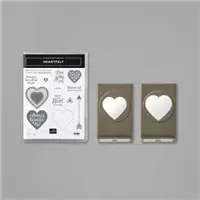
After all the coloring was complete I attached them to the card fronts using Multipurpose Liquid Glue.  I then punched out the two different heart designs on the the designer series paper using the Heart Punch Pack which are part of the Heartfelt Bundle.  I stamped my sentiment on the scalloped heart in Real Red Ink before punching each one out.
So after all the punching I had enough hearts to do all my cards.   So I laid them all out to look at them and see if I needed anything else for my cards.  
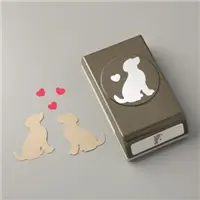
Once I had everything laid out and looked at everything I decided that it needed another heart, but I didn't want a large one.  I thought that the smaller heart would work just great and not over power the card but add to it.  So I pulled out my Dog Builder Punch and the scraps from the larger hearts and went around and punched out enough of the smaller ones to make my cards.  The heart in the dog punch is the perfect size to do the small ones and it almost fit the red little heart in the design above.
After everything was put together I decided that the large hearts needed to be popped up well the scalloped one anyway.  So I attached the regular heart with liquid glue and used a couple stampin' dimensionals on the scalloped heart with my sentiment.  I attached the small dog punch heart with a mini glue dot.
Thanks for dropping by today I will see you again tomorrow with a new project and video tutorial.
Happy Stampin' 
Rick Adkins 

Stampin' Up! Shopping List: 

Sunday, January 19, 2020

From My Heart Case the Catalog

Hello and welcome to my blog; today I am going to share with you another card that I received in the CASE the Catalog swap I took part in.  CASE stands for Copy and Share Everything or Copy and Selectively Edit.  Casing is a great way to take a design in the catalog and either recreate it just as you see it or use it as the base of the design and change things up a little.  This is a super cute card and came from page 8 of the January - June Mini Catalog.  On the very first page of the From My Heart Suite.  Here's a look at the card.

This super cute card features the From My Heart Speciality Designer Series Paper.  There's four different designer series paper designs featured on this card.  This is one of those card designs that will allow you to use up your designer series paper.  But, it's okay you can order more.  The From My Heart Speciality Designer Series Paper features playful heart patterns that have red and pink foil accents on some designs.  Some images from the paper can be cut out using the Heart Punch Pack. This paper is excellent for valentines, cards, and scrapbook pages.


The sentiment comes from the Heartfelt Stamp Set which is part of the Heartfelt Bundle.  The bundle contains the Heartfelt stamp set and the Heart Punch Pack.  The heart punches in the punch pack coordinate with some of the images from the From My Heart designer series paper, as well as images from the stamp set.  You can use both punches and punch out information from either the paper or the stamp set.

The designer series paper was layered together onto the Flirty Flamingo card base.  The sentiment was added to a whisper white strip in real red ink.  Behind the sentiment strip is a nest of gold thread and another strip of the SDSP.  Behind the punched out heart is a strip of Real Red Double Stitched Ribbon.

Sizes & Dimensions: 

  • Flirty Flamingo Cardstock 5 1/2" x 8 1/2" scored at 4 1/4"
  • From My Heart Speciality Designer Series Paper (White background with hearts) 3 3/4" x 4 1/2"
  • From My Heart SDSP (Red background with Pink Hearts) 3 1/4" x 4 1/4"
  • From My Heart SDSP (striped design) 1/4" x 3 3/4" 
  • Whisper White Cardstock:  4" x 5 1/4" (inside) & 1/2" x 3 3/4"
  • Real Red Double Stitched Ribbon: 3" 
Thanks for dropping by today, I hope that you are inspired to CASE a card in the catalog.  
Happy Stampin' 
Rick Adkins 


Join my NEW Online Technique & Fancy Fold Club!  You can find out all the details by clicking here!

Receive the January Creative Stampers Tutorial Bundle with any size order!

Stampin' Up! Product & Shopping List: 

Saturday, January 18, 2020

Simple Stamping Birthday Card - Little Ladybug Saleabration Host Set

Hello and welcome to my blog:  Simple stamping was started to help the new and beginning stampers to have ideas and inspiration as well as learn the basics.   Today I am going to share a Simple Stamping Birthday Card using the Little Ladybug Saleabration Host Stamp Set.  This is a super cute stamp set that can be earned with a qualifying order of $300 during Saleabration.  I am super in love with these cute little ladybugs and all the sentiments in this stamp set makes this set a perfect one for every occasion.  I will also share with you two designs for the Casual and Avid stampers during this post.  Here's a look at my card. 


For today's simple stamping card I used just stamps, ink , and paper.  These are the basic supplies along with a little adhesive that anyone needs to create a card.  You can create wonderful cute cards with just these few supplies.  When you are starting out you don't have to have everything in the catalog or stores to create cute projects.  I love going back to the basics and using the basic supplies to create.  It helps to free my mind and allows me to think creatively to create more involved projects.

Simple Stamper Version: 

The Simple Stamping version I only used stamps ink and paper as I mentioned above.  For my card base I used a piece of Thick Whisper White Cardstock cut at 4 1/4 x 11 scored at 5 1/2.  I used Poppy Parade ink and stamped the two little ladybugs in the center right-hand side of the card.  I used a blender pen to add a watercolor like look to the wings and little of the body using just my ink pads.  This is a easy technique that is good for beginners that don't have a lot of supplies because it will widen your range of coloring media without much investment.  I stamped my sentiment on a strip of Highland Heather Cardstock in Gorgeous Grape Ink.  I cut a slanted end to draw a little interest.  I added a strip of Poppy Parade Designer Series Paper from the Brights Paper Stack cut just a little bigger than the sentiment strip.  I then stamped the little line of ladybugs above and below the stamped images and sentiment strip.  

  Video Tutorial: 

If you are viewing this post by email you may have to click here or click the image below to view the video.  Not all mail servers will show the embedded video.  

Casual Card:  

For my casual version of this card I added in the addition of the Everyday Label Punch.  I extended the length of the label by cutting the strip of cardstock that I stamped cut just to fit inside the punch.  You have to thread the paper through one side of the punch but out the inside of the punch where the only thing being punched is the very end.  I did this on both sides and then repeated it with the Highland Heather cardstock.  Everything else with the card was done exactly the same, besides I added a few more Champagne Rhinestones.  I did pop the punched out piece up on Stampin' Dimensionals.  

Avid Card: 

For my avid card I added in a few more ink pads and the addition of the coordinating dies.  I added in Blushing Bride, Pear Pizzazz and Petal Pink to go along with the Gorgeous Grape and Poppy Parade.  I stamped the flower in Blushing Bride and then colored it in with my blender pen and Blushing Bride, Gorgeous Grape, and Pear Pizzazz ink pads for a simple watercolor appearance.  For my ladybugs I used the two colors I had previously but also added in a little Petal Pink to their faces and bellies.  I then used the Ladybug Dies (which will be coming out in February as part of this years Coordination Product Release.  I will have more details on that coming soon.  One of the perks of being a demonstrator is you get to order new products early so you could add these items to your starter kit by joining my team.  
 Thanks for dropping by today I hope that you have found this post inspiring and that if you are not currently a stamper that you will give it a try.  
Happy Stampin' 
Rick Adkins 


Join my NEW Online Technique & Fancy Fold Club!  You can find out all the details by clicking here!

Receive the January Creative Stampers Tutorial Bundle with any size order!


Product List
Blender Pens
[102845]
$12.00

Template Designed by creativeworkerbee