Wednesday, December 25, 2019

Our Christmas Decor 2019 at the Westmoreland House c1917

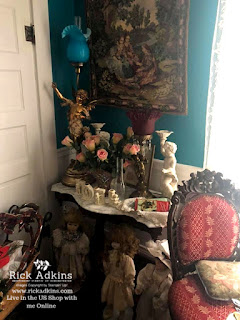
Hello and welcome to my blog; today I am going to share with you pictures of this years Christmas Decorations at our home.  We had a few people over last Friday night from our church to celebrate Christmas.  Charles loves Christmas and decorating and well all things Christmas.  He used to have a complete storage unit that was packed from top to bottom of Christmas decorations.  So this is his holiday.  So each year we decorate and have a few friends over.  Our home was built in 1917 by the Westmoreland Family hence the name.   I know this is not a card or paper crafting project post presay.  But, we did do a try this year with handmade ornaments or ornaments that looked handmade.  I had mentioned this in a video and people wanted to know if I would be sharing pictures this year.  So this is my post for today!   Let's get started on the picture tour shall we.

Living Room: 

We are going to start as soon as you walk into the house.  So we are going to start with the Living Room.  


Victorian Room/Parlor:

This is Charles' Room.  It stays this way most of the year well minus the Christmas Decor.  This has most of his antiques in it.  And a lot of his mother's dolls that she had collected.  Which by the way I find creepy.  I am just waiting on one to come to life and grab me.  Okay maybe I watch to many horror movies, but you never know.  


Dinning Room: 


Kitchen: 

Between the dinning room and the kitchen is where we placed the new tree this year.  This is the tree that I mentioned with the handmade or handmade looking ornaments on.  Charles loves to knit and we found these beautiful knitted looking ornaments.  On this tree is a garland that I made and on the garland after his mom passed we placed all her gloves on it to add a touch of her to the holidays each year.  


The End: 


I wanted take the time to wish every one of you a very Merry Christmas and Happy Holiday today!  I also wanted to take this time to thank each and everyone of your for following me on my blog, and social media this year!  And, for being loyal fans and customers.  I love you all!  HAPPY HOLIDAYS from myself and Charles! 

Tuesday, December 24, 2019

Window Card - Honey Bee Bundle Stampin' Up! Video Tutorial

Hello and welcome to my blog; I hope that you are having a wonderful day.  Today, I am going to share with you a super quick and easy window card using a new bundle from Stampin' Up!.  The Honey Bee Bundle is one of the twenty new bundles in the January-June Mini Catalog.  It's also one of those that I noticed right off the bat when I first thumbed through the catalog.  It's a super cute Spring and Summer stamp set that will let you create great greeting cards that are oh so sweet.  Here's a look at my project.


Tips & Tricks: 

With the Honey Bee Stamp Set, you’ll make greeting cards that are oh, so sweet! Use the greetings in this set to convey your thoughts of friendship and support. This is a Distinktive** stamp set; it has a special texture that gives added depth and dimension in a single step, creating photo-realistic images. **Patent pending

The Honey Bee Bundle includes the Honey Bee Stamp Set and the Detailed Bee Dies.  Create custom die-cut flowers, bees, a honeycomb, a beehive, and more using the Detailed Bee Dies. Use these dies with the Honey Bee Stamp Set to quickly cut out stamped images from the set. Create thank you cards, thinking of you cards, and other fun cards and paper crafts!
I stamped the large bee all over the Real Red card base in matching Real Red ink to add a little pattern and texture to the card.  I then used the Stitched Nested Label Dies to cut out the window on the card front.  I then stamped and die cut the large bee and the smaller one in Tuxedo Black ink and colored it with my Crushed Curry Stampin' Write marker (from the Regal Marker Collection).  Next I stamped the Bee Hive in Crushed Curry and cut everything out with the matching dies.  I added them to the front of the card with a couple dimensionals.
For the inside of the card since you are able to see inside with the window I added a strip of the Golden Honey Specialty Designer Series Paper (which can only be earned for Free with a qualifying order during Saleabration) to the center of the inside of the card.  I made sure that the designer series paper lined up with the points of the large stitched window.  I then added a thin strip of whisper white with the sentiment stamped in Real Red ink in the center of the designer series paper.  To finish off the card I added a few Red Rhinestones around the front of the card and on both sides of the sentiment.

Video Tutorial: 

If you are viewing this post by email you will have to click here or click on the image below to view the video.  

Sizes & Dimensions: 

  • Real Red Cardstock:  5 1/2 x 8 1/2
  • Whisper White Cardstock:  4 x 5 1/2 (inside) 1/2" x 5 1/4" (sentiment) Scrap for Bees and Bee Hive
  • Golden Honey Specialty Designer Series Paper:  1 1/2" x 5 1/4" 
Happy Stampin' 
Rick Adkins 

If you live in the US.  I would love you to choose me as your demonstrator.  If you would like to purchase any of these products you can click on the Shop Now Button or by clicking on any of the images below.  Alternatively, you can also contact me by email to place your order.  Please be sure to use the monthly host code and I’ll send a little something out to you the following month to say Thank You!  

 HOST CODE:  3PN3UVRP
  1. Spend any amount with me this month and receive the Creative Stampers Tutorial Bundle.  Plus get a gift from me in February
Please remember that if you use the host code you cannot use that order towards my KCRP’s (Kinmon Crafty Reward Points) that would be double dipping and is not allowed.  For more information on KCRP’s click here.  


Three main reasons to Join!  
1.     You Get at least a 20% discount on all your orders while you are a demo.   
2.     You get to join my fun Kinsmon Crafters Team and Private Facebook Group.
3.     Access to directions to all my online classes 

Last Week To Take Advantage of the Close Out Sale:


Stampin' Up! Shopping List:

Monday, December 23, 2019

Spread Your Wings and Fly - Little Ladybug

Hello and welcome to my blog; today I am going to share with you a card using a very special stamp set.  I am going to share with you a card that I made with the Saleabration Host/Hostess Stamp Set called Little Ladybug.  These cute little ladybugs are eager to help you spread some love with fun handmade cards for birthdays, thank you, thinking of you, encouragement, and more!  This adorable stamp set can only be earned during Saleabration with a qualifying order, party, or workshop.  I will tell you more on that in a little while.  I based my card today on a card that's in the Saleabration brochure.  Here's a look at my card.

Tips & Tricks: 

I started my card by making my own designer series paper using my Old Olive Stampin' Blends and a piece of Whisper White cardstock.  Once I had the pattern I wanted; I just simply cut it into the size strips I needed.   After that I started working on stamping the flowers and the ladybug.  


I stamped the ladybug and the two flowers in Memento Tuxedo Black ink.  This allowed me to color each of them with my Stampin' Blends.  I did really simple coloring on both.  For the flowers I just colored the centers (Mango Melody) and the stems and leaves were done in Old Olive.  And, for the lady bug I colored the wings (Poppy Parade), and a little coloring on the body (Petal Pink).  I even colored in the dots on the wings because they are not stamped all the way with the image.  The sentiment was stamped in Versamark ink and sprinkled with White Stampin' Emboss Powder and heat set onto a piece of Poppy Parade Cardstock that was made into a banner.  

How to Get this set: 

To get the adorable Little Ladybug Host Stamp Set FREE!  Yes, you can get it for free; when you host a party or place an order totaling $300 or more during our Sale-A-Bration promotion (January 3–March 31, 2020).    Once you hit the threshold for the order you will be able to add it to your order along with your Stampin' Reward items.

Sizes & Dimensions: 

  • Crumb Cake Cardstock: 4 1/4 x 11 scored at 5 1/2
  • Whisper White Cardstock: 4 x 5 1/4 (inside) 
  • Whisper White Thick Cardstock:  4 x 5 1/4 (for Lady Bug and Flowers) 2 1/4 x 5 1/2 (Old Olive Striped Piece) 
  • Poppy Parade Cardstock: Scrap for banner
When I saw this stamp set in the catalog I knew I had to have it because it was just so darn cute.  I hope that you enjoy this card idea as much as I did making it.  I will see you again tomorrow with another project, and tutorial.
Happy Stampin' 
Rick Adkins 


If you live in the US.  I would love you to choose me as your demonstrator.  If you would like to purchase any of these products you can click on the Shop Now Button or by clicking on any of the images below.  Alternatively, you can also contact me by email to place your order.  Please be sure to use the monthly host code and I’ll send a little something out to you the following month to say Thank You!  

December HOST CODE:  CEUXJX6R
  1. Spend any amount with me this month and receive the Creative Stampers Tutorial Bundle.  Plus get a gift from me in January.
Please remember that if you use the host code you cannot use that order towards my KCRP’s (Kinmon Crafty Reward Points) that would be double dipping and is not allowed.  For more information on KCRP’s click here.  


Three main reasons to Join!  
1.     You Get at least a 20% discount on all your orders while you are a demo.   
2.     You get to join my fun Kinsmon Crafters Team and Private Facebook Group.
3.     Access to directions to all my online classes 


  Stampin Up! Shopping List:

Template Designed by creativeworkerbee