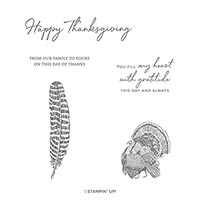
Hello and welcome to my blog; today I am going to share with you this super cute card featuring the Day of Thanks Stamp Set, which is a wonderful set that hasn't gotten a lot of love. It's a very underrated set that I think at this time of year deserves some more love. So, don't be a turkey. Express your thanks with the Day of Thanks Stamp Set. The realistic images and heartfelt sentiments radiate gratitude. Here's a look at my card.
Tips & Tricks:
To start this card I cut a piece of Early Espresso cardstock in half to 4 1/4 x 11 scored at 5 1/2. I added a piece the Come to Gather Designer Series paper to the card front. I stamped the turkey from the stamp set on a stitched oval after stamping off once. I then stamped the sentiment on that piece full strength. To finish the card I stamped the feather in the set three times and cut it out. I added them to card with a mixture of liquid glue and dimensionals.
Thanks for dropping by today. I hope that you have enjoyed this quick little card.
Happy Stampin'
Rick Adkins
If you live in the
US. I would love you to choose me as your demonstrator. If you
would like to purchase any of these products you can click on the Shop Now
Button or by clicking on any of the images below. Alternatively, you can
also contact me by email to place your order. Please be sure to use the
monthly host code and I’ll send a little something out to you the following
month to say Thank You!
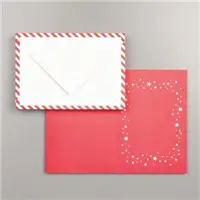
Hello and welcome to my blog; today I am going to share with you another Case the Catalog project. For today's project I am going to share with you; a card from the Holiday Catalog. The card that I am going to share was CASEd from one of the projects on page 25. The project that I am going to CASE today features the Night Before Christmas Memory and More Card pack and the Night Before Christmas Memories & More Card and Envelopes. If this is your first time here welcome and if you are returning welcome back. If you are new to my blog and crafting; you may not know what the term CASE means. CASE is a term that card makers use to learn by copying a project. CASE stands for Copy and Share Everything or Copy and Selectively Edit. By doing this you can learn new skills or techniques. Here's a look at my card.
Tips & Tricks:
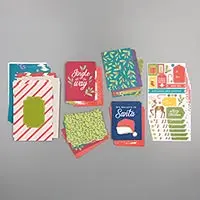
I always love the Memory and More card packs and the matching cards and envelopes that we offer in our catalogs. The holiday catalog has a lovely pack of Memory and More cards and matching Night Before Christmas Memory and More Cards and Envelopes. Both of these items match the Night Before Christmas Suite. The Memory and More card pack includes 54 double sided cards 6 each of 9 designs in 3" x 4" and 4" x 6" size along with 6 sticker sheets. This card pack is also designed for a Holiday Memory Book (which was I offered as one of my online classes last month).
To use the Night Before Christmas Memory & More Card Packs and the Night Before Christmas Memory & More Cards and Envelopes together to create cards is really really easy. All you have to do is simply adhere cards from the card pack to the cards. With just these products you can make 20 cards and coordinating envelopes.
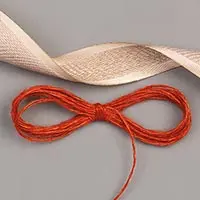
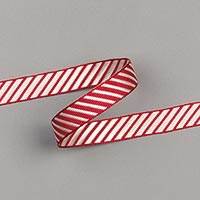
For this card I took the card that said To Santa and used some scrap Crumb Cake Cardstock and punched out a 1/2 circle using my 1/2 Circle Punch. I attached that with a little liquid glue to the card from the Card pack. I then took a hand held punch (retired) and punched a hole in the center of the crumb cake piece through the card. I added some of the Cherry Cobbler 3/8" Diagonal Stripped Ribbon through the hole and tied it into a bow. I then attached this to the card with a few Stampin' Dimensionals.
And just like that you have a complete card all done. Really and truly it's just that quick to create tons of cards just using these products. Thanks for dropping by today. I am glad that you are here. I am preparing as I type this blog post to get ready to attend the OnStage Local in Atlanta next weekend, so be on the watch out on my Social Media channels for little sneak peeks of upcoming products from the 2020 Occasions Catalog and Saleabration Brochure.
Happy Stampin'
Rick Adkins
If you live in the
US. I would love you to choose me as your demonstrator. If you
would like to purchase any of these products you can click on the Shop Now
Button or by clicking on any of the images below. Alternatively, you can
also contact me by email to place your order. Please be sure to use the
monthly host code and I’ll send a little something out to you the following
month to say Thank You!
November HOST CODE: QU2TJBJN
1.Spend any
amount with me this month and receive the Creative Stampers Tutorial
Bundle. Plus get a gift from me in December.
Please remember that if you use the host code you cannot use that
order towards my KCRP’s (Kinmon Crafty Reward Points) that would be double
dipping and is not allowed. For more information on KCRP’s click here.
Three
main reasons to Join!
1.You Get at least a 20% discount
on all your orders while you are a demo.
2.You get to join my fun Kinsmon
Crafters Team and Private Facebook Group.
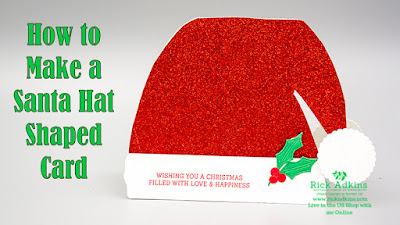
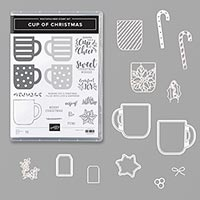
Hello and welcome to my blog; today I am sharing with you the next project in my 25 Days of Christmas Holiday Card Series 2019. Today, I have a super cute and fun card for you and it's a lot easier than you may think just looking at it. I was super surprised at how easy it was to create when I sat down and created it. For today's card I am going to share with you how to create a Santa Hat Shaped card that will truly make someone smile when they open it this Holiday Season. Let's look at my card shall we.
Tips & Tricks:
This is actually a very easy card to make. It's just a matter of drawing out the shape you want the card to be. The drawing doesn't have to be perfect because you are going to cut it out with your paper snips. I used a piece of 5 1/2 x 8 1/2 Very Vanilla Thick card stock scored at 4 1/4 to start. I then sketched out the shape of the Santa Hat with a pencil making sure to take the sketch up to the top of the fold, letting it go across. Next I just cut it out using my paper snips, making sure to not cut the top of the card. If you cut the fold you have nothing to hold the card together.
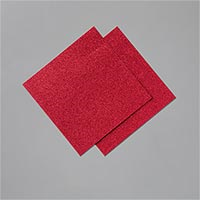
After cutting the shape out I flipped it up side down on the Real Red Glimmer Paper and cut it out in reverse. By doing this when flipped the right way around the glimmer paper fits perfectly on the card base. I attached it with Multipurpose Liquid Glue. At this point I had to add the White band and the pom pom at the end. I stamped the sentiment on the Whisper White Band in Real Red Ink.
I did this with just a few pieces of scrap Whisper White Cardstock. I attached the band with a few Stampin' Dimensionals. I gave the ends a little shaping before attaching it. For the end of the hat I used my 1 3/8" scallop circle punch and punched out two and attached them to the end of the hat with a little liquid glue.
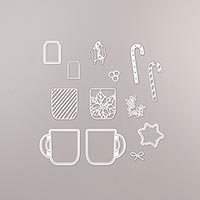
I then die cut the holly and berries from some scrap cardstock. I used Call Me Clover and some Real Red for them. The Holly die came from the Cup of Cheer Dies which match the Cup of Christmas Stamp Set (which is also where the sentiment on my card came from) in the Holiday Catalog. I attached the holly and berries with a little liquid glue and mini glue dots and a mini dimensional behind the holly leaf sticking out over the rim of the hat.
Video Tutorial:
If you are viewing this post by email you may have to click here or the image below to view the video tutorial. Some mail servers will not show the embedded video.
Thanks for dropping by today I hope that you have found this post useful and inspiring. I will see you again tomorrow with a new CASE the Catalog project.
Happy Stampin'
Rick Adkins
If you live in the
US. I would love you to choose me as your demonstrator. If you
would like to purchase any of these products you can click on the Shop Now
Button or by clicking on any of the images below. Alternatively, you can
also contact me by email to place your order. Please be sure to use the
monthly host code and I’ll send a little something out to you the following
month to say Thank You!
November HOST CODE: QU2TJBJN
1.Spend any
amount with me this month and receive the Creative Stampers Tutorial
Bundle. Plus get a gift from me in December.
Please remember that if you use the host code you cannot use that
order towards my KCRP’s (Kinmon Crafty Reward Points) that would be double
dipping and is not allowed. For more information on KCRP’s click here.
Three
main reasons to Join!
1.You Get at least a 20% discount
on all your orders while you are a demo.
2.You get to join my fun Kinsmon
Crafters Team and Private Facebook Group.


 Thanks for dropping by today. I hope that you have enjoyed this quick little card.