Tuesday, May 28, 2019

Graduation Hat Easel and Gift/Money Holder Card Video Tutorial

Hello and welcome to my blog & YouTube channel; today I am going to share with you another Graduation Gift Card/Money Holder option.  If you are like us you are differently going to be needing these right now.  We have gotten a few Graduation invitations from both friends and family.  So that means we will be sending out either gift cards or a little cash; I mean what graduate wouldn't like cash or a gift card right now.   I shared a very super quick and easy card with you yesterday that was a gift card/money holder featuring the Beautiful Promenade Stamp set and matching designer series paper.  I will link to that here so you can check that out.  My card today is actually very easy but looks more complicated.  it can also be customized to match any schools colors.  Here's a look at today's card.

Tips & Tricks: 

Like I said this is a super easy card but looks way more complicated than it really is.  It's just a couple score lines, a little stamping, and a little die cutting.  To start off you will need a piece of 4 1/4 x 11 cardstock in what ever color you need for the school of the graduate.  I did a couple different colors because we have to send them to people in different schools.  So the one in the video tutorial that you will find below in just the Merry Merlot version.  I found it super easy to find matching Stampin' Up! cardstock to each schools colors.  I did two of these types cards and the one I shared yesterday, plus one more that I will share later this week.  
I designed the card so that it could be folded up like a normal card and be placed in one of our medium envelopes, so there's no extra postage.  I also designed it so that when it opens up you can not only have a place to put a gift card or a little cash but it would act like a easel card as well.  
The Celebrate die cuts act as the stopper for the easel but it also helps as my inside sentiment.  Plus I made a place to write a message on the inside as well.  So I think I have all the bases covered so to speak.  Here's a little look at the inside.  
The basic black version is done the exact same way except I changed up a couple of the elements and the dies.  Instead of the basic black mat I used pumpkin pie, and instead of the Celebrate You Dies (Which are retiring, sadly.  So if you want them you need to get them now) I used the Well Written Dies from the Occasions Catalog as well as the Well Said Stamp Set.  On the Merry Merlot version I used Ittly Bitty Greetings.  If you are looking for a stamp set that has almost everything you will need you can find them with both these sets.  

Video Tutorial: 

If you are viewing this post via email you may have to click here to see the video.  For some reason some mail servers will not show the embedded video. 

Sizes & Dimensions: 

 Supplies: 

  • Merry Merlot Cardstock  - 4 1/4 x 11 scored at 2 3/4 & 5 1/2
  • Merry Merlot Cardstock - 3 x 3 square, sliver of cardstock, 3/4" x 1" & scrap for die cutting words
  • Basic Black Cardstock - 4 1/8 x 2 5/8 you will need two of these
  • Whisper White Cardstock - 4 x 2 1/2 you need three of these 
I gave you the cardstock that I used in the video but like I said before you can change the color as you need.   All the sizes are the same for each version.  

Thanks for dropping by today I hope that you have a wonderful day and that you have enjoyed this video and look at my Graduation Cap Easel Card Gift Card/Money holder.  If you need any of the supplies you can pick them up in my online store 24/7.  If you want the Beautiful Promenade Stamp and Die bundle I would suggest getting them now before they are no longer at the bundle price.  Save that extra 10% on the bundle, it will no longer be a bundle after June 3, 2019.  
Happy Stampin' 
Rick Adkins


Stampin' Up! Shopping List

Join me for my Daisy Lane Online Class Click the image to learn more.
Purchase Rooted in Nature Stamp Set (using host code CC2HECY2) from me now until June 3 and get a pack of the Leaves Trinkets Free.  Must use host code to receive this offer.

Host Code and Free Gift:

May Host Code:  UMR2NHW7
Spend $50.00 (before taxes & shipping) in my Online Store using the current host code during May and get my May Creative Stampers Tutorial Bundle.  Tutorial Bundles will be sent to you starting the 20th of the month. 

Monday, May 27, 2019

Stampers Showcase Blog Hop: Fancy Folds

Hello and welcome to my blog; today I am going to share with you a super easy fun fold gift card holder for the Stampers Showcase Blog Hop.  Our theme for this month's hop is Fun Folds so this was perfect.  This is not your traditional graduation card, this is one that shows off both sides of the designer series paper that you pick.  I picked the Petal Promenade Designer Series Paper & Beautiful Promenade Stamp Set and matching dies for my project today.  Okay, I know you want to see this super easy gift card holder. 
I used a piece of designer series paper cut at 5 1/4 x 11 for my card today.  It's also backed on a piece of petal pink cardstock that's cut at 5 1/2 x 4 1/4 which acts as a stabilizer and finishes off the card to a regular A2 size card.   I scored the designer series paper at 4 and 8 on my trimmer.  On the inside with the smaller side I folded down one corner and added liquid glue behind that corner and attached it.  I then added tear & tape to the left side and attached it to the inside piece.
So that I had a place to write a message I added a piece of whisper white to the top piece cut at 3 3/4 x 5.  I took a piece of matching designer series paper and the envelope liner die from the Beautiful Layers Die Set.  You can get both the Beautiful Layers Dies and the Beautiful Promenade Stamp Set right now in a bundle and save 10%.  This bundle will be gone after June 3, 2019 when the new 2019-2020 Stampin' Up! Annual Catalog goes live.
 For the outside of the card I Petal Pink classic ink and stamped a couple of the flower images on the front of the designer series paper.  Once I had these few images stamped on what would be the front of the card I needed a little more color.  So I stamped one of the other large flower images in Highland Heather and colored it in using both Petal Pink and Highland Heather Light Stampin' Blends.  The light Highland Heather acts as the shadow for the light petal pink when layered on top of each other.  I then stamped some leaves in Mossy Meadow and used the matching dies to cut both the flower and leaves out.  I stamped the Happy Graduation sentiment from Itty Bitty Greetings in Highland Heather on a piece of scrap cardstock and cut it out using the classic label punch.
\
And that finished my card; thanks for dropping by today.  You can click on the next button to go to the next blog.  I am glad that you took a few minutes and dropped by.  If you want any of the supplies that you have seen today you can pick them up in my online store.  You will find a full list of supplies below in the shopping list.  


Stampin' Up! Shopping List


Happy Stampin' 
Rick Adkins 


Friday, May 24, 2019

Broadway Birthday Turnabout Card

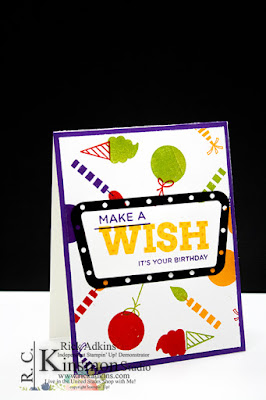
Hello and welcome to my blog; today's post has been a challenge to get up.  I have been trying to upload the images to my computer since 6:15 am this morning.  My laptop has been a little ornery, but I have finally gotten everything uploaded and edited.  Today, I am going to share with you another card featuring the Broadway Birthday Stamp Set.  This card is a little different, I used the small images in the stamp set to create my very own turnabout style card.  I will be shooting a video later today and will add it to this post so that you can see just how I did that.  Here's a look at my card. 

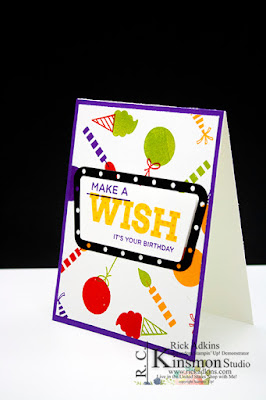
For my card I picked some bright fun colors.  I mean come on it's a birthday card it should be bright and fun right?  I laid out my stamps on my stamparatus and created the layout so that I could use the turnabout style stamping to get all the fun colors and change things up.  The hardest part about this process is the actual making sure everything is lined up just right.  But once you do the cards are so much fun.   After editing the photos I realized I forgot one of the small stamps and could have used it to fill in some of the areas on my card.  Silly me; this is what happens when you aren't paying attention to your stamp sets.  
The small stamps in your sets really shouldn't be over looked you can use them to create some many different techniques and fun card designs.  I often use these small stamps to create a background piece for my card.  
As I mentioned before turnabout stamping is a great way to use these small images in a new way with a wonderful dramatic look.  It just takes a little playing to arrange all the images.  But, once you do you can create a colorful background just like I did here with just a few turns of the turnabout set up.  
The Broadway Birthday Stamp Set has great fun images that are great for this technique.  You have the balloon, party hat, candle, and ice cream cone.  All of which are easy to stamp by them self but when done in this style it creates a whole new world of creative expression.  
Once I had everything stamped I simply trimmed down my image and placed it on a piece of Gorgeous Grape cardstock that was cut to 4 1/4 x 5 1/2 and I glued the entire thing onto my A2 card base.  I then die cut the marquee from whisper white cardstock (this I used to stamp the sentiment) and one from Basic Black Cardstock (for the outside).  For the whisper white one I stamped the Wish image in Daffodil Delight and then used the dotted wish image (which represent the lights from the marquee) in Mango Melody.  Then I finished off the sentiment with the two stamps that read Make A, and it's your birthday in Gorgeous Grape ink.  I popped the whisper white layer up on dimensionals and adhered the basic black outside frame to the card front with a little liquid glue.  

I hope that you liked my card today and that you give this technique a try.  Again I will be doing the video and uploading it today, so be on the watch out for that as well.  If you are loving the Broadway Birthday Stamp Set and want to get your hands on it, please do so now.  This set and the matching dies are carrying over to the new 2019 -2020 Annual Catalog but will not be part of a cost saving bundle (like it is in the current 2018-2019 Annual Catalog).  So I would suggest ordering it now to save that extra 10% off both products.  Thanks for dropping by.  
Happy Stampin' 
Rick Adkins 

Use my May Host Code and receive a free gift with qualifying orders.  Host Code will end May 29, 2019.  
May Creative Stampers tutorial bundle!  Use Host Code KKTS7NHU with a $50 or more order before shipping and taxes and get the May Creative Stampers Tutorial Bundle Free!  This month we are featuring 8 masculine themed projects.  If you don't live in the U.S. or are a demonstrator you can purchase the bundle in my online tutorial store.  
Use Host Code CC2HECY2 and order the Rooted in Nature Stamp Set from me by June 3, 2019 and receive a pack of the Leaves Trickets Free
My New Online Class preorder is available now!  Click to learn more and to sign up! 
There's still time to join my 2019 Annual Catalog Paper Share.  Click here to join!  Sign ups end June 3, 2019
Place a minimum of a $45(order before shipping and taxes) using host code KKTS7NHU by midnight Monday June 27th and get a roll of the Basic Black Satin Ribbon Free (a $7.00 value)

Stampin' Up! Shopping List: 

Stamparatus
[146276]
$49.00

Template Designed by creativeworkerbee