Showing posts with label leaves. Show all posts

Monday, October 28, 2019

Stampers Showcase October Blog Hop: It's Fall Y'all

Hello and welcome to my second post today; I am sharing a project for the Stampers Showcase October Blog Hop.  The theme this month is It's Fall Y'all.  I have created a fun Fall themed card using the Gather together stamp set.  Here's a look at my card.
I started may card by stamping the large leaf image from the Gather Together Stamp set over and over masking each time on a piece of Crumb Cake cardstock.  Once I had all the leaves stamped felling up the entire piece of cardstock, I started coloring each of them using my Polychromos Colored Pencils.  I think that color pencils look better on darker color cardstocks.
I started each leaf the same way.  I started coloring with my white pencil and then added in other colors.  I always start out with a light hand and build up layer by layer and eventually getting heavy with the pigment of the pencil to fill in the tooth of the paper.  By starting out with a very light hand I can build up multiple layers overlapping the colors letting the colors underneath show through the layers on top.  This is called glazing.  Once I start pressing firmer on the pencils this starts to blend the colors.  You can also use a blending pencil to do this once you have all your colors laid down.  Because with the blending pencil it puts a coating on top of the pencils and doesn't allow for more pigment to be added.
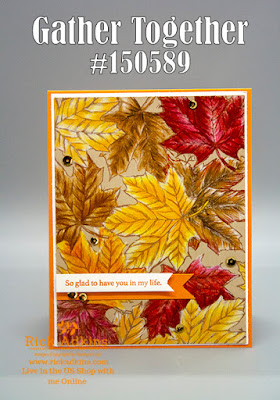
With all the leaves colored I added the crumb cake piece to a piece of whisper white cardstock that was cut at 5 3/8 x 4 1/8.  I then added the focal image to my card base made out of Pumpkin Pie cardstock.  I added a pumpkin pie banner and a sentiment banner to the front of the card.  I added some gold sequins to finish off my card.

Thanks for dropping by today, you can click on the next button above to go to the next blog on the list.

Happy Stampin' 
Rick Adkins 

If you live in the US.  I would love you to choose me as your demonstrator.  If you would like to purchase any of these products you can click on the Shop Now Button or by clicking on any of the images below.  Alternatively, you can also contact me by email to place your order.  Please be sure to use the monthly host code and I’ll send a little something out to you the following month to say Thank You!  

November HOST CODE:  QU2TJBJN
1.     Spend any amount with me this month and receive the Creative Stampers Tutorial Bundle.  Plus get a gift from me in December.
Please remember that if you use the host code you cannot use that order towards my KCRP’s (Kinmon Crafty Reward Points) that would be double dipping and is not allowed.  For more information on KCRP’s click here.  


Three main reasons to Join!  
1.     You Get at least a 20% discount on all your orders while you are a demo.   
2.     You get to join my fun Kinsmon Crafters Team and Private Facebook Group.
3.     Access to directions to all my online classes 


Product List

Wednesday, October 9, 2019

Harvest Hello Jack-o-lantern and a Night Scene Card for #PCC354 Rick Adkins

Hello and welcome to my blog; today I am going to share with you a card i created for this weeks Paper Craft Crew Challenge.  This weeks challenge is all about Halloween and Haunting.  One of the things that I think of when someone mentions Halloween is Jack-o-lanterns.  The other thing I think of is fall leaves and the crisp cool night air.  So, for my card I wanted to come up with something that embodied all those elements.  I think I came up with a super cute card for you all today.  Here's a look at my card.

I created a card with a fun little jack-o-lantern in a pile of Fall leaves at night.  Here's the image that inspired my card.  I have linked the inspiration image below to the Paper Craft Crew website.  You can click on the image to play along and to check out what all the other design team members came up with.  

 Tips & Tricks: 

I started my card by stamping the jack-o-lantern face in Pineapple Punch Ink and then masked it off.  I then stamped the pumpkin from Harvest Hello in Tuxedo Black ink, because I knew I was going to color it with my stampin' blends.  But before coloring I needed to create my night sky.  
To start that process I masked off the pumpkin and stem with some masking paper.  Then I stamped the some of the leaves in front of the pumpkin.  After that was done I began with some ink blending.  I did this really light starting in the center around the pumpkin.  I started out with Pineapple Punch, then moved to Mango Melody, and Pumpkin Pie.  And finally moving into Rich Razzleberry.  Then I repeated the process again blending all the colors together.  Once I had everything blended I came back in with a little tuxedo black just around the edges.  
After everything was blended the way I wanted it.  I flipped on some water from my stampin' spritzers and let it sit for just a little bit then pressed a paper towel on that.  I then dried the ink with a heat tool.  Then I removed the masks from the pumpkin.  With the ink blending and the masks in place; I had a white ring around the stem and the pumpkin.  So, how to handle that.  I made both into  part of the jack-o-lantern.  I colored the jack-o-lantern with a combination of Mango Melody, Pumpkin Pie, and a little Pineapple Punch.  I also added a little dark soft suede around the edge and the stem.  When I have so many colors on the same image I like to color from lightest to darkest, then come back with darkest to lightest.  
After the coloring was done on the pumpkin I came back in with my stampin' blends but added in the same colors I used before but added in a little Cherry Cobbler and Rich Razzleberry as well.  Once That was all done I came back in with a journaling pen and outlined the pumpkin, the face, and the leaves.  I then came back in with the dark soft suede blend and added some shadows around the outside of the leaves around the pumpkin leaving the center free to give the look of a glow from the jack-o-lantern.  I finished off my card by heating embossing my sentiments on Early Espresso Cardstock.  My sentiments came from Harvest Hellos and Wonderfully Wicked.  I matted my focal image on a Early Espresso mat and then placed everything on a Pineapple Punch card base.  
Thanks for dropping by today, I hope that you have enjoyed my little card that I came up for you.
Happy Stampin' 
Rick Adkins 

  If you live in the US.  I would love you to choose me as your demonstrator.  If you would like to purchase any of these products you can click on the Shop Now Button or by clicking on any of the images below.  Alternatively, you can also contact me by email to place your order.  Please be sure to use the monthly host code and I’ll send a little something out to you the following month to say Thank You!  

Stampin' Up! Shopping List

Template Designed by creativeworkerbee