Showing posts with label ink blending. Show all posts

Friday, March 27, 2020

Grace's Garden Window Card

Hello and welcome to my blog; today I am going to share with you a fun little card that I CASEd from the January-June Mini Catalog from Stampin' Up!. I was searching for a little inspiration yesterday, because I just wasn't feeling crafty at all.  One of our cats passed yesterday which actually all started on late Wednesday afternoon.  So needless to say I was not feeling it yesterday or Wednesday, this little event threw us for a whirlwind.  So I went to what I do to start feeling creative again.  I looked through the catalogs to try and find a little inspiration.  And I came across this bundle and knew that I hadn't even touched it yet so I thought why not recreate one of the cards here.  So that's how this came about.  The card in the catalog is more of a square card and I made it into a regular old A2 size card.  Here's a look at the card.   You will find the A4 metric measurements for my card in ()'s for each piece of cardstock through out the post.

Tips & Tricks: 

I started off my card by die cutting the with arbor opening in my Sahara Sand Cardstock.  I just centered it on the 4 x 5 1/4 (14.4 cm x 10 cm) Sahara Sand cardstock and ran it through my die cutting machine.  Next I took my Sahara Sand layer and layered it on my 5 1/2 x 8 1/2 Thick Whisper White Card Base (14.9 cm x 21 cm) and lined up the die again and ran it back through to cut the window.  After that die cutting was complete I used the Brick and Mortar 3D Embossing Folder and ran the Sahara Sand piece back through with the 3D Embossing Plate to emboss the wall.  If you run it through before die cutting you will flatten out your embossing.  

Next I took some Whisper White and cut the arbor and gate out using the die and my die cutting machine.  I added that to the front of the card using Liquid Glue.  I then cut the gate open with my Paper Snips so that it could be open just a little.  I then stamped the images I had planned to use in Tuxedo Black Ink and colored them with my Highland Heather and Mossy Meadow (Light and Dark) Stampin' Blends.  I then die cut those out with the matching dies.  I also cut out one of each vine dies from some scrap of Mossy Meadow Cardstock. 


I started adhering the vines down first after I arranged everything on my card front.  To do this I used a mixture of Multipurpose Liquid Glue and Fine Tip Glue mixed in my Fine Tip Glue Bottle.  The combination of glues add the best of both for maximum adhesion.  Once the vines were attached I then started add the flowers with Stampin' Dimensionals on some and Liquid Glue on one.  I wanted a few different layers on the card so this was the best option.

Next I took a 3 x 5 1/2 (7 cm x 14.9 cm) piece of Whisper White Cardstock and did a little ink blending over it using just Highland Heather Ink.  I used the ink blending technique to create a Ombre look to this piece of cardstock.  I then placed it where I wanted it to go inside the card and closed my card.  I used Gorgeous Grape Ink (because I was to lazy to put the sentiment in my Stamparatus and double stamp it with Highland Heather Ink to get a dark color) and stamped the sentiment in the window opening.  

Video Tutorial: 


If you are viewing this post by email you may have to click here to view the video.  Not all mail servers will show the embedded video tutorial.  You can also click on the image below to watch.

  
Happy Stampin' 
Rick Adkins 

If you live in the US.  I would love you to choose me as your demonstrator.  If you would like to purchase any of these products you can click on the Shop Now Button or by clicking on any of the images below.  Alternatively, you can also contact me by email to place your order.  Please be sure to use the monthly host code and I’ll send a little something out to you the following month to say Thank You!  

Use the March Host Code on any order of $50 (before taxes & shipping) or more during the month and receive a gift from me in April as a Thank You.  If your order is $150 or more, please don't use the host code.  You will forfeit your Stampin' Rewards if you do; and I want you to get those rewards.


If you place any size order with me during the month of March, you will receive the March Creative Stampers Tutorial Bundle from me as a little thank you.  This month's tutorial bundle features fourteen floral themed tutorials.  The Creative Stampers Tutorial Bundle can either be earned for FREE with any size order or Can be purchased for $20 from me.

Stampin' Up! Shopping List:

Thursday, March 19, 2020

Peaceful Moments Lidded Poppy Box

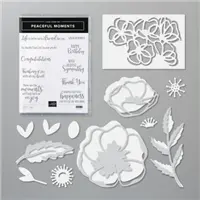
Hello ans welcome to my blog; today I am going to share with you my Lidded Poppy Box, that I made.  I used the Peaceful Moments Bundle for my flower and sentiment and created this super cute little box for you today.  The Peaceful Moments Bundle includes the Peaceful Moments Stamp Set and the Poppy Moments Dies.  Create fancy, layered die-cut poppies, leaves, and more to add beauty and depth to your handmade cards, scrapbooks, journals, and other paper crafts using the Poppy Moments Dies. Pair the dies with the coordinating Peaceful Moments Stamp Set to add heartfelt sentiments to your projects for birthdays, congratulations, sympathy, thank you, and more.  Here's a look at today's project.

Tips & Tricks: 

To created the multi colored flower on the top of my box I used the Peaceful Moment Dies and cut out all the pieces of cardstock.  I used scraps to create the flower.  As far as cardstock goes I used scraps of Daffodil Delight, Mango Melody, for the flower and Mossy Meadow and Old Olive for the leaves.  I did a little sponging of the colors onto the cardstock to create the different values.  I also added a little Whisper White Craft Ink for the highlights.  I used a sponge dauber to get into the areas and sponged on the ink.  Once all the inking was completed and dried I glued everything together with a little liquid glue.  


I then created my box top and base with a little cardstock and put them together with a little Tear & Tap.  The box was a basic box construction so nothing fancy there.  The base was created from a 8 x 8 piece of Daffodil Delight cardstock and the top was made from a 6 x 6 piece of Thick Whisper White Cardstock.  I wrapped a little of the Daffodil Delight Ruched Ribbon around the top and tied it into a pretty little knot so it would stay in place.  You can add a few mini glue dots under the ribbon if you don't want it to move at all.  


Once the box was completed I added the poppy with a few Stampin' Dimensionals.  I then created a double fish tail banner for my sentiment which comes from the Peaceful Moments Stamp Set in Mango Melody Ink.  Greetings, greetings, and more greetings. Whatever the situation, the Peaceful Moments Stamp Set has the words you need to express your thoughts.  I thought this made for a prefect little gift box for someone.  Thanks for dropping by today I hope that you have a wonderful day and stay safe.  If you need any of the supplies you can order them in my online store by clicking on the item below.  
Happy Stampin'
Rick Adkins


Use the March Host Code on any order of $50 (before taxes & shipping) or more during the month and receive a gift from me in April as a Thank You.  If your order is $150 or more, please don't use the host code.  You will forfeit your Stampin' Rewards if you do; and I want you to get those rewards.


If you place any size order with me during the month of March, you will receive the March Creative Stampers Tutorial Bundle from me as a little thank you.  This month's tutorial bundle features fourteen floral themed tutorials.  The Creative Stampers Tutorial Bundle can either be earned for FREE with any size order or Can be purchased for $20 from me.

Stampin' Up! Shopping List: 


Template Designed by creativeworkerbee