Showing posts with label heat embossing. Show all posts

Monday, October 14, 2019

Kylie's Demonstrator Training Program Monthly Team Blog Hop


Hello and welcome to my second post for today!  I am back with you again today for Kylie's Demonstrator Training Programs Monthly Team Blog Hop.  This is a wonderful hop and you will see projects from all over the world.  I hope that you will take the time to hop along with us this month.
If this is your first time here welcome, if you have dropped by again welcome back.  Here's a look at the project I am going to be sharing with you today.


For my card today I created a fun little Fall themed wedding card using the Bloom & Grow Stamp set from the 2019 Stampin' Up! Annual Catalog.  My card is a monochromatic card using only Early Espresso and Copper.  I thought this was a perfect Fall color combination and it uses one of my favorite stamp sets.  I love the Bloom and Grow stamp set but I've not gotten to use it a lot so far this year.  I thought this was the perfect time to do so.  Fall is a big time for weddings and let's face it we can all use a few extra wedding cards that can be used for anytime of the year.
The 
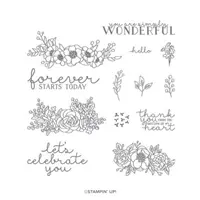
Bloom & Grow Stamp Set offers beautiful decorative flower bouquets for all occasions.  All for you to color in! Which are just a few of the reasons I love it so much.  It's a perfect set to create all occasions cards with; almost everyone loves flowers and you don't have to use it as a coloring set; just like I did today.  I used it to create a stunning card with just stamps, ink, and paper.  I had the best time creating the focal image in the background and the copper embossing paired with the early espresso is a show stopper.  If you are wondering how I did this; well, it was super easy with my Stamparatus.  I arranged all the large floral images on the card front and closed the stamparatus door on it.  I then stamped in versamark ink and covered that section in copper embossing powder.  I then rotated the card front and repeated the process until I had everything covered.
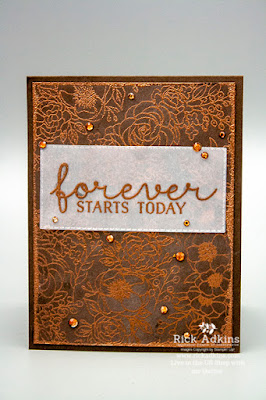
While arranging the large images I was very surprised at how easily they all lined up, and sort of interlocked with the other images.  I then came back in with the smaller images in the set and filled in any holes I had in my design.  I then took my card front and ran my Versamark Ink Pad along the edge and dipped the edges in the copper embossing powder and heat set.  This created my mat for around the card.  I heat embossed my sentiment in a piece of Vellum Cardstock using the copper embossing powder.  I then cut it out using the Stitched Rectangle Dies and added it to my card front with a little liquid glue behind the lettering.  I then colored some 
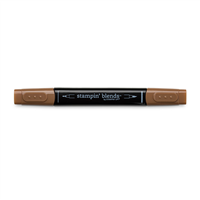
Rhinestone Basic Jewels using my Bronze Stampin' Blend marker, I put a coat on and let it dry and then added another two coats of ink.  Once completely dry I added them to the card front.  I added some on the parts of the vellum that was hanging of on the card front to add a little extra security.  With the addition of the colored rhinestones I was finished with my card.
I hope that you like my little Fall wedding card for this month's blog hop.  If you are viewing this post on my word press site you will have to click here to go and view the blog roll.  The embedded code for the blog roll doesn't play nicely with word press dot com blogs.  So you will have to visit my new blog.

Blog Roll: 


Happy Stampin' 
Rick Adkins 

If you live in the US.  I would love you to choose me as your demonstrator.  If you would like to purchase any of these products you can click on the Shop Now Button or by clicking on any of the images below.  Alternatively, you can also contact me by email to place your order.  Please be sure to use the monthly host code and I’ll send a little something out to you the following month to say Thank You!  


October HOST CODE:  SQ2WWJZN
1.     Spend any amount with me this month and receive the Creative Stampers Tutorial Bundle featuring Fall & Halloween Projects.  Plus get a gift from me in November.
Please remember that if you use the host code you cannot use that order towards my KCRP’s (Kinmon Crafty Reward Points) that would be double dipping and is not allowed.  For more information on KCRP’s click here.  


Three main reasons to Join!  
1.     You Get at least a 20% discount on all your orders while you are a demo.   
2.     You get to join my fun Kinsmon Crafters Team and Private Facebook Group.
3.     Access to directions to all my online classes 

 Stampin' Up! Shopping List:


Sunday, October 6, 2019

Color Inspiration: Joseph's Halloween Coat

Hello and welcome to my blog today I am going to share another place to find color inspiration for your projects and the card that I created from this week's inspiration piece.  The Color Inspiration is a bi-weekly series that I share with you places and ideas to find color inspiration.  Here's a look at my project this week.

I found my color inspiration piece this week from Dollar General in the card section of the store.  I was so surprised at how many beautiful cards where there that you could draw inspiration from.  For this weeks card I did the Joseph's Coat Technique.  If you don't know what that is I will try and do a video coming up on how to do that.  But, here's the inspiration piece for this week's card.  
I found a couple cards in the card section of the store that caught my eye so you will be seeing some more inspiration from those later on in this series.  I love the use of Coastal Cabana, Mango Melody, Terracotta Tile, and Basic Black on this card, plus a little Very Vanilla as well.  Which are all the colors that I used on my card.  I am not a big fan of glitter but I will use it every once and awhile, I didn't use it on today's project.  

As I mentioned I used the Joseph's Coat Technique to create today's card.  Basically all that is is you color an area with ink and trap it under clear embossing powder and then cover over it in black or another dark ink color.  For my version I inked up my stamps in versamark first then inked it up in the color ink I wanted to use and then stamped it down.  After I did a few images I would cover it in clear embossing powder and heat set it.  I repeated this until I had the entire card covered.  Then I inked over everything with Tuxedo Black ink.  And, then buffed it off with a paper towel.  What you are left with is this wonderful multicolored card that pops.
You can save this image to your color inspiration board over on Pinterest.  Thanks for dropping by today, I hope that you have a wonderful Sunday.  If you need any of the products you have seen on my card you can pick them up in my online store from the Stamping Up! Shopping List below.
Happy Stampin' 
Rick Adkins 


Stampin' Up! Shopping List

Wednesday, September 25, 2019

Gather Together Window Card #PCC352

Hello and welcome to my blog!  Have you ever wanted to show off your designer series paper and a fun colored image on the same card but thought that they each were to much for the same card?  If you have I have the solution for you with today's project.  I am going to share with you a quick solution that was probably in your crafting wheel house but you my have forgotten about.

I had this same problem with today's card for the Paper Craft Crew Sketch Challenge this week.  I wanted to use a piece of the Come to Gather Designer Series Paper but wanted to create a colored pencil piece for the card featuring the large leaf from the Gather Together Stamp Set.  I had to thing about how to do this plus tie in my design to go along with the sketch.  It took a little thinking but I did figure out a very cute solution to all the problems that I had facing me.  Here's a closer look at my card.
Here's the sketch that inspired my card today.  You can click on the sketch below to go to the Paper Craft Crew Website and check out what the other Design team members came up with from being inspired from this sketch.  You can also join in with this weeks sketch challenge by following the same link.

Tips & Tricks: 

For my card as I mentioned above I had several things I wanted to accomplish, but had to give it a lot of thought to come up with something that was inspired by this weeks sketch.  And, also to fit my style of card making along with accomplishing all the goals I had set fourth.  So I started with trying to figure out how to use the stamp set I waned along with the designer series paper.  My solution to the problem was actually very simple and we sometimes forget about it.  The solution was like a brick wall smacking me in the face.  Create a Window card!   By doing so it would accomplish all my goals.  So I started out by cutting my window in the piece of Designer Series Paper I selected for my card.  Which by the way provided my color inspiration for my card as well.  
For the Window I decided to use the Layering Oval Dies.  The ovals not only would provide the window that I needed but also keep the shape from the card sketch.  I used the two largest ovals from the set to use for my windows.  And I guess I should have called this a double window card because I actually do have two windows on the card front.  Anyway I used the largest oval from the set to cut out the oval in the center of the Designer Series Paper.  Once I had that cut out I took my Whisper White Cardstock that I was going to use for the mat and created the second window.  I used the second oval die and the piece of designer series paper I just talked about and lined them up together how they would go on the card.  Once I had the designer series paper lined up perfectly I added the oval and lined it up in the cut oval and ran that through my die cutting machine.  
Once that was cut out I went ahead and layered them together and adhered them.  I then took and lined them up on my card base and used a pencil and outlined the oval.  At this point I started stamping the large leaf image from the stamp set in Versamark ink and added Gold embossing powder and heat set it until it was smooth and melted.  Once I was cooled I started coloring with my Polycromus Color Pencils.  Once I had everything colored I layered the card front on to the card base using dimensionals.  I then cut out one of the small leaves from the Gather Leaves dies from Gold Foil.  I added it to the card front using a dimensional.  I stamped a piece of Merry Merlot cardstock with my sentiment and heat embossed it with white embossing powder.  I added a few gold sequins to the card to finish everything off.  I added a piece of whisper white cardstock with a couple of the leaves stamped on it for the inside.  
Thanks for dropping by today, I hope that you enjoyed my little card today.  You can find a full list of the supplies I used below besides the color pencils.  I purchased them from Amazon.  My suggestion is to always purchase the set that you can afford; you can work wonders with just a few colors.  So don't ever think you have to have the biggest set that's out there.  
Happy Stampin' 
Rick 


If you live in the US.  I would love you to choose me as your demonstrator.  If you would like to purchase any of these products you can click on the Shop Now Button or by clicking on any of the images below.  Alternatively, you can also contact me by email to place your order.  Please be sure to use the monthly host code and I’ll send a little something out to you the following month to say Thank You!  
September  HOST CODE:  SQ2WWJZN
  1. Spend any amount with me this month and receive the Creative Stampers Tutorial Bundle featuring Fancy Fold or Interactive Projects.  Plus get a gift from me in October. 

Please remember that if you use the host code you cannot use that order towards my KCRP’s (Kinmon Crafty Reward Points) that would be double dipping and is not allowed.  For more information on KCRP’s click here. 


Product List

Template Designed by creativeworkerbee