Showing posts with label floral. Show all posts

Saturday, July 6, 2019

Rick's Saturday Simple Stamping Episode 25 Featuring the Beautiful Friendship Stamp Set by Stampin' Up!

Hello and welcome to my blog; today I am going to share with you the next Episode of Rick's Saturday Simple Stamping.  For this weeks card I used one of my favorite stamp sets, and the stamp set that I will be featuring in my Summer Retreat this year, Beautiful Friendship.  This is a great floral stamp set that has a watercolor look without all the work.  Which was one of the reasons I picked it for this week's Simple Stamping episode.   Here's a look at this weeks #simplestamping card.


This is one of those stamp sets that you can do so much with if you just think outside the box a little.  Not that you may want to considering what beautiful floral bouquets you can create.  This card literally took me just a few minutes to create.  The longest part was picking out what images and colors to use.  That's really how easy this card was.  I actually did this card last Saturday while I was at a Alabama Mini Retreat with Stampin' Up!.  I had just gotten mine in and hadn't had time to play with it because I was presenting at the Mini Retreat and had to finish getting my presentation ready, while waiting on the electrician to come and fix our power from the outside of the house to the inside.  Long story, I will fill you in on that during a upcoming Facebook Live.


I used three ink pads for today's card.  I used Lovely Lipstick, Call Me Clover, and Balmy Blue.  I started out by stamping the Hydrangea in Balmy Blue Classic ink and then stamped the roses in Lovely Lipstick and nestled them up right next to the Hydrangea.  I finished off by adding in a few leaves and the sentiment in Call me Clover.  My card base is a sheet of Whisper White Cardstock that was cut in half (5 1/2 x 8 1/2 scored and folded at 4 1/4).  If you are just starting out I always suggest getting either a pack of Whisper White Cardstock and a pack of Medium White Envelopes or a pack of the Whisper White Note Cards and Envelopes.  With either of these two options you are covered to create super cute cards.  As you progress in your stamping journey you can add more supplies.  But really and truly these few items and maybe a roll of white ribbon will get you through for awhile, before you decide you need to add other items to your shopping cart.


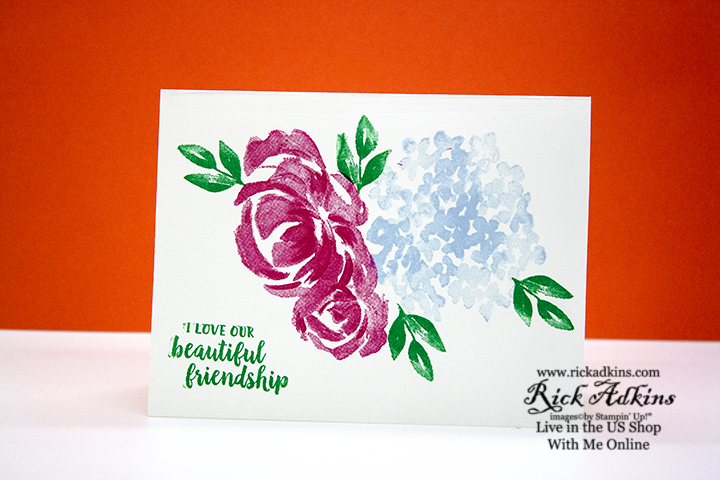
Friendships are some of the most precious things we have in our lives.  Show your cards made with this stamp set to your friends, and I promise you they will love them too.  You can even get your friends to help you create heartfelt projects using the Beautiful Friendship Stamp Set.  This is one of our DistINKtive stamp sets.  Which means it was laser etched to give different tones and values with just one stamp, no need to layer multiple images to get the multilayered look.  It's all done with just one stamp.  

Video Tutorial: 


If you are viewing this post by email you may have to click the image below to view the video.  Some email servers will not show a embedded video.  
Thanks for dropping by today for another episode of Rick's Saturday Simple Stamping.  I hope that you enjoyed my card today, and if you have not started stamping that I have inspired you to jump in and get started.  You can pick up all the supplies you will need in my online store.  You can find the list of supplies in the shopping list below.  
Happy Stampin'
Rick 


Stampin' Up! Shopping List


Host Code and Free Gift:

July Host Code:  J2YFZZ34
This host code and offer only good from June 30, 2019 till July 17, 2019.


  1. Spend any amount (using this month’s host code) and get the July Creative Stampers Tutorial Bundle FREE (This month we are featuring products from the Follow Your Art Suite in the 2019-2020 Annual Catalog)
  2. Spend $25 (before taxes and shipping) or more using this month’s host code and get the my July Monthly Card Class Make & Takes Mailed to you FREE as a Thank you.
  3. Spend $75(before shipping and taxes) or more and get the July Monthly Make & Take Class and a bolt of the Tricolor Ribbon for FREE as a Thank You gift when you use this month’s host code.
  4. Spend $150 or more and get the July Creative Stampers Tutorial Bundle, July Monthly Card Class Make & Takes, & a Bolt of the Tricolor Ribbon for FREE as my thank you.  If your order is over $150 please don’t use the host code.  You will give up your Stampin’ Rewards if you do. 


Please remember that if you use the host code you can not use that order towards my KCRP’s (Kinmon Crafty Reward Points) that would be double dipping and is not allowed.  For more information on KCRP’s click here. 

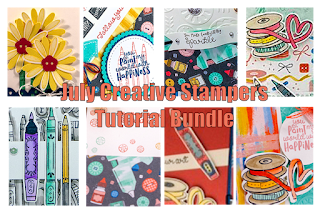
You have to ways to get the July Creative Stampers Tutorial Bundle.  1.) Earn it FREE with a qualifying order (see above host code information).  2.) You can purchase it from my Tutorial Store for $20 US by clicking here as a Instant Download.  This month's Creative Stampers Tutorial Bundle features 8 projects using products from the Follow Your Art Suite.  

Summer's here and I am ready to beat the heat!  To celebrate Summer, I am going to run a three-month promotion with the chance to earn a prize in September!  I will be giving away a few prizes from the Holiday Catalog in September and you can get your name in the Coconut now! Click here to learn more!
Now's a great time to shop!  For every $50 you spend in my online store Stampin' Up! will send you a $5.00 Coupon code by email to use toward your orders in August.  Click here to shop! 

With the Extra Extra Joining Special you earn 2 times the Extras!  Join my family of Kinsmon Crafters now and earn an extra $30 in FREE items to add to your $99 Starter kit.  That means you can pick out $155 of wonderful Stampin' Up! Products for only $99.  And you get FREE shipping on your starter kit.  Extra #2 You will receive a $10 Coupon Code if you Sign up in July to use in August. If you sign up in August your will get the Coupon Code to use in September.  Have questions visit my Join my Team Page and my FAQ page for more details.  

Three main reasons to Join!  

  1. You Get at least a 20% discount on all your orders while you are a demo.   
  2. You get to join my fun Kinsmon Crafters Team and Private Facebook Group.
  3. Access to directions to all my online classes 

I All Ready Know I Want to Join!  Sign Me UP!

Monday, April 29, 2019

Stampers Showcase April Blog Hop

Hello and welcome to this month's Stampers Showcase Blog Hop.  This month our theme is Spring/Floral.  So I had one card made and ready to go but really didn't like it.  So after a lot of thinking about showing it or not last night about 7:30 I decided to scrap the original card and go with something completely different.  So for my new card for today's blog hop I went with a new set that will be coming in the 2019 Annual Catalog but paired it with some retiring favorites and some things that are carrying over as well.  I picked the new Bloom & Grow stamp set and matching dies to do my card.  Here's a look at my card.
The Bloom & Grow stamp set is a wonderful floral themed set that has three different large floral images along with wonderful sentiments.  The matching dies not only cuts out the flower sprays but there are two dies that cut out two openings that allow you to stick the sprays into.  I stamped the sprays in memento tuxedo black ink so that I could use my Stampin' Blends to color the sprays.
For the coloring I used Lovely Lipstick, Highland Heather, Mango Melody, Pineapple Punch, and Call Me Clover Stampin' Blends in light and dark.  Once I had them colored I cut them out using the matching dies. My card base is a piece of Mango Melody (4 1/4 x 11 scored at 5 1/2).  I added a piece of whisper white that was cut at 5 3/8 x 4 1/8 to which I added a piece of Lovely Lipstick DSP (4 x 5 1/4).  I stamped my sentiment in Versamark and used the 2018-2020 In Color embossing powder in Lovely Lipstick (which is on the retiring list) and them embossed it with my Heat Tool.  I added this strip between each floral spray and added a few rhinestones just to add a little sparkle.
Thanks for dropping by I hope that you have enjoyed my card today.  I hope that you have fun hopping along with the rest of the hoppers today.  Sue Vine from Australia is next on the hop today so I hope that you hop on over there and check out what she has created for this month's hop.  I know it's going to be great.
Happy Stampin' 
Rick Adkins 


Stampin' Up! Shopping List: 

Thursday, April 4, 2019

Tea Together Fun Fold Card Verizon 2

Hello and welcome to my blog; today I am going to share with you the other version of the Tea Together Card that we made last Wednesday night during my Facebook Live, but I shared the card in my blog post on Monday.  If you missed that card you can check it out here.  I had gave a little sneak peek of this card while it was unfinished and had a few suggestions that I needed to go ahead and finish it.  So over the weekend I did just that.  Here's a look at the 2nd version of that card.

I used the same designer series paper, decorative ribbon border punch, and stamp set but changed the ribbon, and focal image.  For the focal image I stamped one of the single roses and colored it with my Stampin' Blends.  I used Calypso Coral and Old Olive this time for the coloring.  I then punched out the rose with a 2" circle punch and layered that on a 2 1/4" circle punched from Calypso Coral Cardstock.  As I mentioned I changed up the colors for this card.  
I picked a piece of the Tea Room Specialty Designer Series Paper that had Crushed Curry and Coastal Cabana on it and used a piece of Old Olive Cardstock for the decorative edge that was punched with the decorative ribbon boarder punch.  I assembled the card the same way as the last one.  
 
I then added a small piece of Calypso Coral designer series paper to the inside of the card.  Before closing the fun fold up I added some of the dotted tulle trim to the front.  I popped the circle up on a couple stampin' dimensionals on the front edge.  
 I didn't add pearls to the front of this design I felt that with all the different patterns of paper and the trim that the pearls would be a little to much.  This fun fold is actually very easy to recreate and allows you to show off which ever side of the designer series paper you want to feature.  As you can see I decided to show off three different patterns.  The floral pattern and the coastal cabana pattern are on the same sheet.  Stampin' Up!'s designer series paper has some of the best patterns in the last couple years.  Lately they have been giving us a floral or other design on one side and a more subtle geometric pattern on the other side.  
Thanks for dropping by today.  I hope that you like the second version of this card as much as the first.  If you need any of the products you've seen today; you can pick them up in my online store 24/7 by clicking on the shop tab above or by clicking on the item in the Stampin' Up! Shopping List Below.  
Happy Stampin'
Rick

If you are looking for a storage option for your ink pads stampin' write markers and blends we now have you covered.  These items are actually a early release from the upcoming Stampin' Up! 2019 Annual Catalog.  If you would like to order some you can read more about Storage by Stampin' Up! by clicking here, as well as order.  
Build your Stampin' Blend collection each month with my Stampin' Blends Club.  Request information here

Host Code and Free Gift:

April Host Code:  UMR2NHW7

  1. Spend $50.00 (before taxes & shipping) in my Online Store using the current host code during Aprils Creative Stampers Tutorial Bundle and get two PDF tutorials sent to you starting the 20th of the month.  
Stampin' Up! Shopping List

Template Designed by creativeworkerbee