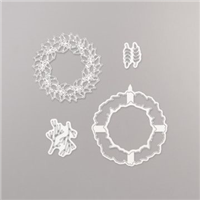
Hello and welcome to my blog; today I have a super fun Fall themed card for you for the Paper Craft Crew Weekly Sketch Challenge. This week we have a very versatile sketch for you that you can create a lot of different cards with. I used the Seasonal Wreath Stamp Set from the 2019 Stampin' Up! Holiday Catalog to create my card for you. Here's a look at my card.
And here's the inspiration image for my card. You can play along over at the Paper Craft Crew website or just check out all the designs that the design team came up with with this sketch.
Tips & Tricks:
For my card I heat embossed the wreath image from the Seasonal Wreath Stamp Set in Clear Stampin' Emboss Powder onto a piece of Whisper White Cardstock. Then I took my sponge daubers and added ink to the wreath for a emboss resist technique. As far as the inks I used they are as followed; Crushed Curry, Pumpkin Pie, Cajun Craze, and Merry Merlot. I went with nice Fall colors, I did throw in a little Rich Razzleberry just for fun.
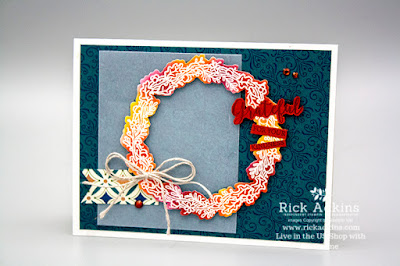
My card base is a piece of Thick Whisper White Cardstock cut at 5 1/2 x 8 1/2 scored at 4 1/4. I added some of the Brightly Gleaming Specialty Designer Series Paper that was cut at 5 1/4 x 4 to the front of the card base. I thought that the Pretty Peacock color complimented the colors in the embossed resist wreath very nicely. I then added a scrap of Vellum Cardstock to the front of the card so that the wreath would have an anchor point. I also added a little strip of the same designer series paper (this is the reverse side) under the wreath and made it into a fish tail banner.
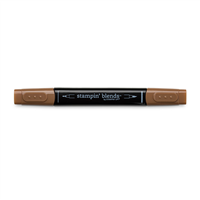
To finish off the card I popped the wreath up on Mini Stampin' Dimensionals and placed it over the vellum layer. I stamped my sentiment onto a scrap of Cajun Craze Cardstock and trimmed it out using my Paper Snips. I cut around the grateful and then cut the two smaller sentiments into thin strips. I added these to the wreath with a little Multipurpose Liquid Glue. I then added a few Basic Rhinestone Jewels that I colored with my Bronze Stampin' Blend Marker and added a double bow that I made from a little Linen Thread. I attached the bow with a Mini Glue Dot, and that finished off my card.
Thanks for dropping by today, I hope that you have enjoyed my little card and that you will give this simple emboss resist technique a try on your next Fall themed card. I will see you again tomorrow for another fun little project.

Happy Stampin'
Rick Adkins
If you live in the
US. I would love you to choose me as your demonstrator. If you
would like to purchase any of these products you can click on the Shop Now
Button or by clicking on any of the images below. Alternatively, you can
also contact me by email to place your order. Please be sure to use the
monthly host code and I’ll send a little something out to you the following
month to say Thank You!
October HOST CODE: SQ2WWJZN
1. Spend any
amount with me this month and receive the Creative Stampers Tutorial Bundle
featuring Fall & Halloween Projects. Plus get a gift from me in
November.
Please remember that if you use the host code you cannot use that
order towards my KCRP’s (Kinmon Crafty Reward Points) that would be double
dipping and is not allowed. For more information on KCRP’s click here.
Three
main reasons to Join!
1. You Get at least a 20% discount
on all your orders while you are a demo.
2. You get to join my fun Kinsmon
Crafters Team and Private Facebook Group.
3. Access to directions to all my
online classes
Stampin' Up! Shopping List: