Hello and welcome to my blog; today I am going to share with you a fun spring/summer easel card using the Pansy Patch Bundle from Stampin' Up!. This is a card that you make the person that receives it say WOW and they will love to display it all year round with all the beautiful handmade pansies. Here's a look at todays card.
This is a great card to make for someone that you want to show a little appreciation to or to just share a little happiness with. Just so you know this card does end up measuring 5" x 7" once all completed. So, you would have to make an envelope for it using some of the Pansy Petals Designer Series Paper.
Pansy It Up!:
I started out making this card by die cutting all the different color pansies and the leaves. I used scraps of cardstock in the following colors; Daffodil Delight, Mango Melody, Fresh Freesia, Pale Papaya, Calypso Coral, Highland Heather, Blackberry Bliss, Soft Succulent, Evening Evergreen, and Basic White. I ran the scraps through my Stampin' Cut & Emboss Machine with each of the different layer dies from the Pansy Dies many times to create each of the pansies and leaves.
 |
| Image by Stampin' Up! |
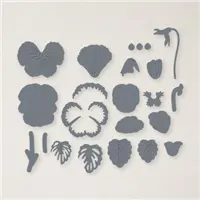
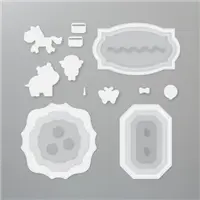
These Pansy Dies add an elegant touch to any papercrafting project. Detailed pieces can be cut and layered for a unique 3D effect that's sure to impress. Use your favorite coloring technique to finish the look. There are 21 dies in the Pansy Dies set with the largest die measuring: 1-7/8" x 1-13/16" (4.8 x 4.6 cm). You will want to use with your Stampin' Cut & Emboss Machine. They are also compatible with the Mini Stampin’ Cut & Emboss Machine.
 |
| image by Stampin' Up! |
Above is what each of the dies look like when cut out from cardstock. Dies help you create unique die-cut shapes and paper cut outs with just a quick run through your Stampin' Cut & Emboss Machine. Detailed dies include ejection holes so you can remove the paper easily.
Once I had all the cardstock scraps cut into either pansy petals, centers, edges, and leaves I sat down with them and my Multipurpose Liquid Glue and paper pieced them all together in different color combinations. I pulled up Pansy images from Google to make sure I had the right colors of flowers (before die cutting everything) color combinations. I did figure out that you can line up some of the dies twice to cut out the different color centers to add even more texture and drama to each one. Just a note that the dies not only cut but they emboss some of the pieces as well. Once I had all the flowers and leaves pieced together I sat them aside to dry and it was time to work on the flower pot.
Build Your Own Flower Pot:
For the flower pot I cut a piece of Calypso Coral Cardstock to 4 1/4" x 11" and scored it at 1", 5 1/2", and 10". Then I folded up the card base at 5 1/2" and at the score line I measured in on both sides 3/4" and made a mark. I then placed the folded card base into my Paper Trimmer and lined up the corner of the first score line (just below it) and the 3/4" mark that I made and cut up at an angle. I repeated this on the other side flipping the cardstock over so it was easy to cut. I then cut the card base in half at the 5 1/2" mark to make two flower pots. After all the cutting was complete I could fold down the other score line from the top and secure in place with some strong adhesive and make the top of the flower pot.
Time to Plant:
Now at this point it was time to plant all the pansies and leaves we have made in their pot and to put the easel card together. I started with some Basic White Thick Cardstock and made the card base. It's cut at 4 1/4" x 11" and scored at 5 1/2" and 2 3/4". I wanted to dress up the card front a little so I cut two pieces of the Pansy Petals Designer Series Paper to 3 3/4" x 2 1/2" and matted both of them on to a 3 7/8" x 2 5/8" pieces of Fresh Freesia Cardstock and placed them between the 2 3/4" score lines.

I could then start working on the pot and putting each of the flowers inside. I worked on my Silicone Craft Sheet (since glue does not stitch to it) and started with the leaves that would be coming from underneath the pansies but over the flower pot and glued them in place with my Multipurpose Liquid Glue. Next I glued down the first section of pansies. From there I would add a few leaves tucking them in here and there and more pansies until I got the pop completely filled. Each one was attached with just a little Multipurpose Liquid Glue under each connecting edge (meaning any edge that touched either another leaf or pansy has just a little glue under it.) This way I could make sure that it was all nice and secure.

Next I attached the flowering pot to the card base with Stampin' Dimensionals. The Dimensionals were only placed under the part of the part that would sit on the bottom flap of the card base. So, I had to be careful on placement and make sure that I didn't put any of them where it would close the card together and keep it from folding up like you see above. I then created the stopper for the card to be able to sit upright. I used one of the dies from the Hippo & Friends Dies to cut out my sentiment and placed a piece of the same Designer Series Paper where I wanted the stopper to go. Then I placed the stopper into the inside of the card with a few more Stampin' Dimensionals. That way the flap would sit upright when opened.
Finishing Touches:
To finish off the card I added a message ton the outside of the card that I die cut using one of the Tailor Made Tags Dies. I mean a pot of flowers delivered always comes with a personal note either on a tag or a notecard so why not my paper flower pot as well. I attached the tag with a little Multipurpose Liquid Glue; tucking it slightly under the flowers. I then added a multi-looped bow made from Linen Thread and attached it over the tag opening with Mini Glue Dots to make it look as if the tag was tied to the flower pot.
For the center of each of the Pansies I could have die cut little centers from cardstock but I wanted a little more bling to the card. So, I opted to use the Opal Rounds in the the center of each Pansy. Which was a great way to go because the Opal Rounds also will pick up the colors of the cardstock underneath and around it. So it added additional color to each pansy.
Thanks for dropping by today, I hope that you have a wonderful day I hope that you give this fun fold technique a try this week. If you need any of the supplies that you have seen today you can pick them up in my online store.
Happy Stampin'
Rick Adkins
Creative Stampers June Tutorial Bundle:
Get the June 2021 Creative Stampers Tutorial Bundle Free with any size order in my online store or it can be purchased for $22 in my
Tutorial Store. The June Creative Stampers Tutorial Bundle features 10 creatively fun projects using our favorite new products from the 2021-2022 Stampin' Up! Annual Catalog
.
Round 2 runs from June 4, 2021 through July 2, 2021 You will need to place your orders by June 18, 2021 to receive the Round 2 Card Kits. Video Tutorials will be Live on my YouTube Channel each Friday, at 11:30 am CST.
Join me each week for Coffee & A Card on my YouTube Channel!
Place a $44 order before shipping and taxes using this month's Coffee & A Card Host Code CKPEVJ37. You will have to use the Coffee & A Card Host Code in order to get the card kits. Card Kits are available until June 18, 2021 (or while supplies last). I will send you the card kits to make all five Coffee & A Card projects Free as a thank you gift. Kits will be mailed to the address that is on the order. Additional Items Needed: https://s.tamp.in/_QZLi0
Shopping Link with Round 2’s Host Code: https://www.stampinup.com?hostcode=CKPEVJ37
Just a little reminder that I can only ship within the United States.
Rick's Fun Summer Stamping Special:

Summer is almost here, and I am super excited to announce my Summer Promotion for this year. This year I want to kick summer off with a bang and with a whole lot of fun too! And what is more fun that spending summer stamping together! You will be able to earn tokens for a couple different things. When you earn a token, I will put your name on it during my weekly Facebook Live and drop it into my Garden of Fun Prize Bucket! At the end of the promotion, I will do a prize draw for some fun prizes from everyone’s name in the bucket.
Beauty of the Earth One Sheet Wonder Card Class:
One Sheet Wonder Card Class with Rick… Featuring Beauty of the Earth Designer Series Paper Take a break from Summer with me! So, much fun is in store…12 projects!
One Sheet Wonder Card Class with Rick featuring the Beauty of the Earth Designer Series Paper and a whole lot of crafting fun!
Click here to register by June 21, 2021.
Spring & Summer Retreat:
Spring/Summer 2021 Retreat in a Box…Crafty Corner Retreat to GO!
The Spring/Summer 2021 Retreat in a box Registration is now open!
Grab one while you can.
Enjoy the fun of a retreat RIGHT from your home and computer! Grab one before they sell out!
Click here to learn more and to register today! Early Bird Price available until June 26, 2021
June Crafty Corner Monthly Card Club/Class:
There's still time to join this month's Crafty Corner Online Card Club/ Card Class. Deadline to register is the 20th of the month. You can
click here to find out all the details.
Inspired Thoughts Bundle Class:
Sign Ups are open from Tuesday, June 15th - Tuesday, June 29th or until the class fills.
I am so excited to be bringing you my latest online class preorder for the Inspired Thoughts Bundle! This bundle is a great one to have in your stash because you can use it all year long. I know that you are going to love this class.
Click here to find out all the details and to register for this class.
Stampin' Up! Shopping List:


0 Comments:
Post a Comment
Thanks for taking the time to leave a comment.
Much Love,
Rick