Tuesday, April 14, 2020

Positive Thoughts The Spot Color Challenge #106

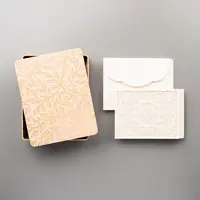
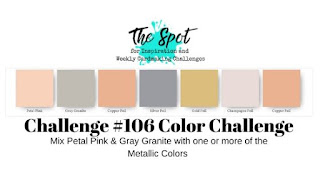
Hello and welcome to my blog; today I am going to share with you the card that I made for this week's color challenge over at The Spot.  The color challenge this month features Petal Pink, Gray Granite and at least one or more metallic Color.  I chose to use copper as my metallic, and I used the Positive Thoughts stamp set from the January-June Mini Catalog on my card today.  I did a fun little technique that's been around for a while on my card. I used the triple stamping technique to create a fun and actually quick card.  Here's a look at my card.  


Here's the challenge image that inspired today's card.  You can click on the image below to check out what the other design team members created and play along with us this week. 

Tips & Tricks: 

The triple stamping technique is really quite easy.  All you have to do is have three pieces of cardstock that are cut two sizes smaller than the base layer.  You want to leave room for the three mats that you are going to add.  Add a little removable adhesive to the cardstock and stack them all up at one time.  Stamp the images you are going to use.  In my case I stamped all the images from the Positive Thoughts stamp set in Versamark ink and then covered them all in Copper Stampin' Embossing Powder heat set each layer and then added them to my copper foil mats.  


I attached everything together with Multipurpose Liquid Glue.  You do have to make sure that when you are lining the layers back up on the layer on top you have to line the images up so that they look as if they fit back together correctly.  You do have a little wiggle room but not alot.  I love the look of how the stamping looks endless.  I chose to alternate the colors of my cardstock between Petal Pink and Gray Granite between each copper foil layer.  I started out with my Petal Pink card base then did a copper foil layer then a gray granite layer then the copper the petal pink and so on and so forth.  


Before adding the layered card front to the card base I added some of the Petal Pink Organdy Ribbon to the front and tied a simple knot to one side.  I then used the Stitched Shapes Dies and cut out a stitched circle from some Petal Pink Cardstock and stamped the flower from the sent in the middle with Petal Pink ink.  I did stamp off once to get a lighter shade of Petal Pink for the flower.  I then stamped the sentiment in Versamark and covered with it copper embossing powder and then heat set it.  I added the stitched circle to a scalloped circle that I die cut from some copper foil.  The sentiment piece was then popped up over the ribbon with a couple stampin' dimensionals.  To finish off the card I added a few champagne rhinestones.  I thought they complimented the copper foil really nicely.  


For the inside of my card I stamped one of the sentiments in Gray Granite ink and stamped the feather a few times around the inside of the card.  Thanks for dropping by today.  I hope that you will take a little time this week and play along with us at The Spot for this week's color challenge.  I know that you will find this to be a super fun challenge and it will really spark your creative juices.  If you need any of the supplies that you have seen used today you can order them from my online store by clicking on the items in the shopping list below.  

Happy Stampin' 
Rick Adkins 

Stampin' Up! Shopping List: 


Supply List


Use the April Host Code on any order of $50 (before taxes & shipping) or more during the month and receive a gift from me in May as a Thank You.  If your order is $150 or more, please don't use the host code.  You will forfeit your Stampin' Rewards if you do; and I want you to get those rewards.


If you place any size order with me during the month of April, you will receive the April Creative Stampers Tutorial Bundle from me as a little thank you.  This month's tutorial bundle features eleven tutorials that use the outgoing 2018-2020 In Colors.  The Creative Stampers Tutorial Bundle can either be earned for FREE with any size order or Can be purchased for $20 from me.


Order $50 (before shipping and taxes) of products from the Ornate Garden Suite of Products in my Online Store in April using the Host Code:  ZPBUDHR7 and I will send you’re the Ornate Garden Mega Tutorial Bundle for FREE as a thank you gift.  That’s 90 tutorials featuring products from the Ornate Garden Suite (a $21 value) free for purchasing products from the Ornate Garden Suite from me this month free.  

Don’t want to order but still would like to get the Ornate Garden Mega Tutorial Bundle featuring 90 projects with both metric and Imperial measurements for each project!  You can purchase it from me for $21.00 US any where in the world in my online store by clicking here.  

Monday, April 13, 2020

Fanciful Fragrance Detailed Laser Cut Card - Stampin' Up!

Hello and welcome to my blog; today I have a very easy and quick card for you using the Fanciful Fragrance Stamp Set which is my featured product of the week this week.  So, you will see a few different projects this week featuring the stamp set.  This is also the featured stamp set in one of my online classes this month so I wanted to give them people taking the class a few more options to use their products in the class.  If you haven't signed up for my Fanciful Fragrance Online Class yet you still have until  April 16. 2020 to do so.  For today's card I used the Bird Ballard Detailed Laser Cut Cards and a few other supplies.  Let's have a look at the card shall we.  


Fanciful Fragrance Stamp Set, Bird Ballad Laser Cut Cards, Rick Adkins, Stampin' Up!

Tips & Tricks: 

I wanted to do something quick and easy for today's project and the Bird Ballad Detailed Laser Cut Cards where perfect to accomplish that mission.  The Bird Ballad Laser-Cut Cards & Tin includes lacy laser-cut cards ready for your finishing touches in a lovely storage tin. Add labels you create using your favorite stamp set and dies or punches.  For this reason I thought they would pair nicely with the Fanciful Fragrance Stamp Set.  They both are very feminine to me and I thought the detailed images in the stamp set would look fabulous on the laser cut cards.  And, I was floored when I put them together to get such a wonderfully pretty card.  

The Bird Ballad Laser-Cut Cards & Tin includes lacy laser-cut cards ready for your finishing touches in a lovely storage tin. Add labels you create using your favorite stamp set and dies or punches

For my card I cut a piece of Very Vanilla cardstock into a large stitched oval using the Stitched Shapes Dies.  I then inked up the perfume bottle image from the Fanciful Fragrance Stamp set with Rococo Rose Classic Ink and stamped it on the outside one of the envelope that comes in  the Bird Ballad Laser-Cut Card Tin.  I did this because I wanted the image on my oval to be lighter (2nd generation stamping) so that I could stamp the sentiment but still see the stamped image.  I love that you can get multiple shades by stamping off with just one ink pad.  

Fanciful Fragrance Stamp Set, Bird Ballad Laser-Cut Cards & Tin, Rick Adkins, Stampin' Up!

After stamping the image and the sentiment (which I stamped with Early Espresso Classic Ink) I placed the stitched oval onto a large scalloped oval with a few Stampin' Dimensionals.  I then took the scalloped oval (which I cut two) and placed the mounted sentiment onto the center of the laser-cut card with snail.  In order not to glue the card shut I added the other scalloped oval to the inside of the card behind the sentiment oval on the front of the card.  This allows me to open and close the card freely with no worry of glueing it shut.  
Fanciful Fragrance Stamp Set, Bird Ballad Laser-Cut Cards & Tin, Rick Adkins, Stampin' Up!

Video Tutorial: 


If you are viewing this post by email you may have to click here or on the image below to view the video.  Not all mail servers will show the embedded video.  

Fanciful Fragrance Stamp Set, Bird Ballad Laser-Cut Cards & Tin, Rick Adkins, Stampin' Up!

Thanks for dropping by today, I hope that you give this quick and easy card a try.  The Bird Ballad Laser-cut cards can be used for so many different beautiful cards.  And the best part is they are so easy to use.  

Fanciful Fragrance Stamp Set, Bird Ballad Laser-Cut Cards and Tins, Rick Adkins, Stampin' Up!
Happy Stampin' 
Rick Adkins 

If you live in the US.  I would love you to choose me as your demonstrator.  If you would like to purchase any of these products you can click on the Shop Now Button or by clicking on any of the images below.  Alternatively, you can also contact me by email to place your order.  Please be sure to use the monthly host code and I’ll send a little something out to you the following month to say Thank You!  


Stampin' Up! Shopping List: 


Supply List


Use the April Host Code on any order of $50 (before taxes & shipping) or more during the month and receive a gift from me in May as a Thank You.  If your order is $150 or more, please don't use the host code.  You will forfeit your Stampin' Rewards if you do; and I want you to get those rewards.


If you place any size order with me during the month of April, you will receive the April Creative Stampers Tutorial Bundle from me as a little thank you.  This month's tutorial bundle features eleven tutorials that use the outgoing 2018-2020 In Colors.  The Creative Stampers Tutorial Bundle can either be earned for FREE with any size order or Can be purchased for $20 from me.


Order $50 (before shipping and taxes) of products from the Ornate Garden Suite of Products in my Online Store in April using the Host Code:  ZPBUDHR7 and I will send you’re the Ornate Garden Mega Tutorial Bundle for FREE as a thank you gift.  That’s 90 tutorials featuring products from the Ornate Garden Suite (a $21 value) free for purchasing products from the Ornate Garden Suite from me this month free.  

Don’t want to order but still would like to get the Ornate Garden Mega Tutorial Bundle featuring 90 projects with both metric and Imperial measurements for each project!  You can purchase it from me for $21.00 US any where in the world in my online store by clicking here.  

Sunday, April 12, 2020

Mystery Stamping Card Revealed Video Tutorial


Hello and welcome to my blog; today I am going to reveal the cad that I made during Friday's Mystery Stamping Event that I held on my Facebook Business Page.  Were you able to join me live on Friday or did you catch the replay?  If not you will find the step by step tutorial here.  For those that missed the event and have no clue what I am talking about I held a event via Facebook Live on Friday morning at 10 am CST where I gave you clues and walked you through how to create the card that I had designed for you during the event.  The best part about this event was that you got to use any supplies that you wanted in your stash.  And we got to create a fun little card together by following the steps.  Here's a look at my card.  

Bonanza Buddies Stamp Set, Birthday Bonanza Designer Series Paper, Daffodil Delight Ruched Ribbon, Birthday Card, Mystery Stamping, Rick Adkins, Stampin' Up!

Mystery Stamping Supplies: 

• Cardstock 5 ½ x 8 ½ scored at 4 ¼
• A Stamp Set with both Sentiments and images
• Designer Series Paper or matching cardstock to your card base – four cut at 4” x 1”
• two 4 x 5 ¼ piece of Whisper White
• 2” Circle Punch or 2” Circle Die
• Coordinating Ink Pads: Two or three colors
• Ribbon and Embellishment
• Adhesive: Snail Adhesive/Multipurpose Liquid Glue, Dimensionals, Mini Glue Dots if you need them

Tips & Tricks: 

During the live event and even on the replay that you can watch and play along with below I walked everyone through the steps to make this card design.  The first thing we did was take our chosen card base and fold in half.  I picked Mango Melody cut at 5 1/2 x 8 1/2 scored at 4 1/4 for my card base.  I picked this color because it was one of the colors in the designer series paper. Plus I really like this color it's a nice bright fun yellow orange color that just makes me happy.  

Bonanza Buddies Stamp Set, Birthday Bonanza Designer Series Paper, Daffodil Delight Ruched Ribbon, Birthday Card, Mystery Stamping, Rick Adkins, Stampin' Up!

Next we attached the four 4" x 1" strips of designer series paper to the card front.  You could have chosen to use matching cardstock cut the same way.  I think it would be pretty to have either used a border die, border punch, or even embossed cardstock for this step.  I picked the Birthday Bonanza Designer Series Paper because it was part of Birthday Bonanza Suite of products and coordinates perfectly with the stamp set and the fun card design I had planned for this event.  

Bonanza Buddies Stamp Set, Birthday Bonanza Designer Series Paper, Daffodil Delight Ruched Ribbon, Birthday Card, Mystery Stamping, Rick Adkins, Stampin' Up!

Next we stamped the sentiment from the stamp set and stamped one of the images from the stamp set onto a 2" circle that was either die cut or punched out.  Before adding the circle on dimensionals we added two 3 1/2" strips of ribbon.  You could use any ribbon you wanted as long as it coordinated with your products.  I used the Daffodil Delight 1/4" Ruched Ribbon.  I love the texture the ribbon adds to the card and the pop of color.  Not that the products I picked didn't create a colorful card as it was but it just needed a little something.  

Bonanza Buddies Stamp Set, Birthday Bonanza Designer Series Paper, Daffodil Delight Ruched Ribbon, Birthday Card, Mystery Stamping, Rick Adkins, Stampin' Up!

To finish off the card and to solve the mystery we added an embellishment of your choosing.  I picked the Iridescent Sequin Assortment from the Annual Catalog.  I thought the fun colors played well with the colors in the card.  I know that they Iridescent Sequin Assortment doesn't have the same colors in it I thought they played nicely with the colors on the card.  I tired to use only the So Saffron and Pear Pizzazz sequins on my card.  

Mystery Stamping Video Tutorial: 


If you are viewing this post in your inbox you may have to click here to view the video.  Not all mail servers will show the embedded video tutorial.  You can also click the image below to view the video.  


Play along for a Chance To Win:  


I am going to give away one Little Ladybug Stamp Set on YouTube and on Facebook to a randomly selected person that shares their card that they create during the video.  You have until Midnight Tuesday Night to enter your card.  I can only send products to people in the US so this is only open to US residents only.  Sorry for my international friends.  The Little Ladybug Stamp Set was a Host only Sale-a-bration reward for qualifying orders during Sale-a-bration.  I saved the extra ones I received based on class orders to be able to give them away.  

Supplies Used: 


Template Designed by creativeworkerbee