Wednesday, February 26, 2020

Flowering Florals Pop Up Card for #GDP229

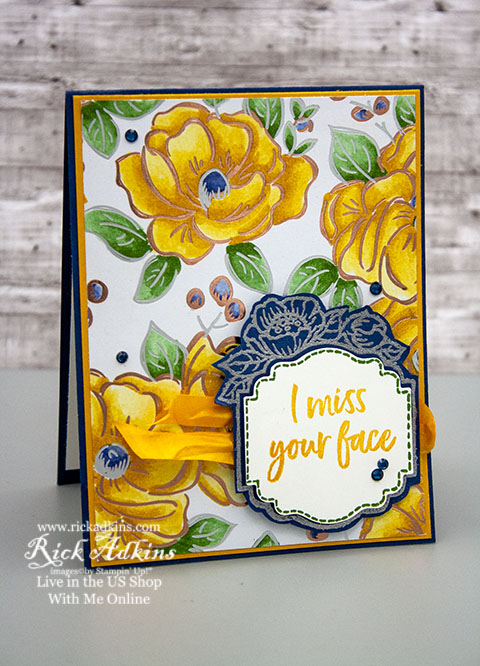
Hello and welcome to my blog; today I am going to share a card with you that I designed using the Flowering Florals Speciality Designer Series and the Tags In Bloom Stamp Set; both are new Sale-a-bration items that will be coming out on March 3, 2020.  I also designed this card for this weeks Global Design Project Color Challenge.  Which are featuring some fun regal colors this month.  Here's a look at my card.

Tips & Tricks: 

I started off my card by cutting my piece of Flowering Florals Specialty Designer Series Paper down to 4" x 5 1/4".  I went ahead and cut down to card front size so that it would be easier to turn and move while coloring.  To color this piece of DSP I used Crushed Curry, Night of Navy, and Garden Green Stampin' Write Markers along with a Blender Pen.  This paper has a slicker surface to the front and allows the ink from the Stampin' Write markers and blender pen to move easier than some others.  I had to be careful how much ink I put down because it's not watercolor paper and will only hold so much moisture.  I put the darkest (pure color straight from the marker) where I wanted the shadows to be, and then used the blender pen to pull it out to the other parts of the flowers, leaves, and berries.  I worked petal by petal of the flowers repeating this process until I had everything colored.  


Once I had all the images colored I then layered the colored designer series paper onto a Crushed Curry Mat that was cut 4 1/8" x 5 3/8".  And, then applied it to my Night of Navy Card base.  To finish off the outside I stamped the floral tag from the Tags in Bloom Sale-a-bration set in Versamark ink onto some scrap of Night of Navy Cardstock and heat embossed it with Silver embossing powder.  I then used my paper snips and cut it out.  I added some of the crushed curry crinkled seam binding to the front and placed my embossed image on top.  I then stamped the stitched layer from the stamp set in Garden Green Ink and the sentiment in Crushed Curry.  I punched this out using the Label Me Lovely Punch and added it to the center of the embossed image with a few Stampin' Dimensionals.  To finish off the front I used some Navy Rhinestones from the Holiday Rhinestone pack from the Holiday Catalog that are carrying over.  
For the inside of the card I created a simple pop up theired pop up panel with some whisper white cardstock that was cut at 4 x 10 1/2" and scored at 5 1/4.  I also colored some more of the Flowering Floral Speciality Designer Series Paper and cut them out by hand and added the colored leaves, flowers, and berries to the pop up feature of the card.  I attached each with a little perfectly placed liquid glue.  I stamped a inside sentiment and add a night of navy mat to that and attached it below the pop up.  
Here's the Global Design Project Color Inspiration for this project.  You can play along or just check out what's been created by the design team and others using this color combination by clicking on the image above.  Thanks for dropping by today, if you need any of the supplies that I used you can find them in the supply list below.  Remember that the Tags in Bloom and Flowering Florals Speciality Designer Series Paper will be available March 3, 2020.  
Happy Stampin' 
Rick Adkins 

Stampin' Up! Supply List: 


Tuesday, February 25, 2020

Wishing You The Best - Tags in Bloom New Saleabration Stamp Set

Hello and welcome to my blog; today I am going to share with you a card I made using the New Tags in Bloom Stamp Set.   Brighten someone’s day with a tag or card you make using the Tags in Bloom Stamp Set. This Two-Step Stampin’ set lets you layer images to create more depth and interest. Stamp the outline flower image in one color, then stamp the corresponding solid flower image over it with a different color. The photopolymer clear stamps make it easy to align the images. Earn this stamp set FREE with a qualifying purchase March 3–March 31, 2020, during part two of our Sale-A-Bration.  Here's a look at my card.

Tips & Tricks: 

I started out with stamping the floral frame in Melon Mambo on a piece of Whisper White cardstock.  Next I stamped the fill in stamps to add the colors to the flowers, and leaves.  For that I used Melon Mambo stamped off for the outside of the flowers.  For the inside I used So Saffron, and for the leaves I used Granny Apple Green.  
Once I had everything on the floral frame stamped I stamped the stitched label in Granny Apple Green Ink and then the sentiment in So Saffron.  I used the Label me Lovely Punch and punched out the stitched tag and popped it up in the center of the floral one using dimensionals.  I then layered that piece onto a piece of Melon Mambo cardstock, and then popped that up onto the card base (Melon Mambo) over the Granny Apple Green Gingham pattern from the Brights DSP paper pack.  
To finish off the card I added a few rhinestones to the card front along with a double bow that I made using pieces of the burlap that I removed from the Burlap Braided Trim from the Tropical Oasis Suite.  I love the texture that the twine from this ribbon gives to the project.  It has great texture that's hard to come by.  You also get a ton when you start pulling it apart.  

Video Tutorial: 

If you are viewing this post by email you may have to click here or click on the image below to view the video.  Not all mail servers will show the embedded video.  

The Tags in Bloom stamp set will be available starting March 3, 2020 to earn with a qualifying order.  This is not the only item that's will be part of the second release.  Be watching this week for more sneak peeks.  If you want to earn the Tags in Bloom Stamp Set the products that I have listed below in the shopping list will get it for you.  The total cost of the items listed was $108 before taxes and shipping so you would have a qualifying Sale-a-bration order for this stamp set.  
Happy Stampin' '
Rick Adkins 

Stampin' Up! Shopping List: 


Monday, February 24, 2020

So, Inviting! How to Create Custom Invitations Online Class Announcement


Learn how to create elegant invitations for parties and weddings with ease in my So Inviting Online Class.  We will be using the So Inviting Stamp Set to create beautiful invitations in four different styles.  You will make 8 invitations (2 each of four designs).  You will then be able to combine the phrases from the So Inviting Stamp Set with your favorite image stamps to customize the invite for any kind of event. 
Image by Stampin' Up! 

Class Cost:   Depends on the Cost Saving Options You Pick


·         Option 1:  Mega Invitations Bundle $67.00         
o   Includes the following
§  Magnolia Blooms Stamp Set
§  So Inviting Stamp Set
§  ½ pack Magnolia Lane Designer Series Paper
§  1 bolt – 5/8” Organdy Stripped Ribbon (Free Gift)
§  Frosted & Clear Epoxy Droplets
§  Card kit with all the precut supplies Ready to go
§  Video & Printable Step by Step Tutorial emailed to you free ($25.00 value)
·         Option 2:  Medium Invitations Bundle $40.68 (no stamp sets)
o   Includes:
§  ½ pack Magnolia Lane Designer Series Paper
§  1 bolt – 5/8” Organdy Stripped Ribbon
§  Frosted & Clear Epoxy Droplets
§  Card kit with all the precut supplies Ready to Go
§  Video & Printable Step by Step Tutorial emailed to you free ($25.00 value)
·         Option 3:  PDF Printable Step by Step Tutorial Only $15.00
·         Option 4: (Kinsmon Crafters Team Only Option Make & Take Packets) $12.00

Image by Stampin' Up! 

Deadline:  Deadline to order my So Inviting Online Class is Friday, March 13, 2020. 

Once all the orders have been received, I will order all the supplies needed for everyone on Saturday March 14, 2020 and have everything sent to me.  Once I receive everything, I will cut all the card kits and supplies needed for the class repackage them and get them in the mail to you by or on March 20th. 
To reserve your spot click here and I will email you the link to pay for your budget saving option. 

Wishing You Much Happiness today and Always - So Sentimental - Bird Ballad Notecard

Hello and welcome to my blog; today I am going to share with you a super cute and easy notecard using products from the January-June Mini and the 2019 Stampin' Up! Annual Catalog  For my project today I created a note card to share with someone that maybe getting married, or maybe they are going through something, or maybe they just need a little encouragement.  These little notecards are perfect for all those occasions you may run into.  I picked one of my favorite Sentiment sets and one of my favorite Designer series papers for this project.  Here's a look at the notecard.


I used the Bird Ballad designer series paper and the So Sentimental Bundle for my project today.  I love the fun spring feel of the designer series paper.  I am really feeling the spring-fever right now, as you may have noticed from my projects as of late.  And, the Bird Ballad Designer series paper helps kind of curves the I am Ready for Spring feeling I've got going on.  I wanted to showcase the big sentiment from the So Sentimental Stamp Set so I keep the card really simple in design.  Just a little designer series paper and a few colored rhinestones.  Which by the way I colored with my Dark Daffodil Delight Stampin' Blend.


My note card was cut from a piece of thick whisper white cardstock which measures 4" x 10 1/2" and I scored it at 5 1/4" to make the top folding note card.  I actually did this by accident I thought was cutting down two pieces of whisper white for another project but learned after I had it cut that it was a Thick Whisper White Card base; I think it all worked out because I adore the card that it made.  The Bird Ballad Designer Series Paper was cut to fit the entire front of the card.  I used another piece that I had cut down for the center of the card to add a little color interest plus to help ground the sentiment.  I also added a little strip to the inside of the card to make everything tie in.
After all the designer series paper was attached I stamped my sentiment onto a scrap of the thick whisper white cardstock in Daffodil Delight ink and used the matching dies from the bundle to cut it out.  The So Sentimental Bundle includes the So Sentimental Stamp Set and the Stitched So Sweetly Dies.

SO SENTIMENTAL CLING STAMP SET

Create tags, labels, and more with the phrases in the So Sentimental Stamp Set. These greetings are suitable for so many occasions—celebrating birthdays, welcoming new babies, saying “thank you.”
* 11 cling stamps
* Suggested clear blocks (sold separately): a, b, c, d


STITCHED SO SWEETLY DIES

Create frames and tags of various shapes and sizes using the Stitched So Sweetly Dies. Pair the dies with the coordinating So Sentimental Stamp Set to quickly cut out sentiments for your handmade cards, tags, and more. You’ll love the versatility of these dies and the all-occasion sentiments from the stamp set.

Thanks for dropping by today, I hope that I have inspired you to power thorough your mess ups and try to create something beautiful with them.  Sometimes it's just a matter at looking at things just a little differently to get over that hurdle.  If you need any of the supplies that I used today you can pick them up in my online store 24/7 by clicking on the items in the shopping list below.

Stampin' Up! Shopping List: 


Happy Stampin' 
Rick Adkins 

Template Designed by creativeworkerbee