Thursday, October 10, 2019

Toile Christmas Gift Card Holder

Hello and welcome to my second post today!  We all need gift card holders, but must are all the same and there's nothing exciting or different about them.  Must crafters love designer series paper but we struggle with which side to use.  Well, I have a solution for both of these problems with this little gift card holder that I created.  I love this little gift card holder so much that; I wanted to share it with you today.  I couldn't hold this project for another day.  That's how excited I am about  the super easy and cute gift card holder that I made last night during my Facebook Live.  Here's a look at my project.


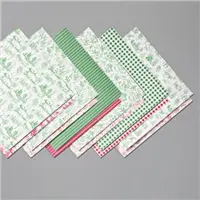
I am going to show you how to create a gift card holder using the Toile Tidings Designer Series Paper and the Toile Christmas Stamp Set and matching dies from the 2019 Stampin' Up! Holiday Catalog.  Toile Tidings Designer Series Paper features traditional toile designs in classic Christmas colors--the perfect paper for a cozy Christmas.

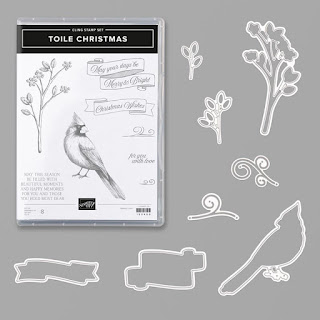
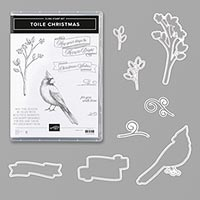
The Toile Christmas Bundle includes the Toile Christmas Cling Stamp Set and the Christmas Cardinal Dies.  Toile Christmas Cling Stamp Set pairs the classic Christmas cardinal image with sophisticated seasonal greetings for all your Christmas projects. The berry branch works as a sweet perch for the cardinal or as an accent piece with your greetings. Cardinals never go out of style, so you'll love the Toile Christmas Stamp Set for many Christmases to come! This is a Distinktive* stamp set; it has a special texture that gives added depth and dimension in a single step, creating photo-realistic images. *Patent pending. The Christmas Cardinal Dies helps you to create custom Christmas die cuts, including a festive cardinal, in record time.
Now that I have shown and talked to you a little about the products that I used on my gift card holder let's have a little chat about the holder itself shall we.  This is a great project for someone that doesn't have a lot of time but wants to create some holiday gifts.  I mean who doesn't like a gift card to their favorite store or to a coffee shop.  This is perfect for a teacher gift with a Starbucks gift card inside.  Or for the person that finds it hard to cut up that designer series paper you've been hording because you can't decided which side to use.   One of the other things I love about this project is you actually get to see both sides of the designer series paper.
Just a word of warning!  Once you start stamping the branch and cardinal you may not be able to stop.  It becomes a little additive.  I am just saying.  I may have stamped about 50 or so to color.  I am not sure what I am going to do with these yet but I am sure I can think of something.

Video Tutorial: 

If you are viewing this post via email you my not be able to see the embedded video tutorial.  If that's the case you can click here or on the image below and it will take you to the video on my YouTube Channel.  
Thanks for dropping by for my second post today, I hope that you find this project helpful and that I have inspired you to use up some of your designer series paper.  Remember you can always purchase another pack.  You have my permission.  LOL!  
Happy Stampin' 
Rick Adkins 

If you live in the US.  I would love you to choose me as your demonstrator.  If you would like to purchase any of these products you can click on the Shop Now Button or by clicking on any of the images below.  Alternatively, you can also contact me by email to place your order.  Please be sure to use the monthly host code and I’ll send a little something out to you the following month to say Thank You!  
October HOST CODE:  SQ2WWJZN
  1. Spend any amount with me this month and receive the Creative Stampers Tutorial Bundle featuring Fall & Halloween Projects.  Plus get a gift from me in November. 

Please remember that if you use the host code you cannot use that order towards my KCRP’s (Kinmon Crafty Reward Points) that would be double dipping and is not allowed.  For more information on KCRP’s click here. 

Stampin' Up! Shopping List: 

OSAT Blog Hop Spooktacular


Hello and welcome to my blog and the October OSAT Blog Hop.  This month we have a Spooktacular hop for you.  I have created a super fun card and a cute fun Halloween filled dimensional project for you.  Here's a look at my projects for this month's hop.

Crystal Ball Card: 

For my card this month I wanted to create a Halloween card but with a little twist.  And the Snow Globes Shaker Domes and the Snow Globe Dies allowed me to do just that.  I wanted to create a crystal ball on my card and with both those items (by the way they are not just for Christmas) allowed me to create the perfect card that fit the bill.  I started out my card by cutting the snow globe shape from my card front.  Which was a piece of the Monster Bash designer series paper on a piece of Mango Melody cardstock.  Once I had it cut out I wanted to add a little darkness around the edges.  So I masked off my mat on my card front and used a sponge and sponged on so Tuxedo Black ink.  I did this just around the edge of the card so it looked like it was sitting back.
Once that was completed and I had the Snow Globe Shaker Dome in place I added my sequins and another piece of the Monster Bash Designer Series paper over that to enclose the shaker.  For my sequins I used a mix of sequins from past Paper Pumpkin Kits, and some other spooky colored ones I had on hand.  I then cut out the base with a piece of Mango Melody Cardstock, which I added my sentiment to using Versamark ink and some Black Stampin' Emboss Powder.  I then used a couple sponge daubers and added some Mango Melody ink and Tuxedo Black ink around the edge of my die cut shape.  This allowed for more of a vintage look to the crystal ball base.  I then added that to my card front with liquid glue.  I looked at the card and thought it was cute but it needed something else.
That's when I had the idea to make a wood shelf or table top for the crystal ball to be sitting on.  So, I cut a piece of Very Vanilla Cardstock to 4 x 1 15/16 and colored it with my Stampin' Blends to create the wood look.  For the coloring I used Soft Suede (combo pack) Crumb Cake (combo Pack), Bronze, and the light Basic Black.  I keep layering the colors until I got the look I wanted.  I then used the sponge again and darkened the back and sides.  I then used the snow globe dies one more time and cut out the opening to fit the base.  I then added that to my card front and added the it to my Smoky Slate card base.

Coffin Shadow Box: 

For my dimensional project this month I knew I wanted to do something with the Coffin Treat boxes but I didn't want to just make a treat box and call it done.  So I had been thinking about how to make them into a shadow box for the last few months.  So, I sat down and spent an afternoon in the craft room to figure out how I could do just that.  And this is what I came up with. 
From the outside I know it looks just like a treat box, but when you open it up, it's a completely different story.  I added some shelves to the inside with some basic black cardstock and liquid glue.  I then added my additional shadow box elements with images from the Spooktacular Bash stamp set and some some of the designer series paper and other elements form the suite.  I stamped and colored the little vampire portrait and cut it out then I added little stands to the back and glued everything in place.  I repeated that process with the jars after cutting each one apart.  I added the sign on the inside of the coffin lid with some of the black dimensionals.  I also dressed it up and added googly eyes to the o's.  I thought that added a super cute touch.  
To finish it off I added the designer series paper to the front and some of the black scalloped edge ribbon to secure it closed.  Well, that's my projects for this month I hope that you have enjoyed them.  If you are viewing this post on my wordpress site you will have to click here to see the blog roll.  If you are on my blogger page (which is my new blog) you can find the blog roll below.  

Blog Roll: 


Happy Stampin' 
Rick Adkins 
If you live in the US.  I would love you to choose me as your demonstrator.  If you would like to purchase any of these products you can click on the Shop Now Button or by clicking on any of the images below.  Alternatively, you can also contact me by email to place your order.  Please be sure to use the monthly host code and I’ll send a little something out to you the following month to say Thank You! 

Stampin' Up! Shopping List


Template Designed by creativeworkerbee