Wednesday, October 2, 2019

Rare Blessings One Layer Card PCC353 By Rick Adkins

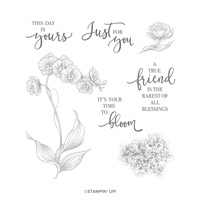
Hello and welcome to my blog; today I am going to share a really pretty and easy one layer card with you today.  I wanted the orchid image in the Rare Blessings Stamp Set from Stampin' Up! to be the main focus on my card today.  I didn't want a lot of embellishments, or layers so a one layer card was the way to go.  Here's a look at my card. 
 The Rare Blessings Stamp Set features a wonderfully detailed orchid just for you to give to a friend. The Rare Blessings Stamp Set also comes with great sentiments in a beautiful font.  I think the orchid is what I noticed first when I was thumbing through the catalog back in April and was like omg I have to have that set.  Then I look at the sentiments and it was a must have after reading what was in the set and seeing the fonts.
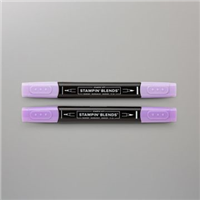
I used a little ink blending in the background of the card to enhance the coloring of the orchid.  But, before I laid down the Crushed Curry ink blend; I had to stamp the orchid and mask it.  I create my mask with a little Avery Removable Label and cut it out.  For the colors of the orchid I used my Stampin' Blends.  There's really not a lot of real estate to color with this image, but I still got four different colors on each section.  For the leaves I used Old Olive and Mossy Meadow.  For the orchid's blooms I used Purple Posy and Highland Heather.  For the flower centers I used Daffodil Delight.  I did use the light and dark of all these markers on the flowers and leaves.  Even with out a lot of area to color I still could get in there and add some nice shading.  

When I got the orchid colored it was standing out from the background enough.  The reason for that was the ink blending in the background was so soft compared to the coloring with the blends.  So I came back in with the Daffodil Delight blends and the color lifter and added some color around the the orchid.  I wanted it to kind of look like a glowing shadow around the image.  I think it made the image pop more.  What do you think?  

To decorate the envelope for this card; I simply stamped the orchid in tuxedo black ink on the front.  This gave me a nice backdrop for the front of the envelope and I still have plenty of room to write my recipients address.   To decorate the flap of the envelope I just stamped the orchid blooms around in a pattern, as you all know I like to do if you follow my blog.  
I hope that you have enjoyed my little one layer card today.  Thank you for stopping by and spending a few minutes of  your day with me.  I will be back again tomorrow with a video tutorial so I will see you tomorrow.  
Happy Stampin' 
Rick Adkins 


If you live in the US.  I would love you to choose me as your demonstrator.  If you would like to purchase any of these products you can click on the Shop Now Button or by clicking on any of the images below.  Alternatively, you can also contact me by email to place your order.  Please be sure to use the monthly host code and I’ll send a little something out to you the following month to say Thank You!

October HOST CODE:  SQ2WWJZN
  1. Spend any amount with me this month and receive the Creative Stampers Tutorial Bundle featuring Fall & Halloween Projects.  Plus get a gift from me in November. 

Please remember that if you use the host code you cannot use that order towards my KCRP’s (Kinmon Crafty Reward Points) that would be double dipping and is not allowed.  For more information on KCRP’s click here. 

Stampin' Up! Shopping List: 


Tuesday, October 1, 2019

Wonderfully Wicked Night Sky Silhouette

Hello and welcome to my blog; today I am going to share a super cute evening silhouette card with you!  This little cutie is perfect for Halloween or any other time of the year.  For my card today, I used the Wonderfully Wicked stamp set on page 55 of the 2019 Stampin' Up! Holiday Catalog.  In the video tutorial I show you how to create the ink blended background complete with my tips on creating the perfect moon.  Here's a look at my card.

The Wonderfully Wicked Stamp Set was the perfect choice for today's card because of the perfect sentiments, and the fun little silhouette images.  You'll have a wicked good time using the Wonderfully Wicked Stamp Set.  The silhouette images look great stamped solid in any color as I did on today's card.  With the sentiments in this stamp set you can combine individual greetings to create a custom sentiment.
To create the moon I used one of my Layering Circle dies and cut out a piece of Masking Paper.  For masking paper I use Avery Reuseable Labels, which can be picked up online or in some office supplies stores.  I ordered mine from Amazon.  The pack is huge so it will last forever.  I've had it since last year.  Once I had my mask in place I did my ink blending.  I use Makeup brushes for this because they don't hurt my hands.  I started out with Crushed Curry and then faded that into Pumpkin Pie.  Next I used Rich Razzleberry and Blackberry Bliss inks to finish everything off.
I used a t-square ruler to draw my horizon line and then stamped my images in tuxedo black ink.  For the cat I used my Stamparatus to be able to stamp it a couple times to get him black enough.  I then filled in the ground with multiply layers of  the Dark Soft Suede and both Dark and Light Basic Black Stampin' Blend Markers.  I flicked up some grasses using the Dark Basic Black Stampin' Blend.  To finish off my card I used Versamark ink to stamp my sentiment and White Stampin' Emboss Powder and heat set it.  I stamped some more bats on my inside piece and then layered everything together.

Video Tutorial: 

If you are viewing my post via email you may not be able to see the embedded video.  Some mail servers will not show them. You will need to click here or click on the image below to see it.  

Thanks for dropping by today, I hope that you have enjoyed my little card.  If you need any of the supplies you have seen today you can pick them up in my online store.  
Happy Stampin' 
Rick 

If you live in the US.  I would love you to choose me as your demonstrator.  If you would like to purchase any of these products you can click on the Shop Now Button or by clicking on any of the images below.  Alternatively, you can also contact me by email to place your order.  Please be sure to use the monthly host code and I’ll send a little something out to you the following month to say Thank You! 

October HOST CODE:  SQ2WWJZN

  1. Spend any amount with me this month and receive the Creative Stampers Tutorial Bundle featuring Fall & Halloween Projects.  Plus get a gift from me in November. 

Please remember that if you use the host code you cannot use that order towards my KCRP’s (Kinmon Crafty Reward Points) that would be double dipping and is not allowed.  For more information on KCRP’s click here.  


Stampin' Up! Shopping List:

Stamparatus
[146276]
$49.00

Template Designed by creativeworkerbee