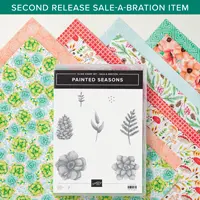
Hello and welcome to my blog and YouTube channel; today I am going to share with you the card that I made earlier today for this weeks episode of Rick's Saturday Simple Stamping. For My card today I used two stamp sets and some designer series paper. I used the Amazing Life Stamp Set, and the Painted Season Stamp Set along with some of the Painted Seasons Designer Series paper. Here's a closer look at my cards.
For today's card I started out by stamping the background using the succulent image in Lemon Lime Twist and Pool Party Classic Ink on whisper white cardstock (3 3/4 x 5). I then used my Stamparatus to stamp the sentiment from the Amazing Life Stamp Set in Tuxedo Black ink. I used the stamparatus because I figured I would need to stamp it twice to get a nice crisp black impression. The Stamparatus makes this much easier than trying to line the stamped images up.
Video Tutorial:
I did do a little something different then most cards. Instead of using a piece of cardstock as my mat. I used a piece of the Painted Season Designer Series Paper as the mat. This not only frames the stamped image but adds a little more color and texture to the card.
For the inside of the card I stamped a couple of the succulent images on a piece of whisper white and attached that to the inside of the card.
That finishes my card for today, and for this weeks episode of Saturday Simple Stamping. Thanks for taking the time to stop by and view my post or watch my video tutorial. If you need any of the supplies you have seen today you can pick them up in my online store.
Hello and welcome to my YouTube Channel and blog; today I am going to share with you my Facebook live from Wednesday, February 20, 2019. During this weeks Facebook Live I did a unboxing of the February Paper Pumpkin Kit (Grown With Kindness).
During the Live replay you will see me walk you through how to make one each of the 3 designs that came in this month's kit. This kit makes nine cards featuring the gorgeous succulent paper that came in this month's kit.
image by Stampin' Up!
If you have never heard of Paper Pumpkin; well it's a monthly subscription kit from Stampin' Up!. Each month for $19.95 plus tax you will receive this fabulous crafting kit in your mailbox. Each kit comes with a exclusive stamp set, matching ink spot, and all the coordinating products pre-cut, scored and ready to go, when you open the box. Here's a look at this month's exclusive stamp set.
Image by Stampin' Up!
To sign up for Paper Pumpkin you have two options:
Earn Saleabration Items with Pre-Paid Subscriptions:
New to crafting? Paper Pumpkin is a quick and easy way to learn this fun skill. And when you join during Sale-A-Bration, you get a fantastic bonus: FREE Stampin’ Up! product(s)! I listed below the number of Sale-a-bration Rewards that can be earned from the qualifying Pre-Paid Subscription you choose below.
Hello and welcome to my blog; today I am going to share with you a couple cards and a great way to find inspiration for your cards if you are in a slump. Have you ever been just sitting around trying to come up with a card design but nothing seems to be working? I have and so has any card maker out there. Sometimes no matter what you do you just can't come up with that right card to share or the ideas feel like they have dried up. So I have a quick and easy tip for you to help you find that inspiration. My little inspirational tip will not only help you today but all the time with just a little work.
You may be asking well Rick what do you do you are sharing cards and projects all the time. One of my best tips is to look around right in your studio, craft area, or home. Must of us have these little inspirational things and haven't even realized it. They come in a ton of different sizes, styles, and themes. Okay, I will let you in on my little creative inspirational secret. Your not going to believe me when I tell you.
You don't have to look any further then your mail box. You can find the most inspirational item right there. Look at your postage stamps. You can get them in any shape, size, and theme and they are very inexpensive. For example I took inspiration from these love stamps, and this peace rose stamp. Here's a look at both of the cards that came from these designs.
I pulled the colors from the postage stamps along with the themes, and subject matter. I am going to break down each card for you both with a shopping list.
Meant to Be Colorful Hearts Thanks Card:
For my first card I pulled the hearts and colors right from the postage stamps. You would be surprised how easy it was to match the colors to Stampin' Up! inks. Let's have a closer look at the card before I tell you the colors; shall we!
I even have plans to come back and copy the pattern of these stamps on another card, but haven't gotten around to it as of yet, but that will be happening soon.
As far as what colors I matched for the stamps; it was super easy to do. I matched the stamps to the following inks; Gorgeous Grape, Mango Melody, Mellon Mambo, and Real Red. To create the card I used a piece of whisper white cardstock cut to 3 3/4 x 5 and stamped the striped heart from the Meant to Be Stamp Set in each color until I had this piece filled. I did pull in a additional stamp set to stamp the sentiment. I found the perfect thanks in the A Big Thank You Photopolymer Stamp Set.
Finding this sentiment in this stamp set wasn't hard at all! One of the reasons was that this is a stamp set geared towards all things thanks. And, has some beautiful fonts, as fell as some images that are perfect for any occasion.
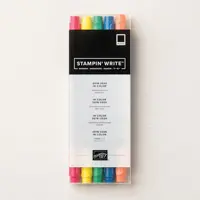
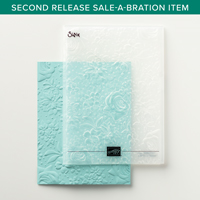
For the second card I used the 2nd Saleabration Release Country Floral Dynamic Textured Impression Embossing Folder and my Stampin' Write markers to color the embossed images. Well actually the stampin' write markers and a small damp paint brush. Here's a look at my card.
I embossed a piece of Strathmore Bristol (300 Series Artist Paper) using the Country Floral DTIEF and the Big Shot. The Strathmore Bristol paper is a 100 lbs weight and lets the ink from the marker sit on top of the paper allowing you to more the ink around easily. The pad comes in many different sizes and two different finishes. It comes in both smooth and vellum textures. The vellum texture is a much smoother tooth then the smooth. You can use either. The pad also comes in different series; with Strathmore artist papers the higher the series number the higher the quality. For card making the 300 series which is usually considered student grade is just fine. You can pick up this paper in many different locations from big box stores, art supply stores, as well as online. Here's a link to what I found on Amazon and probably the best price I've seen since I graduated art school.
To color on each flower I added just a little bit of the marker to the creases of each petal and used a damp watercolor brush size 1. All I do is dip the brush in a little water and then place it on a paper towel to soak up most of the water. With this technique it doesn't take much water to move the color around. Once it dries the ink dries back a little and you get some very nice tones.
As far as the colors I used with my Stampin' Write Markers I keep it very simple. I used Flirty Flamingo (from the Brights Pack) and Pineapple Punch, Lovely Lipstick, Grapefruit Grove, and Call Me Clover (from the 2018-2020 In Color Pack). I loved how it turned out. You can't get this effect by using whisper white cardstock because it's designed to absorb the ink into the cardstock quickly, this is why I went with the bristol paper.
Video Tutorial:
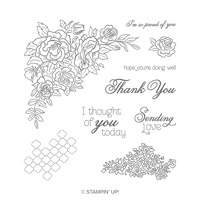
To finish off the card I used the Thank you sentiment from the Climbing Roses stamp set. I inked the stamped up in a rainbow style using the same stampin' write markers as I did on the coloring. You can watch how I colored the embossed images on the replay of the live video above.
This card is easily recreated and the Country Floral Dynamic Textured Impression Embossing Folder as a gift with a $50 purchase in my online store. You will be able to pick this item as supplies last as your Saleabration item. Below you will find the full list of supplies that I used.