Hello and welcome to my second blog post for today; I wanted to take a little time and share with you the project that I made last night during my weekly Facebook Live. Each Wednesday at 8 pm CST I do a Facebook Live on my business page showcasing a different project. This week I wanted to share a project using the From My Heart Suite. Roses are red, violets are blue; this product suite was designed just for you! Celebrate your sweetheart with the From My Heart Suite Bundle. With bursts of hearts, traditional Valentine’s Day colors, and pops of pretty foil, your handmade creations will speak from the heart this Valentine’s Day. The heart craft punches perfectly align with some of the images on the Designer Series Paper and stamps. Use the ribbon, gems, doilies, and tins to create to your heart’s content! This suite of products goes live tomorrow with all the other great wonderful products in the Stampin' Up! Mini Catalog. Here's a look at my project.
Tips & Tricks:
This was a extremely easy box to put together once I figured the measurements. The trick to figuring out what size you need is to measure the items that you are going to put in it. I always measure height, width, and depth. Then at that point it's pretty easy to figure out. For my box I needed a 5 1/4 x 8 1/4" piece of cardstock.
I designed my project to hold two regular size Reese's Peanut Butter Cups. They are stacked up on top of each other. I started out on the 8 1/4" side of the cardstock and scored at 1 1/4, 3 1/2, 4 3/4, & 7. On the short side you score at 1 1/4 & 4". Once I had all the scoring done it was time to do a little folding and burnishing. Once I had the cardstock cut as shown in the video, I added my designer series paper first. I used a little of the From my Heart Specialty Designer Series Paper.
The playful heart patterns in the From My Heart Specialty Designer Series Paper have red and pink foil accents on some designs. Some images from the paper can be cut out using the Heart Punch Pack. This paper is excellent for valentines, cards, and scrapbook pages. After adding the paper I stamped the Happy Valentine's Heart from the Heartfelt Stamp Set and punched it out with the matching punch. I also punched out a scalloped heart using the other punch. I layered both hearts together and added a dimensional at the top of the heart and the bottom. This way once added to the top of the box the ribbon was still free to slide and tie easily.
Video Tutorial:
If you are viewing this post by email you may have to click here or the image below to view the video. Some email servers will not show the embedded video.
Sizes & Dimensions:
Flirty Flamingo Cardstock: 5 1/4 x 8 1/4 scored at 1 1/4, 3 1/2, 4 3/4 & 7 (long side) & 1 1/4 and 4 on the short side
Whisper White Cardstock: Scrap for stamping and the scalloped heart
From my Heart Specialty Designer Series Paper: (2) 2" x 1", (1) 2 1/2" x 1", (1) 2" x 2 1/2"
Thanks for dropping by today, I hope that you are having a wonderful day. By the way I forgot to mention that most of the products that I used today will be part of my first Online Bundle Class of the year that will release on Friday. You will want to make sure you are tuned in tomorrow to get registered for this fun Heartfelt Bundle Class.
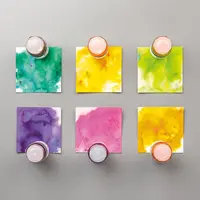
Hello and welcome to my blog; today I am going to share with you the card I made during last nights Facebook Live. Where I shared some tips and tricks about using the new Pigment Sprinkles by Stampin' Up!. Pigment Sprinkles come in Stampin' Up! colors and coordinates with all out products. .You get them in a set of six and they come in the following colors; Daffodil Delight, Mango Melody, Gorgeous Grape, Granny Apple Green, Melon Mambo, and Bermuda Bay. If you notice those colors are your primary and secondary colors, and just with those you can make any color you need. Here's a look at the card I made last night with the Pigment Sprinkles and the Frosted Foliage Bundle.
Basics of Pigment Sprinkles:
Pigment Sprinkles can be a fun media to play with as well as one of the most intimidating! Why you may ask; well, it's because it's such a freeing carefree media and very hard to control. One of the reasons it's hard to control is the fact that it's a powder. Unlike traditional watercolors or watercolor pencils; Pigment Sprinkles has very little control. Well, that's what most people think anyway. But, if you know how to use them you can find it very freeing and controllable. It all depends on how you use them. You can if you take your time control where the sprinkles will go, it's a matter of the control you have with your hand and the heaviness or lightness of your application. More sprinkles means more pigment on the paper, less sprinkles mean less pigment. You can also use a aqua painter to apply the pigment to the paper, you will see this in the video tutorial below.
Pigment Sprinkles are a dry media that you have to add water too. You do this by spritzing the watercolor paper with a little water in a Stampin' Spritzer. This way it helps to keep most of the pigment on the paper rater than your work area. Don't get me wrong it does still get off the paper, as you can see in the picture above and below. Once you have the pigment put down; you then can spritz it with more water to really activate the pigment. This is when you really start to see the magic happen.
As far as what surface you can use with the Pigment Sprinkles, as long as it's a heavy paper meant for watercoloring you are fine and ready to go. We offer both watercolor paper and shimmery white cardstock as the paper of choice for watermedia. Both are able to take a lot of pigment and water, so they are the go to for this or any type of watermedia. So just a few things to keep in mind when you start using the Pigment Sprinkles.
You can use your heat tool to speed the drying time, but to me if you just let it dry naturally you achieve much better results. The air from the heat tool can move the wet pigment around a little more and if you let it dry naturally the wet pigment stays in place and can create some beautiful light and dark areas on it's own.
Frosted Foliage Card:
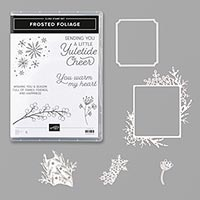
Once you have the watercolor or shimmery white cardstock all Sprinkled up and dried then you can really start playing with them. You can use it as just a background for a card or you can do like I like to, and cut them up with my dies. This creates some fun colorful shapes to play with on your cards. I used the new Frosted Foliage Bundle to create the card that I shared last night during my Facebook Live. I had predone some watercolor paper using the Pigment Sprinkles so that they would be dry enough for me to die cut.
I used the largest die from the Frosted Frame dies to create the focal image on my card. At first I decided to just stamp a sentiment in the middle of this piece. After doing so, I decided I didn't like it and cut out the next size down and stamped my sentiment on that with some 2nd generation stamping for added fun. I then layered those two pieces together and liked it so much better.
For my card base I used some Very Vanilla Thick Cardstock cut at 4 1/4 x 11 and stamped the berries from the stamp set around the outside edge. I then layered my foliage frame in the center. I also had die cut some of the other foliage pieces in the set in two other pieces of watercolor paper that I had used the Pigment Sprinkles on. I then added these die cuts at the top and bottom sticking them under the frame. This added more interest and color to the card.
To finish off my card design I added some Rhinestone Basic Jewels around the card. This helped to add a little sprinkle and shine to the card; as well as help draw the eye to the sentiment. As if the foliage frame needed any help at all.
Video Tutorial:
If you are viewing this post by email you may have to click here or on the photo below to view the video. Sometimes certain mail servers do not show the embedded video.
Thanks for dropping by today, I hope that you have a wonderful day, and I will see you again tomorrow with another card design.
Happy Stampin'
Rick Adkins
If you live in the
US. I would love you to choose me as your demonstrator. If you
would like to purchase any of these products you can click on the Shop Now
Button or by clicking on any of the images below. Alternatively, you can
also contact me by email to place your order. Please be sure to use the
monthly host code and I’ll send a little something out to you the following
month to say Thank You!
October HOST CODE: SQ2WWJZN
1.Spend any
amount with me this month and receive the Creative Stampers Tutorial Bundle
featuring Fall & Halloween Projects. Plus get a gift from me in
November.
Please remember that if you use the host code you cannot use that
order towards my KCRP’s (Kinmon Crafty Reward Points) that would be double
dipping and is not allowed. For more information on KCRP’s click here.
Three
main reasons to Join!
1.You Get at least a 20% discount
on all your orders while you are a demo.
2.You get to join my fun Kinsmon
Crafters Team and Private Facebook Group.


")


 Double-Stitched Satin Ribbon")


")