Showing posts with label Video. Show all posts

Wednesday, May 6, 2020

Stampin' Up! Timeless Tropical - Quick Easy Card Tutorial

Hello and welcome to my blog; today I am going to share with you a quick & easy card using the Timeless Tropical Stamp Set from Stampin' Up!.  This card was actually CASED from the January-June Mini Catalog.  If you are not sure what I mean by CASE it means to copy and share everything or to copy and selectively edit.  Its a great way to learn new techniques or to produce a project in a pinch.  But, mainly I use it to learn.  Here's a look at today's card.


timeless tropical stamp set, label me lovely punch, in the tropics dies, CASE, Rick Adkins, Stampin' Up!

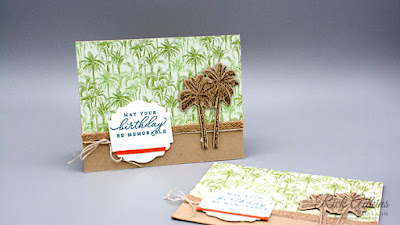
Like I said above this is really a quick and easy card to do.  It's perfect to create if you have a birthday coming up for a man, or someone that's in a tropical setting, or even someone you want to make smile.  The fun mix of the Tropical Oasis Designer Series Paper with the Crumb Cake and Soft Suede Palm Trees. The texture added by the Braided Burlap Trim and the Linen Thread just makes me happy.  

timeless tropical stamp set, label me lovely punch, in the tropics dies, CASE, Rick Adkins, Stampin' Up!

Sizes & Dimensions: 

  • Crumb Cake Cardstock - 5 1/2 x 8 1/2 (scored at 4 1/4) for the card base, 2 1/2 x 3 1/4 (for palm trees) 
  • Whisper White Cardstock - 2 1/2 x 2 1/2 (for label), 4 x 5 1/4 (inside) 
  • Tropical Oasis Designer Series Paper - 3 1/4 x 5 1/2
  • Terracotta Tile Cardstock - scrap for strip
timeless tropical stamp set, label me lovely punch, in the tropics dies, CASE, Rick Adkins, Stampin' Up!

I stamped my palm trees onto the 2 1/2 x 3 1/4 piece of Crumb Cake Cardstock in Soft Suede Classic Ink and used the matching die from the In The Tropics Dies to cut them out.  I then added the 3 1/4 x 5 1/2 piece of the Tropical Oasis Designer Series Paper to the top part of the Crumb Cake card base using Multipurpose Liquid Glue.  Next I stamped the sentiment in Pretty Peacock Classic Ink onto the 2 1/2 x 2 1/2 piece of Whisper White Cardstock and punched it out with the Label Me Lovely Punch, making sure to line the sentiment up toward the top of the punch.  

timeless tropical stamp set, label me lovely punch, in the tropics dies, CASE, Rick Adkins, Stampin' Up!

I then added the small strip of Terracotta Tile Cardstock to the label using a little liquid glue. Next I added a strip of Tear & Tape Adhesive along the seam of the card base and the designer series paper making sure to overlap the DSP just a little.  Then I added some of the Braided Burlap Trim to the front and a wrapped some Linen Thread around the card base and tied it in a bow.  I then popped the sentiment up with Stampin' Dimensionals as well as the palm trees.  For the palm trees I used both regular and mini size dimensionals.  

Video Tutorial: 


If you are viewing this post by email you may not see the embedded video above.  If that's the case just click here or the image below to watch.  Not all mail servers will show the embedded video.  

timeless tropical stamp set, label me lovely punch, in the tropics dies, CASE, Rick Adkins, Stampin' Up!

Thanks for dropping by today for my quick and easy Timeless Tropical Card Tutorial.  If you need any of the supplies that you have seen used today you can order them in my online store by clicking on the item in the shopping list below.  I truly appreciate your support and business.  

Happy Stampin' 
Rick Adkins 


Use the Host Code on any order of $50 (before taxes & shipping) or more during the month and receive a gift from me in May as a Thank You. If your order is $150 or more, please do not use the host code.  You will forfeit your Stampin' Rewards if you do; and I want you to get those rewards.


If you place any size order with me during the month of May, you will receive the May Creative Stampers Tutorial Bundle from me as a little thank you.  This month's tutorial bundle features Birthday Bonanza Suite of Products from the January-June Mini Catalog.  The Creative Stampers Tutorial Bundle can either be earned for FREE with any size order or Can be purchased for $20 from me.

Order $50 (before shipping and taxes) of products from the Ornate Garden Suite of Products in my Online Store in April using the Host Code:  RZRUGD7Y and I will send you’re the Ornate Garden Mega Tutorial Bundle for FREE as a thank you gift.  That is 90 tutorials featuring products from the Ornate Garden Suite (a $21 value) free for purchasing products from the Ornate Garden Suite from me this month free. 

Do not want to order but still would like to get the Ornate Garden Mega Tutorial Bundle featuring 90 projects with both metric and Imperial measurements for each project! You can purchase it from me for $21.00 US anywhere in the world in my online store by clicking here


Stampin' Up! Shopping List

Monday, May 4, 2020

It Starts With Art Fun Fold Video Tutorial

Hello and welcome to my blog; today I have a fun fold card to share with you using the It Starts With Art Stamp Set and matching dies and paper.  Yes, you read that correct I am sharing a fun fold card with you today; so you know it has to be easy or I wouldn't be sharing it!  I was sad to see the Follow Your Art Suite on the Last Chance List.   If you have not seen the last chance list of items still available I have added a link in this post.  I need to mention that some items such as the Art & Craft Dies which I used today are heavily discounted.  Now with that out of the way here's a look at my card.  Or I should say cards I made two.  


Tips & Tricks: 

So as I mentioned you know this can not be a very hard card to do or have to many steps because you wouldn't be seeing it here otherwise.  It really is very simple to create, and the Follow Your Art Designer Series Paper and It Starts with Art Stamp Set makes this a very pretty card.  All you need to create this fun fold is a set of layering dies, you can use any shape you want, some cardstock, stamp set, ink, and matching designer series paper.  Here's a look at the card folded out.  


I told you it was cute.  I went with the Layering Square Dies for one card and the Layering Circles for the other.  I wanted to show you a couple options, and how changing the layering dies can change the look of the card.  Let's have a look at the card with the square opening first.  


I really can not decided if I like the square window or the circle window the best.  Which do you like?  I used the same products on both cards I just changed the colors, used different stamped images in the windows, and changed up the shape of the openings.  I just did a little simple stampin' blends coloring to color the images in the window.  You will need a card base that's 5 1/2 x 8 1/2 scored at 4 1/4 for the card base.  Attach your designer series paper to the card base.  Die cut your window. Then the fold out is a piece of whisper white cardstock cut at 5 1/4 x 8 scored at 4" & 6".  


I folded the two score lines into a mountain and valley fold.  I then attached the Whisper White piece to the inside of the card, lined up my window element on the fold and attached it.  I added a frame to the opening by taking the largest scalloped circle die and the third largest and cutting them out.  This was attached with liquid glue to the front.  I added a stamped sentiment to the outside that I used the Tailored Tag Punch to flag the ends with and popped it up on dimensionals.  The sentiment on the inside I just stamped with the coordinating ink colors.  

Video Tutorial: 


If you are viewing this post by email you may have to click here or on the image below to see the video.  Not all mail servers will show the embedded video.  


To finish off my card I added some of the Glitter Enamel Dots to the card front.  Thanks for dropping by today; you will find a full list of the supplies minus the glitter dots because I forgot to add them to the list below.  

Happy Stampin' 
Rick Adkins 


Use the Host Code on any order of $50 (before taxes & shipping) or more during the month and receive a gift from me in May as a Thank You. If your order is $150 or more, please do not use the host code.  You will forfeit your Stampin' Rewards if you do; and I want you to get those rewards.

If you place any size order with me during the month of May, you will receive the May Creative Stampers Tutorial Bundle from me as a little thank you.  This month's tutorial bundle features Birthday Bonanza Suite of Products from the January-June Mini Catalog.  The Creative Stampers Tutorial Bundle can either be earned for FREE with any size order or Can be purchased for $20 from me.

Order $50 (before shipping and taxes) of products from the Ornate Garden Suite of Products in my Online Store in April using the Host Code:  RZRUGD7Y and I will send you’re the Ornate Garden Mega Tutorial Bundle for FREE as a thank you gift.  That is 90 tutorials featuring products from the Ornate Garden Suite (a $21 value) free for purchasing products from the Ornate Garden Suite from me this month free. 

Do not want to order but still would like to get the Ornate Garden Mega Tutorial Bundle featuring 90 projects with both metric and Imperial measurements for each project! You can purchase it from me for $21.00 US anywhere in the world in my online store by clicking here

Stampin' Up! Shopping List: 

Template Designed by creativeworkerbee