Showing posts with label Birthday Card. Show all posts

Friday, March 22, 2019

Hello Cupcake Stacked full of Goodness

Hello and welcome to my blog; today I am going to share with you a card that I made using the Hello Cupcake Stamp Set which you can earn for free with a $50.00 order for another 10 days.  That's right Saleabration is almost over!  I know sad face right; So if you want to take advantage of this promotion now is the time to do so I am just saying.  Here's a look at my card.

Saleabration, Stampin' Up!, Rick Adkins, Hello Cupcake Stamp Set, Fussy Cutting


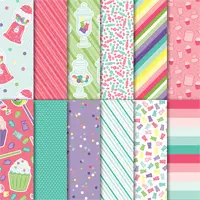
Like I said I used the Hello Cupcake stamp set.  Which is a great set with the fun cute cupcake and coordinating images.  I actually designed this card before the coordinating framelits for Saleabration Coordination came out and have since sold out.  I cut each layer out by hand.  Yes, you just read that correct I actually did fussy cut each and every piece.  Here's a few cards that Stampin' Up! designed for the Saleabration Brochure.
Image by Stampin' Up! 

Actually I only had to cut the top there layers of icing and the little heart pick.  After that I had stamped the cupcake bottom and cake on the whisper white (3 3/4 x 5) card front layer.  After the stamping of the bottom layer I added the icing each layer at a time with a little multipurpose liquid glue.  I find this adhesive the best for this type of card because you have a little wiggle room to make sure everything lines up perfectly.
Saleabration, Stampin' Up!, Rick Adkins, Hello Cupcake Stamp Set, Fussy Cutting

For the inside of the card I stamped the sprinkles from the stamp set in the same colors that I used for the card.  Pineapple Punch, Flirty Flamingo, Merry Merlot, and Gorgeous Grape.  This is actually a color combination that you wouldn't think about, but looks really good together.


Hello Cupcake Stacked Cupcake Card Color Combo

by Rick D. Adkins

I matted the card front on a piece of Flirty Flamingo cardstock (4 x 5 1/4).  My card base is a piece of 4 1/4 x 11 Gorgeous Grape that I scored at 5 1/2.  I stamped the little heart pick in Flirty Flamingo and cut it out to put in the top layer of icing.  I attached that with a mini glue dot.  at the bottom of the cupcake on the stamp is a shadow.  Well, with the stack I needed the shadow to extend a little more so I used my wink of stella brush pen to pull the ink out a little more.
Saleabration, Stampin' Up!, Rick Adkins, Hello Cupcake Stamp Set, Fussy Cutting

To finish off the card I stamped my sentiment in Gorgeous Grape beside the cupcake.  I just love this card; it just makes me happy.  I think that the person that gets this card will just love it.  And my hope is that when the recipient opens the envelope this little card will put a smile on their face.  Here's a final look at my card.
Saleabration, Stampin' Up!, Rick Adkins, Hello Cupcake Stamp Set, Fussy Cutting
Thanks for dropping by today.  If you would like to get the Hello Cupcake stamp set and have not gotten it yet; there's still time to do so.  You can easily pick $50 (before shipping and taxes) in my online store and pick the Hello Cupcake stamp set as  your free Saleabration item.  You have ten more days from today to take advantage of Saleabration.  For every $50 you spend in my online store you can pick one Saleabration item.

Happy Stampin'
Rick


Stampin' Up! Shopping List: 


Glue Dots
[103683]
$5.25

Monday, March 11, 2019

Kylie's Demonstrator Training March Blog Hop


Hello and welcome to my blog for the second post today; I am super excited to be hopping with all the wonderful demonstrators in Kylie's Training groups blog hop.  All those involved are very talented and working very hard toward their goals.  The card that I am using for this month's blog hop was not the card that had originally intended to use.  It was quite different in both subject mater and style.  But when I came up with this card design for my niece up coming birthday; I thought it was so cute that I just had to share it.  My youngest niece will be a tween this year and she isn't the easiest one to come up with something for.  She loves art, unicorns, and all things colorful; so when I figured this card out it checked all the boxes.  So I created a Unicorn floral card for her.  Here's a look at my card.

It took a little figuring out and a couple stamp sets and a few dies to come up with this design.  I am betting you are wondering what I used to create this image.  I had actually been contemplating how to do this for a few weeks now and finally came up with how yesterday.  I figured that I could use the Amazing Life Stamp Set for starts.  For the horn I used the cake from this stamp set along with a little masking.  After stamping it I had to take a alcohol friendly pen to change the cake into the horn.   After that I had to do a little stamp surgery to create the eye lashes.  I didn't mind cutting this photopolymer stamp apart since its super easy to place back together on a block.  And then when stamped you would never know that I had cut it.  For the flowers and leaves that required a couple more stamp sets to do. I got the flowers from the Tropical Chic stamp set and the leaves came from Humming Along Stamp Set.  

After stamping the leaves in Tuxedo black ink it was time to do a little coloring.  I colored the horn with light & dark Pineapple Punch and dark Daffodil Delight Stampin' Blend Markers.  For the leaves I used both dark and light Granny Apple Green Blends.  Once I had everything colored it was time to start the die cutting.  I used the matching framelits to cut the flowers and the leaves.  Then I had to create some ears.  I used dies from the Be Mine Framelit Dies to create them.  I used the two smaller longer hearts to create the ears.  
After I had everything glued and popped up where needed it was time to start putting the card together.  I layered my focal image onto a piece of How Sweet It Is Designer Series Paper as my mat.  I then added the card front to my Lovely Lipstick card base (4 1/4 x 11).  I then added clear wink of stella the the unicorn's horn, flowers and leaves.  To add a little more bling to the card for my niece I added 13 rhinestones to represent her birthday.  For the out side sentiment I stamped I believe in you in tuxedo black ink.  I picked that because I wanted her to know that I would also believe in her. For the inside of the card I added a strip of the same designer series paper along one side, and stamped Happy Birthday in Lovely Lipstick.  

I hope that you have enjoyed my super cute card for today's blog hop.  You will find all the supplies listed below the blog roll in the Shopping List.  If you are viewing this post on my Wordpress sight you will need to click here to view the blog roll.  Otherwise you will find it just below.  

Happy Stampin' 
Rick 

Blog Roll: 


Stampin' Up! Shopping List:


Price: $49.00
Price: $110.00

Template Designed by creativeworkerbee