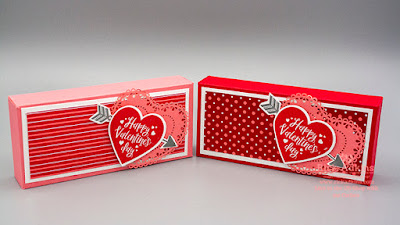
Hello and welcome to my blog; today I am going to share with you a project that I think you can totally use especially if you need to make some treats for your child's classroom for Valentine's day or for a view coworkers to show you are thinking about them. I came up with this super cute inexpensive treat idea using products from the From My Heart Suite from the 2020 January - June Mini Catalog. And, the best part is the treats that fit inside are little snack cakes from Little Debbie I used the Be My Valentine Cakes. The super cute little heart shaped snack cakes! And they have Flirty Flamingo icing on them! So it was perfect. And the even better part was they are super easy to make, and you could fold them flat and store them until you need them. Here's a look at my project.
Tips & Tricks:
To make this top opening box you will need either a piece of Real Red or Flirty Flamingo Cardstock cut at 7 1/2" x 8 1/2". On the 7 1/2" (short) side you are going to score at 2 1/2, 3 1/2, 6 & 7. On the 8 1/2" (long) side you are going to score at 1 /2", 1 1/2", 7, & 8. The long side of the box is the side that the flaps will open and close. Once all the score lines are folded and burnished you will do your cutting. You can watch the video for complete cutting and assembly instructions.
The box measures when complete 2 1/2" x 1" x 5 1/2". So it's a nice size box. You can fit so much more in it then just the little debbie snack cakes if you wanted to. If you are using the little debbie cakes it will fit one pack of the Be My Valentine Snake Cakes pictured above. You get 5 or the two packs in a box for a couple bucks. So really cost effect to give. It's also a great way to dress up a simple little item. And really who doesn't like Little Debbies? I love them and I am almost 46 years old.
I used the Heartfelt bundle to create the sentiment on the outside of the box, and the From My Heart Specialty Designer Series paper along with the Heart Shape Doilies to dress up the box. I cut my DSP down to 2 x 5" and matted them on a piece of 2 1/4 x 5 1/4" whisper white cardstock. I used a scrap piece of whisper white cardstock to stamp the heart in Real Red Ink and punched it out using one of the matching Heart punches from the Bundle. I stamped the arrow in Basic Gray ink and cut it out by hand. I added the doily to the front of the box with a little snail adhesive and then added the arrow with mini glue dots. I popped the heart up on the box with a couple stampin' dimensionals.
Video Tutorial:
If you are viewing this post by email you will have to click here or the image below to view the video. Not all mail servers will show the embedded video.
Thanks for dropping by today! I hope you give this project a try if you need any of the supplies you can order them in my online store by clicking on the item in the shopping list below. You can also email me your list or text me 1 (256) 393-2795 if you are in the US.
Happy Stampin'
Rick Adkins
***Remember, if you put in an order ($35 minimum) by
Tuesday, January 14th, 2020 at midnight,
I'll send you all three make and takes from this weeks Facebook Live Mini Class for free!
But, your order MUST be in by Tuesday at midnight!!
Hello and welcome to my second blog post for today; I wanted to take a little time and share with you the project that I made last night during my weekly Facebook Live. Each Wednesday at 8 pm CST I do a Facebook Live on my business page showcasing a different project. This week I wanted to share a project using the From My Heart Suite. Roses are red, violets are blue; this product suite was designed just for you! Celebrate your sweetheart with the From My Heart Suite Bundle. With bursts of hearts, traditional Valentine’s Day colors, and pops of pretty foil, your handmade creations will speak from the heart this Valentine’s Day. The heart craft punches perfectly align with some of the images on the Designer Series Paper and stamps. Use the ribbon, gems, doilies, and tins to create to your heart’s content! This suite of products goes live tomorrow with all the other great wonderful products in the Stampin' Up! Mini Catalog. Here's a look at my project.
Tips & Tricks:
This was a extremely easy box to put together once I figured the measurements. The trick to figuring out what size you need is to measure the items that you are going to put in it. I always measure height, width, and depth. Then at that point it's pretty easy to figure out. For my box I needed a 5 1/4 x 8 1/4" piece of cardstock.
I designed my project to hold two regular size Reese's Peanut Butter Cups. They are stacked up on top of each other. I started out on the 8 1/4" side of the cardstock and scored at 1 1/4, 3 1/2, 4 3/4, & 7. On the short side you score at 1 1/4 & 4". Once I had all the scoring done it was time to do a little folding and burnishing. Once I had the cardstock cut as shown in the video, I added my designer series paper first. I used a little of the From my Heart Specialty Designer Series Paper.
The playful heart patterns in the From My Heart Specialty Designer Series Paper have red and pink foil accents on some designs. Some images from the paper can be cut out using the Heart Punch Pack. This paper is excellent for valentines, cards, and scrapbook pages. After adding the paper I stamped the Happy Valentine's Heart from the Heartfelt Stamp Set and punched it out with the matching punch. I also punched out a scalloped heart using the other punch. I layered both hearts together and added a dimensional at the top of the heart and the bottom. This way once added to the top of the box the ribbon was still free to slide and tie easily.
Video Tutorial:
If you are viewing this post by email you may have to click here or the image below to view the video. Some email servers will not show the embedded video.
Sizes & Dimensions:
Flirty Flamingo Cardstock: 5 1/4 x 8 1/4 scored at 1 1/4, 3 1/2, 4 3/4 & 7 (long side) & 1 1/4 and 4 on the short side
Whisper White Cardstock: Scrap for stamping and the scalloped heart
From my Heart Specialty Designer Series Paper: (2) 2" x 1", (1) 2 1/2" x 1", (1) 2" x 2 1/2"
Thanks for dropping by today, I hope that you are having a wonderful day. By the way I forgot to mention that most of the products that I used today will be part of my first Online Bundle Class of the year that will release on Friday. You will want to make sure you are tuned in tomorrow to get registered for this fun Heartfelt Bundle Class.
Hello and welcome to my blog; today I am going to share with you the Large Chocolate Truffle Box that I made during last nights Facebook Live. I do a Facebook Live each Wednesday at 8 pm CST on my Facebook Business Page. This is a large box that's holds a half a bag of Lintz or Moser Roth Truffles. This box measures 7" x 2" x 2", so you can see it's a great size for gift giving. For my project today I used the Toile Tidings Designer Series Paper to decorate my box. Here's a look at my project.
As I mentioned I used the Toile Tidings Designer Series Paper to decorate my box today. The base of the box was made with cardstock. I used either Real Red or Garden Green for the base and then the other color for the mats for the designer series paper. I used the same color of the box base for the designer series paper. With the Toile Tidings it was super easy to pick which color to use. There are only three colors in the designer series paper; Very Vanilla, Real Red, and Garden Green. The same pattern is on each side of the paper but in either Very Vanilla and Real Red or Very Vanilla and Garden Green so it makes creating super easy.
The Real Red version was the first one that I made for my Facebook Live. I used the 1" Real Red Ruched Ribbon to tie the box close. This box uses one full sheet of 8 1/2 x 11 cardstock to make the base. I scored the base cardstock on the short side at (on the 8 1/2" side) at 2, 4, 6, and 8. On the long side (11" side) I scored at 2" and 9".
The box was decorated with three pieces of cardstock (cut at 6 3/4 x 1 3/4) for the front, top, and back. The two side mats were cut at 1 3/4 x 1 3/4. The Designer Series Paper for the box was cut at 6 1/2 x 1 1/2" (you need three) and 1 1/2 x 1 1/2 (you need two). To add a little more decoration I used ribbon to secure it close. I used the Garden Green Double Stitched Ribbon and the Very Vanilla & Copper Classic Weave Ribbon on the Garden Green Box.
Video Tutorial:
If you are viewing this post by email you may have to click here or on the image below to view the video.
Sizes & Dimensions:
Real Red or Garden Green Cardstock (Base) - 8 1/2 x 11
Real Red or Garden Green Cardstock (Mats) - (2) 1 3/4 x 1 1 3/4, (3) 6 3/4 x 1 3/4
Designer Series Paper - (2) 1 1/2 x 1 1/2 (3) 6 1/2 x 1 1/2"
I created another version of the same box using new products from the upcoming January - June Mini Catalog. For this box which I designed for Father's Day I used the Country Club Suite of Products. I have a free PDF tutorial that you can download featuring the Country Club Products. Click here to download the tutorial.
Thanks for dropping by I hope that you have a wonderful day.
Happy Stampin'
Rick Adkins
If you live in the US. I would love you to
choose me as your demonstrator. If you would like to purchase any of
these products you can click on the Shop Now Button or by clicking on any of
the images below. Alternatively, you can also contact me by email to
place your order. Please be sure to use the monthly host code and I’ll
send a little something out to you the following month to say Thank
You!
December HOST CODE: CEUXJX6R
Spend any amount with me this month and receive the
Creative Stampers Tutorial Bundle. Plus get a gift from me in January.
Please
remember that if you use the host code you cannot use that order towards my
KCRP’s (Kinmon Crafty Reward Points) that would be double dipping and is not
allowed. For more information on KCRP’s click here.
Three
main reasons to Join!
1. You Get at least a 20% discount on all your orders
while you are a demo.
2. You get to join my fun Kinsmon Crafters Team and
Private Facebook Group.


")


")


 Double-Stitched Satin Ribbon")


 Ruched Ribbon")
 Double-Stitched Ribbon")
 Classic Weave Ribbon")


