
Hello and welcome to my blog; today I have a showstopper card for you and I do mean a show stopper. This is a definite WOW card. When I showed it to Charles last night his first word was "wow!" He never has a reaction like that. He most of the time just says that they are nice and pretty, but never a wow. So, I know that it's differently a wow card. Any way you can decided your self here's a look at the front of the card.

This is a card with lots and lots of layers, but actually wasn't as hard as I thought before making the first one. This is a gatefold card so when you open it up is when the wow factor takes place. But there's a ton of layering that is done to make this card. And I do mean a ton. But, all in all not anything super crazy. Well, I guess that depends on what you think is crazy.

This is a card that is one that you will probably only make for someone you really love. The card base is actually made from two pieces of cardstock that's joined together When opened up the card spans 19 3/4" x 6". It folds up into a nice "little" 6" x 6" card. So, you will have to make an envelope to put the card in.

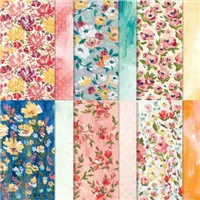
When the card is open there are 16 2" x 2" panels and 10 1" x 2" panels. So, as I mentioned a lot of layering. But, if you sit down and cut all the pieces of cardstock, your layering pieces, Designer Series Paper (here I used the Fine Art Floral Designer Series Paper) and then glue all the layers together and have them ready to go to place on the card base once you have that done it actually goes by pretty fast. It was hard to get a nice picture of the card open all the way because it didn't fit nicely in my photo booth with out the seams showing.

As you can see in this picture above this is a labor of love. And if you follow my blog I don't show cards like this very often. But, I was making graduation cards over the weekend and I need one really special for someone so I ran across this card tutorial on YouTube and gave it a try. This is the card that I am keeping to display in my craftroom and will share the graduation version later on in another post.

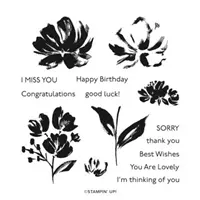
For the inside I stamped the floral image in Flirty Flamingo, Merry Merlot, and Old Olive Inks, and then added the sentiment that said I'm thinking about you. With this design you can also put a place on the back to write a personal message. This way when the card is displayed you don't see what the message is just the beautiful card.

Video Tutorial:
Sizes & Measurements:
- Merry Merlot Cardstock (card base) - (2) 6" x 11" pieces scored on the 11" side at 2", 4" & 6"
- on the 6" sides you are going to score at 2" and 4" going down to 7"
- turn back to the 11" side and score at 1" & 7" just in the center to connect the score lines in the middle.
- On the 6" side line card up at 4" and cut from 1" to 7" on the small trimmer arm and then more to 2" and repeat.
- Flirty Flamingo Cardstock - (16) 1 3/4" x 1 3/4" squares, (10) 1 3/4" x 3/4", (2) 3 3/4" x 5 3/4", 4 1/4" x 4 1/4", (2) 3/4" x 5 3/4"
- Merry Merlot Cardstock - (2) 3" x 6" (front panels), 4 1/2" x 4 1/2", 1" x 12" (belly band)
- Fine Art Floral Designer Series Paper - (16) 1 1/2" x 1 1/2", (10) 1/2" x 1 1/2" , 4" x 4", (2) 1/2" x 5 1/2", (2) 2 3/4" x 5 3/4"
- Basic White Cardstock - (2) 3 1/2" x 5 1/2" plus scrap for stamping the flower on the outside.
Thanks for dropping by today I hope that you have a wonderful week and that you will give this Showstopper Card a try. If you are not on my email list make sure you sign up today to get the latest updates on my classes and events. If you need any of the supplies that you have seen today you can pick them up in my online store by clicking on the item in the Stampin' Up! Shopping List below. When you are shopping make sure that you see my name and in the topper upper left hand side of your screen in the store. If not go to your account and make sure to pick me as the demonstrator you are shopping with.


0 Comments:
Post a Comment
Thanks for taking the time to leave a comment.
Much Love,
Rick