
Hello and welcome to my blog; today I am going to share with you my card for this week's creative challenge over at The Spot. This week we have a fun and different Sketch challenge for you to play along with. I picked the new layering bundle All Things Fabulous to create my card with today. Here's a look at my card.

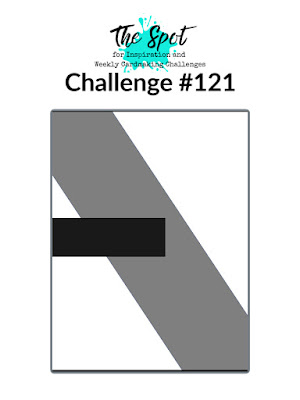
Here's a look at the challenge image that inspired my layout today. You can click on the image below to see what the other design team members created for this challenge to help inspire you and to play along.
Tips & Tricks:
In all honesty this isn't a hard layout to do but it was a little time consuming with the stamping of all the layering flowers from the All Things Fabulous Stamp Set. I knew that I wanted to use this bundle for my card today, that was super easy to figure out. I love florals and I love layering sets So, when I saw this set in the 2020-2021 Stampin' Up! Annual Catalog (on page 121) it was a must have. I started by stamping all of my base layers first in the lightest colors I planned to use.

The Stamparatus came in super hand for this card. I would place a 4 x 5 1/4 piece of Whisper White on the inside stamp the base layer of each flower. Then I would rotate the cardstock around and stamp a second flower. So I got two large flowers on one sheet. Then I would move on to the next color flower stamp all the base layers and so on and so forth After I had all the base layers completed I came back with the second layering image and stampd it in a slightly darker shade. For the purple flowers I actually had to stamp the base layer off first to create a lighter shade and then stamp Highland Heather again as the second layer so that it had some contrast. I did change up the layering process for some of the flowers some have two layers of the same color to make it appear darker.

Once I had all my stamping complete I had to go back and die cut all the flowers with the matching Fabulous Floral Dies. I then used the Many Medallions Dies to cut my background piece from a 4 1/4 x 5 1/2 piece of Whisper White Cardstock which I layered onto a piece of Whisper White that was cut at 4 x 5 1/4. This was then layered onto a 4 1/8 x 5 3/8 piece of Just Jade Cardstock before adding it to my Thick Whisper White card base. I then arranged all the flowers and started attaching them. Some of them were glued down with Multipurpose Liquid Glue and some are popped up with Stampin' Dimensionals. At this point I thought it needed a little more Just Jade so I cut a few of the fern images from the Forever Flourishing Dies and snipped them apart and tucked them under the flowers as well as a couple of the foliage dies from the Fabulous Floral Die Set.

To complete my card I stamped my sentiment onto a piece of Just Jade Cardstock in Just Jade Classic Ink and popped it up on the left-hand side of the card. I thought this was the perfect place for a sentiment.
Project Recipe Card:
I have created a project recipe card for you to be able to save to your Pinterest board so that you would be able to look at a glance and remember what was used on this card. You can check out all of my Project Recipe Cards on my Pinterest board by clicking here.

Thanks for dropping by today I hope you have a wonderful day. If you need any of the supplies you have seen today! You can pick them up in my online Store by clicking on the item in the Shopping List below. I hope that you will take time and play along with us this week. This weeks sketch challenge runs until Sunday at noon so you have plenty of time to create a project and share.

Happy Stampin'
Rick Adkins
Rick Adkins

Use the Host Code on any order of $50 (before taxes & shipping) or more during the month and receive a gift from me in June as a Thank You. If your order is $150 or more, please do not use the host code. You will forfeit your Stampin' Rewards if you do; and I want you to get those rewards.

If you place any size order with me during the month of July, you will receive the July Creative Stampers Tutorial Bundle from me as a little thank you. This month's tutorial bundle has ten project tutorials that feature our favorite new products from the 2020-2021 Stampin’ Up! Annual Catalog. The Creative Stampers Tutorial Bundle can either be earned for FREE with any size order or Can be purchased for $22 from me.

Don't forget about Bonus Days are going on now! You get reward for shopping now with every $50 qualifying order. and you get to spend the $5.00 coupon codes when you shop in August.

If you enjoy card making and love to play games I have a fun event for you coming up in August. I always loved playing Bingo as a kid, and even as an adult. This is a card class but we will be playing a few games of Bingo for fun as well. You can find out all about my Online Stampin' Bingo and Card Class along with Register by July 31, 2020 by clicking here.
Stampin' Up! Shopping List:
 | |||
 |  |  |  |
 |  |  |
")
")


")


 Designer Series Paper")


 Circle Punch")
 Circle Punch")


