Monday, July 13, 2020

How to make a Itty Bitty Birthdays Curvy Keepsake Boxes

Hello and welcome to my blog; today I have a super cute little gift packaging idea for you that's great for birthdays wedding shower favors or anything really.  The great part is they are super easy to do.  You just need the die set, a few sheets of 6 x 6 designer series paper or cardstock a little ribbon and a stamp set with ink.  Here's a look at what I created during my Facebook Live last Wednesday.  


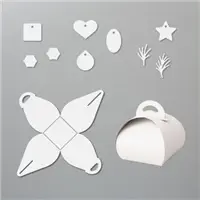
During the Live I actually made five little treat boxes in all the 2019-2021 In Colors; Rococo Rose, Sea Side Spray, Pretty Peacock, Purple Posy, and Terracotta Tile.  I have not decorated them all yet but I asked my viewers if they wanted to see the Mini Curvy Keepsake Box in all five colors and of course they did so I made them.  Really the secret to making these projects are in the Mini Curvy Keepsake Box Dies.  These dies make it so easy to whip out as mini of these little boxes as you want.  It's great with the die set because the die not only cuts everything but it puts the score marks in as well.  

Image by Stampin' Up!

One other great things about this die set is it only takes one sheet of 6 x 6 cardstock or designer series paper to make the box.  So if you are using designer series paper you could whip out 48 in no time.  Think about how fast that would be to make party favors.  They only hold a few pieces of candy but really that's all you need for a little gift.  


To get the nice rounded look that you see in the picture above I used my bone folder and just gave each side a little bend.  It didn't take anytime at all.  I used some scrap Whisper White cardstock and cut out the banner and tag   The tag die came from the stamp set.  With this die set you have a few options on the tags.  There's a heart, the oval (that I used here), a square, a circle and a star.  Plus a couple extra little dies to use to add to your design.  


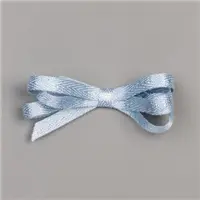
I stamped my greeting in Seaside Spray Classic Ink onto the 1/2" strip of Whisper White Cardstock and made the ends in to a fishtail banner.  I attached it to the tag with a Stampin' Dimensional.  I then added the tag with a little Seaside Spray Metallic Ribbon.  For the other box I colored the Gold Edged Metallic Ribbon with my Stampin' Blends to make a matching ribbon.  

 How To Video: 


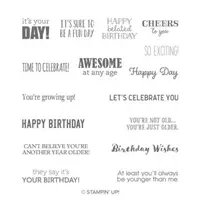
If you are viewing this post by email you may have to click here to view the video.  Not all mail servers will show the embedded video.  I did forget to mention that my greeting came from the Itty Bitty Birthday Stamp Set that is chalked full of birthday sentiments for all types of projects.  


Thanks for dropping by today I hope that you have a wonderful day and that you will give the Mini Curvy Keepsake Boxes a try I was so impressed with how easy they were to create.  If you need any of the supplies you have seen today you can pick them up in my online store in the shopping list below.  

Happy Stampin' 
Rick Adkins 


Use the Host Code on any order of $50 (before taxes & shipping) or more during the month and receive a gift from me in June as a Thank You. If your order is $150 or more, please do not use the host code.  You will forfeit your Stampin' Rewards if you do; and I want you to get those rewards.


If you place any size order with me during the month of July, you will receive the July Creative Stampers Tutorial Bundle from me as a little thank you.  This month's tutorial bundle has ten project tutorials that feature our favorite new products from the 2020-2021 Stampin’ Up! Annual Catalog.  The Creative Stampers Tutorial Bundle can either be earned for FREE with any size order or Can be purchased for $22 from me.


Don't forget about Bonus Days are going on now!  You get reward for shopping now with every $50 qualifying order. and you get to spend the $5.00 coupon codes when you shop in August.  

Join me on Tuesday July 20th for a fun crafting night together.  Bring a Stampin' Up! Kit and let's beat the summer heat with a little indoor crafting in my Zoom Craftroom.  


Join me in my July Monthly Card Class.  It's $25 or free with qualifying order  of $35 (before shipping and taxes) in my online store with this month's host Code  Deadline to get in is July 17th.  


Last day to join the july Card Club is July 17th.  Click on the Club Tab at the top to join.  

The deadline for my Christmas in July Card Class is coming up soon not miss out.  

Stampin' Up! Shopping List: 

Friday, July 10, 2020

July Blogging Friends Blog Hop - Green with Envy


Hello and welcome to my blog, and welcome to the July Blogging Friends Blog Hop.  This month our theme was Green with Envy.  I let everyone interpret that as they wanted but we are showcasing greens today.  Everyone did some fabulous projects.  By the way you may be seeing some new faces along the way of the hop as well as a new look coming soon.  Here's a look at my card for this month's hop.  


I used the Arrange a Wreath Bundle for my card today along with two of my favorite greens (Shaded Spruce and Just Jade).  Shaded Spruce has been around since the Color revamp a couple years ago and Just Jade is one of our new 2020-2022 In Colors.  I love pairing them together because they play so well together.  I did add in a little Calypso Coral to make them pop just a little bit more.  


I started out by stamping the one wreath from the stamp set in Shaded Spruce Classic Ink and then die cut the other (from the matching die set) from some Just Jade Cardstock and added it off set to the stamped wreath.  This allowed me to have both colors without having to do any fancy maneuvers with my Stamparatus.  The little flowers on the wreath are also die cuts from Calypso Coral Cardstock that I attached and added Champagne Rhinestones to the center of each.  I then added a Just Jade Gingham bow with a Mini Glue Dot and stamped the sentiment in the center or the wreath to finish off my card. 

 
Thanks for dropping by I hope that you have fun hopping along today.  Make sure that you leave comments because everyone loves comments and we would love to know what you think of our projects.  

Thursday, July 9, 2020

Birthday Wishes - Itty Bitty Birthdays Stamp Set

Hello and welcome to my blog; today I have a cut birthday set to share with you.  I created a card and a little treat box to share with you today.  I used the Itty Bitty Birthdays Stamp Set for the sentiment on my card and treat box today.  The Itty Bitty Birthdays Stamp Set is filled with different Birthday greetings so you can find the right one to fit your project.  Here's a look at my projects.  


Tips & Tricks: 

We will start with the card because it takes the most time to create.  And that's only because of the die cutting for the peony.  I started out by using the Camouflage Background Stamp in my Stamparatus.  I went with using the Stamparatus because I find that I get better pressure when I use the background stamps.  I can get a more even coverage of pressure when I stamp, and if I don't I can always restamp it again to get a better impression.  But, I stamped the Camouflage Background Stamp onto a piece of 5 1/2 x 4 1/4 Whisper White Cardstock in Rococo Rose Classic Ink.  Once I had the image I wanted nicely stamped I cut it down just a little to 4 x 5 1/4.  

 After cutting down the card panel I added it to a 4 1/8 x 5 3/8 mat of Petal Pink Cardstock.  Then I added the card front onto my Crumb Cake card base that was cut at 4 1/4 x 11.  I next added a little of the Rococo Rose Gathered Ribbon and a little of the 2019-2021 In Color Designer Series Paper.  Next I cut out all the pieces for the peony and leaves using the Peony Dies and the following cardstocks; Petal Pink, Soft Suede, and Crumb Cake.  Before putting the peony together I sponged around all the edges with Rococo Rose Classic Ink.  I assembled all the pieces using my Multipurpose Liquid Glue.  I then added the Peony flower to the card front with a few Stampin' Dimensionals, and then glued the leaves on the card tucking a little bit of each leaf under the flower.  I stamped my sentiment in Rococo Rose Classic Ink onto a strip of Whisper White Cardstock that I made into a banner with my Paper Snips.  

Mini Curvy Keepsake Birthday Box:


For the treat box I used the Mini Curvy Keepsake Box Dies and a piece of the 2019-2021 In Colors Designer Series Paper.  I used the Rococo Rose polka dot pattern from this pack of designer series paper.  I love the new Mini Curvy Keepsake Box Dies because I only have to use one sheet of 6 x 6 DSP or Cardstock to make the box.  Which means it's very cost effective if you are making a lot of them for a wedding, a class party, or just as a little thank you to first responders, or anyone.  

I used a scrap piece of Petal Pink Cardstock to cut out the little stitched heart die from the die set and stamped my greeting (the same one on the card) in Rococo Rose Classic Ink and made it into a fishtail banner.  I added the sentiment strip to the tag with a Stampin' Dimensional.  To attach the tag I took some of the Gold 3/8" Metallic Edged Ribbon and my Dark Rococo Rose Stampin' Blend and colored it.  Once the ribbon dried which doesn't take very long I threaded it through the hole on the tag and the handles on the little curvy box and tied it into a bow.  

To finish off both projects I added a few of the Champagne Rhinestones to both.  Thank you for dropping in today I hope that you have a wonderful day.  If you need any of the supplies you have seen used on today's projects they can all be picked up in my online store by clicking on the items in the shopping list below.  

Happy Stampin' 

Rick Adkins 

Use the Host Code on any order of $50 (before taxes & shipping) or more during the month and receive a gift from me in June as a Thank You. If your order is $150 or more, please do not use the host code.  You will forfeit your Stampin' Rewards if you do; and I want you to get those rewards.

If you place any size order with me during the month of July, you will receive the July Creative Stampers Tutorial Bundle from me as a little thank you.  This month's tutorial bundle has ten project tutorials that feature our favorite new products from the 2020-2021 Stampin’ Up! Annual Catalog.  The Creative Stampers Tutorial Bundle can either be earned for FREE with any size order or Can be purchased for $22 from me.


Join me on July 20th for a fun night of crafting!  Bring a Stampin' Up! Kit and lets beat the summer heat in the cool and do a little crafting together.  Email me for details and the link to register.  


Bonus Days are back!  Get rewarded with a $5.00 coupon code to spend in August with every qualifying order you make in July.  


Join me for my Christmas in July Card Class on July 30th.  Deadline to Register is July 16th or while supplies last.  You will make 16 Christmas cards (4 each of 4 designs) and have a jump start on your holiday card making.  Click here to register and to find out all the details.  


Stampin' Up! Shopping List:

Peony Dies
[152701]
$40.00
Stamparatus
[146276]
$49.00
Paper Snips
[103579]
$10.00

Wednesday, July 8, 2020

Christmas In July Card Class


Class Date: Thursday, July 30, 2020
RSVP & Payment Due:  Thursday, July 16, 2020 
Location: Rick’s ZOOM Classroom (Comfort of Your Own Home) 
Time: 7 pm – 9 pm CST 
Cost: $51.00 


Details: 


Why not get a jump on the holiday season and make some cute easy Christmas Cards to have ready to send out during the Holiday rush?  Join me for a fun Christmas in July card class on Thursday, July 30th in my ZOOM Classroom.  You will make 16 cards (4 each of 4 designs).   
I am featuring the Perfectly Plaid Stamp Set.  This is a cute fun set that is in the Stampin’ Up! Annual Catalog.  I adore this photopolymer stamp set and love how easy it is to work with.
The cost of the class is $51.00 and does not include the Stamp Set you may add that on if you would like of use something you already own.  

The Cost of the class includes: 

  • A pack of 6x6 Designer Series Paper 
  • A bolt of Ribbon
  • An Embellishment 
  • All the precut supplies to make all 16 cards with Envelopes
  • Access to the Live Class in my ZOOM Classroom (so no need to leave the house) 
  • Priority Shipping for your class kit to come to you.

You can add on the stamp set for only $17.00 with no extra shipping or taxes when you purchase the class.  

You will also need your own adhesive, bone folder, paper snips, and ink pads for this class.  Ink pads needed for this class are Real Red, Old Olive, & Soft Suede.  You can order them in my online store if you do not have them already or use a similar color you already own.  

Click here to order the class while supplies last or until July 16th:  

Template Designed by creativeworkerbee