Tuesday, June 23, 2020

Love And Thanks - Prized Peony The Spot Color Challenge #116

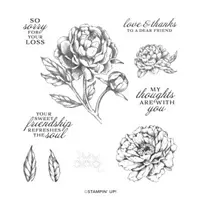
Hello and welcome to my blog; today I am going to share with you the card I designed for this week's color challenge over at The Spot.  I used the Prized Peony Stamp Set and did a little stamping, a little masking, and coloring to create my card.  The Prized Peony Stamp Set features different size Peony blooms and some great sentiments.  The outline images are great to color the flowers in using your favorite color media.  Here's a look at my card.  


Here's a look at this weeks color challenge image that I got my color scheme from.  I used all the colors in the challenge but you only have to pick three.  You can click here to join this weeks challenge or on the challenge image below.  

Tips & Tricks: 

To start off doing this type of card design you need to use a good quality paper.  I picked Thicked Whisper White cardstock to do my stamping and coloring on.  I have found that when I color with my blends on Thick Whisper White I get a brighter colored image.  I am sure that this is because the alcohol in the markers don't soak through the thick cardstock as much as the regular so more of the ink sits on top.  But, I started with the flowers I wanted to be in the front first and stamped that one.  Then I cut a mask and masked over that flower.  


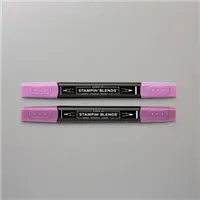
After stamping and masking all the flowers I wanted in the front I moved on to the next set of flowers.  I repeated the process of stamping and masking till I had all the background covered.  I stamped additional leaves in the background as well.  At this point with all the stamping complete I could remove all the masks and start coloring.  I used a mixture of my Stampin' Write Markers and my Stampin' Blends to get the color saturation that I wanted.  I used the Pear Pizzazz Stampin' Write Marker to color the background.  


I colored most of the flowers with my Stampin' Blends first and then came back after the ink dried and added flicks of the same colors using my Stampin' Write markers in the darkest areas.  I colored all the centers with my Bumblebee Stampin' Write Marker and came back in with my dark Crumb Cake Stampin' Blend to add a little texture and shadow.  Once I flicked in the color with the stampin' write markers and the ink dried I came back with my lightest stampin blend that matched the color of each flower and leaves and went back over it to seal in the color.  


Thanks for dropping by today, you will find a full list of the supplies I used in the shopping list below.  If you need any of the supplies you can order them in my online store there.  I hope that you will take time this week and share your projects using this weeks color challenge with us over at the Spot.  


Happy Stampin' 
Rick Adkins 

Stampin' Up! Shopping List: 


Monday, June 15, 2020

Markering Technique featuring the Prized Peony Bundle Video Tutorial

Hello and welcome to my blog; today I am going to share a fun and easy technique with you on how to get multiple colors on one stamped image.  This is a super easy technique but looks like you spent hours inking up the stamp or used multiple stamps to create the look.  I am going to share with you how to do the markering technique.  On my card today I used the new 2020-2022 In Colors and the Prized Peony Bundle.  Here is a look at my project.  


As I mentioned above this is a super easy technique that just gives fabulous results but there are a few tips and tricks you need to be aware of.  So to start this technique uses water based markers.  You get the best effect with those.  You can use the blends but you take the risk of damaging your blends and staining your stamps without being able to remove the stain.  Plus the alcohol in the blends could ruin your stamps.  Anyway, the stampin' blends work the best and are quick and easy to do.  The hardest part of this technique is knowing where to add each color.  

 
I used the new 2020-2022 In Color Stampin' Blends for my coloring today.  I used every one of the colors to achieve this multicolored look on the stamped image on my card.  This technique also works best on cling stamps because the red rubber has just a little more grip for the ink from the markers to hold onto.  You can do it with photopolymer but it takes a little more effort.  I started out my inking up the Bumblebee areas first.  You will always use the side of your maker (the brush tip) to ink up your stamps.  I then came in with Just Jade on the leaves and stems.  I wanted a little shadow to the some of the areas on the leaves and stem so I added just a touch of Misty Moonlight here and there.  


Next I came in with the Magenta Madness Stampin' Write Marker and colored in the Peony.  I also came back in and added just a little Cinnamon Cider to the edge of the center of the flower where I had the Bumblebee.  The Cinnamon Cider didn't show up as much this time as it did in my trail card.  But, was something I expected since each time you do this technique you get a little different result each time.  

Video Tutorial: 


If you are viewing this post by email you may not be able to see the video above.  If so click here to go to the video on my YouTube Channel. 


So, as you can see I have a beautiful multicolored stamped image that I didn't have to spend hours inking up with ink pads, no masking areas that I wanted to be a certain color, or ink everywhere on my Stamparatus plates.  Some key takeaways to remember are; make sure to use the side of the brush tip on your stampin' write markers, start with your lightest color and work darker, make sure to huff on your stamp to remoisten the ink before stamping down, and the most important tip of all have fun playing.  

Thanks for dropping by today I hope you have a wonderful day.  If you need any of these supplies you can pick them up in the shopping list below in my online store.  Don't forget about the awesome pick a bundle promotion going on right now when you purchase the starter kit and join my team.  You could get the Prized Peony Bundle Free when you join in June, or any other bundle that you may pick.  

Happy Stampin' 
Rick Adkins 


Use the Host Code on any order of $50 (before taxes & shipping) or more during the month and receive a gift from me in June as a Thank You. If your order is $150 or more, please do not use the host code.  You will forfeit your Stampin' Rewards if you do; and I want you to get those rewards.


If you place any size order with me during the month of June, you will receive the June Creative Stampers Tutorial Bundle from me as a little thank you.  This month's tutorial bundle features twelve Masculine themed projects.  All the products used can be found in the new 2020-2021 Stampin' Up! Annual Catalog.  The Creative Stampers Tutorial Bundle can either be earned for FREE with any size order or Can be purchased for $20 from me.

Three main reasons to Join!  

You Get at least a 20% discount on all your orders while you are a demo.   
You get to join my fun Kinsmon Crafters Team and Private Facebook Group.
Access to directions to all my online classes 


I All Ready Know I Want to Join!  Sign Me UP!


I announced my Online Summer Retreat yesterday on my blog and my newsletter.  If you missed the information you can click here to join me for a fun day of crafting in July.  We will have a Whale of a good time.  Learn more about my Summer One Day Retreat here and let's beat the heat and do a little crafting together.  

Stampin' Up! Shopping List:

Sunday, June 14, 2020

Rick's Crafty Corner Summer Retreat To Go


Rick’s Crafty Corner Summer Retreat To Go
When:   Saturday July 25, 2020 
Time:  9 am till 5 pm CST 
Where:  From the comfort of your home! 

Join me for my Summer Retreat To Go!  This is a all Online Event that will be held in my Zoom Classroom Live on Saturday, July 25, 2020.  Normally my retreats fill up fast so do not delay on registering.  There is a limited number of boxes to go available.  

Your Summer Retreat will include:  
Exclusive Goody Bag
Pillow Gifts completed and made with Love!  
Over $35 worth of products 
Chance for Door Prizes 
Make & Takes
Shipping Included!
I will bring my Retreat right to your door!  

Cost: 
Early Bird Price before July 3, 2020 - $74.00 
Price After June 3, till July 8, 2020 - $84.00 
Tutorial Only Option:  $35.00 (will be emailed out on or before July 25th) 

Add On Option:  Whale Done Bundle for only $31.50

Register Now!

This box is going to be packed full of fun and excitement!  I hope you love it and feel the joy from my live even packed inside!

Friday, June 12, 2020

Blogging Friends Blog Hop - Summer Parties


Hello and welcome to my blog; today I am sharing the project I made for this month's Blogging Friends Blog Hop.  This month our theme was Summer Parties.  So, I thought what would make a good summer party invitation and I immediately thought of the Whale of A Time Suite of Products.   So I pulled out my products along with some others from the 2020-2021 Annual Catalog and got to work.  This is the card I came up with.  


I started my card design by picking my piece of designer series paper.  I knew I wanted to use the Whale of A Time Designer Series Paper as my background.  So I picked my pattern paper.  But, I needed a sentiment so I picked out the Playful Alphabet Dies and created my own.  I attached one of the Foam Adhesive Sheets to a scrap piece of Pool Party Cardstock and cut out the words You're Invited.  I the adhered them to my designer series paper.  

 
I then attached my  designer series paper piece to a Calypso Coral Mat that was cut at 4 1/8 x 5 3.8.  Next I attached this to my card base.  I stamped the whale from the Whale Done Stamp set and used the matching punch to punch it out.  The whale was popped up on a few Stampin' Dimensionals under the sentiment.  I then added a few of the Whale of A Time Sequins around the card using mini glue dots to finish off my card.  I love the tone on tone sentiment and how it pops out on the foam adhesive sheets.  

Blog Roll: 

Thanks for dropping by today I hope that you have fun checking out what everyone else came up with this month.  If you need any of the supplies you have seen today you can pick them up in my online store by clicking on the item in the shopping list below.  
Happy Stampin' 
Rick Adkins 


Use the Host Code on any order of $50 (before taxes & shipping) or more during the month and receive a gift from me in June as a Thank You. If your order is $150 or more, please do not use the host code.  You will forfeit your Stampin' Rewards if you do; and I want you to get those rewards.


If you place any size order with me during the month of June, you will receive the June Creative Stampers Tutorial Bundle from me as a little thank you.  This month's tutorial bundle features twelve Masculine themed projects.  All the products used can be found in the new 2020-2021 Stampin' Up! Annual Catalog.  The Creative Stampers Tutorial Bundle can either be earned for FREE with any size order or Can be purchased for $20 from me.

Stampin' Up! Shopping List: 


Template Designed by creativeworkerbee