Sunday, May 17, 2020

Celebrate Sunflowers Note Card

Hello and welcome to my blog; today I am going to share with you little sneak peek of some upcoming products with a note card that I Made using the Celebrate Sunflowers Stamp Set, from the 2020-2021 Stampin' Up! Annual Catalog.  Here is a look at my project for today.  

Celebrate Sunflowers Stamp Set, Whisper White note cards & Envelopes, Daffodil Delight classic Ink, Old Olive Classic Ink, Stampin' Up!, Rick Adkins

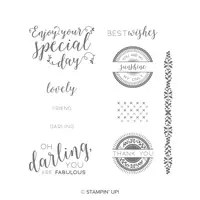
Celebrate Sunflowers Stamp Set: 

The Celebrate Sunflower (New in the 2020-2021 Stampin’ Up! Annual Catalog: will allow you to honor and celebrate friendships with heartfelt sentiments and a stunning set of sunflower images.  The stamp set features wonderful line art sunflowers and leaves that are perfect to color with your favorite coloring media.   The large sunflower image is great for a card front as well as elements on your cards.  I featured it today on my note card.  

Celebrate Sunflowers Stamp Set, Whisper White note cards & Envelopes, Daffodil Delight classic Ink, Old Olive Classic Ink, Stampin' Up!, Rick Adkins

This is a cling mount stamp set so it will stay in place on your block no matter what you are using it for.  There are eight stamps in the set four of which are line art images.  You have the large sunflower, which is one of my favorites, a smaller sunflower image with leaves attached, and two sets of different size leaves.  Along with some great mixed font sentiments.  The deeply etched images will give you excellent detail as you can see with my little note card today.  

Celebrate Sunflowers Stamp Set, Whisper White note cards & Envelopes, Daffodil Delight classic Ink, Old Olive Classic Ink, Stampin' Up!, Rick Adkins

Note Cards Perfect for Any Reason: 

I used the large sunflower to stamp all over my note card in Daffodil Delight Classic Ink.  I stamped it in a triangular pattern to add visual interest to the note card.  I then added the large leaf image stamped in Old Olive Classic Ink to fill in some of the white space on the note card.  This is a perfect example of some simple stamping.  Anyone could create this not card, from beginning crafters to someone that has been doing it for years that just needs to make a bunch of cards quick.  

Celebrate Sunflowers Stamp Set, Whisper White note cards & Envelopes, Daffodil Delight classic Ink, Old Olive Classic Ink, Stampin' Up!, Rick Adkins

I love to make note cards for some occasions because they are the perfect size to be tucked into someone’s lunch, bag, or anywhere.  Plus, they come in a pack of 20 with envelopes so you have plenty to work with.  Another great thing about them is they are ready for you to make and send, no cutting needed if you do not want to add any additional layers.  I only added one additional layer to my note card today.  I stamped the sentiment on a piece of Daffodil Delight Cardstock after stamping the sunflower image on it.  First, I stamped the sunflower off before stamping on the 1 1/16th x 2 ¾” piece of Daffodil Delight Cardstock.  Next, I stamped the sentiment in Old Olive Classic Ink and cut a fishtail banner on one end.  I added it to the note card with a couple Stampin’ Dimensionals.  

Celebrate Sunflowers Stamp Set, Whisper White note cards & Envelopes, Daffodil Delight classic Ink, Old Olive Classic Ink, Stampin' Up!, Rick Adkins

To finish off my note card I did stamp the large sunflower on the front of the envelope to have a matching presentation to the recipient.  I also stamped it on one corner of the flap.  

Get Your Hands On New Products Before June 3rd: 

Thanks for dropping by today, I hope that you have enjoyed my little simple stamping note card, and that you have been inspired to give it a try.  Remember that the products in the new catalog can not be purchased until June 3, 2020.  If you would like to get your hands on them early you can add them to your starter kit when you join my team this month.  The starter kit is always the best deal in the catalog; for only $99 you get to pick out $125 worth of products with Free Shipping.  Plus, you get at least a 20% discount on all orders while you are a demonstrator.  Think of it like buying a membership to Costco.  But, instead of just a membership card you get a discount on all your orders, plus you get to shop a full month early from any of the new catalogs.  

Three main reasons to Join!  

  1.        You Get at least a 20% discount on all your orders while you are a demo.   
  2.   2.  You get to join my fun Kinsmon Crafters Team and Private Facebook Group.
  3. .      Access to directions to all my online classes 

I All Ready Know I Want to Join!  Sign Me UP!

Happy Stampin' 
Rick Adkins 


Use the Host Code on any order of $50 (before taxes & shipping) or more during the month and receive a gift from me in May as a Thank You. If your order is $150 or more, please do not use the host code.  You will forfeit your Stampin' Rewards if you do; and I want you to get those rewards.


If you place any size order with me during the month of May, you will receive the May Creative Stampers Tutorial Bundle from me as a little thank you.  This month's tutorial bundle features Birthday Bonanza Suite of Products from the January-June Mini Catalog.  The Creative Stampers Tutorial Bundle can either be earned for FREE with any size order or Can be purchased for $20 from me.

Stampin' Up! Shopping List: 


Saturday, May 16, 2020

Stitched All Around Copper Dotted Treat Bag Customer Gifts

Hello and welcome to my blog; today I am going to share with you one of my customer gifts that I sent out recently.  Each week I offer a new Deal of the Week for people that place a qualifying order using a host code.  Next to the last week in April I offered a pack of Basic Rhinestones to anyone that ordered that week.   Once I close out the host code for the month I order all the products that were offered during the month then once they come in I have been trying to create a really cute packaging idea for each product.  This time I used the Copper Dotted Treat Bags and my packaging, along with some other products.  Here's a look at how I packaged the Rhinestones.  


Copper Dotted Treat Bags, Follow Your Art Designer Series Paper, Basic Black Satin Ribbon, Rick Adkins

Tips & Tricks: 

Once I figured out how I was going to decorate my little gift bags I started prepping all the supplies.  I decided to use the Follow Your Art Designer Series Paper as my belly band.  When I cut the designer series paper a certain way I can get five belly bands from one sheet of paper.  I cut cut each belly band at 3" x 7".  So I start by cutting one from the either the bottom or the top and then flip it around and cut the other four in the opposite direction.  Once I had everything cut I simply wrapped it around the treat bag after placing the pack of Rhinestones inside.  I secured the belly band with a strip of Tear & Tape in the seam on the back.  

Copper Dotted Treat Bags, Follow Your Art Designer Series Paper, Basic Black Satin Ribbon, Rick Adkins
 
Once I had the belly band wrapped around the treat bag, I then wrapped around some of the Black 1/2" Satin Ribbon around and tied it in a pretty little knot.  I wanted to add a little texture and pretty to the bag, and to make it look a little more like the gift it is.  I then stamped the Thank You sentiment from the Stitched All Around Stamp Set in Tuxedo Black Ink.  By using the black ribbon I also tied in the black from the ink color as well.  Plus black goes with everything.  

Copper Dotted Treat Bags, Follow Your Art Designer Series Paper, Basic Black Satin Ribbon, Rick Adkins

I then took the Layering Circle Dies and cut out the stamped sentiment and a Blushing Bride Circle so that I could layer them up together.  I used a Stampin' Dimensional on the stamped circle and a couple behind the Blushing Bride Circle so that they not only pop the sentiment up but secure the ribbon in place so that the ribbon does not move to much.  And that finishes how I decorated the treat bags.   The Copper Dotted Treat Bags, the Follow Your Art Designer Series Paper, and the Black 1/2" Satin Ribbon are all on the last chance list and I personally think that you should stock up on them before they are gone, since they are while supplies last.  

Copper Dotted Treat Bags, Follow Your Art Designer Series Paper, Basic Black Satin Ribbon, Rick Adkins

I think these treat bags are perfect for so many gift packaging ideas and can be decorated in so many different ways.  Thank you for dropping by today I hope you have a wonderful weekend.  I will be sharing a new project tomorrow with you so make sure you drop back in to see what I have tomorrow.  If you need any of these supplies you can pick them up in my online store.  I will also tell you that the Follow Your Art is on sale at about 60% off so it's a super great deal right now.  

Happy Stampin' 
Rick Adkins 


Use the Host Code on any order of $50 (before taxes & shipping) or more during the month and receive a gift from me in May as a Thank You. If your order is $150 or more, please do not use the host code.  You will forfeit your Stampin' Rewards if you do; and I want you to get those rewards.


If you place any size order with me during the month of May, you will receive the May Creative Stampers Tutorial Bundle from me as a little thank you.  This month's tutorial bundle features Birthday Bonanza Suite of Products from the January-June Mini Catalog.  The Creative Stampers Tutorial Bundle can either be earned for FREE with any size order or Can be purchased for $20 from me.

Stampin' Up! Shopping List: 


Friday, May 15, 2020

Forever Greenery Box Tutorial How To - Stampin' Up! 2020-2021 Annual Ca...

Hello and welcome to my blog; today I am going to share with you the project I made Wednesday, during my Weekly Facebook Live.  This week I changed gears a little bit from what I had originally planned and created a box using products from the upcoming New 2020-2021 Stampin' Up! Annual Catalog.  I had originally planned to share this same box with products from the All Dressed Up Suite from the January-June Mini Catalog.  But, I decided to feature the new 2020-2022 In Color Just Jade, and some of the products from the Forever Greenery Suite instead.  Here's a look at my project.  

Forever Fern Stamp Set, Forever Greenery Designer Series Paper, Forever Gold Laser Cut Specialty Paper, Sneak Peek, Rick Adkins, Stampin' Up!

Tips & Tricks: 

This is actually a super easy project to put together, it must be I did it three times.  This is the same box that I shared yesterday for the One Stamp At A Time Blog Hop, but using products from the World of Good Suite, if you missed that post you can click here to see it.  I also created it before my Facebook Live in the All Dressed Up Products I will share that with you in the coming days so you will be able to see just how changing the up a few items can completely change the looks of your a projects.  I started my Forever Greenery Box with a piece of Thick Whisper White Cardstock cut at 8 1/2 x 10 1/2.  

Forever Fern Stamp Set, Forever Greenery Designer Series Paper, Forever Gold Laser Cut Specialty Paper, Sneak Peek, Rick Adkins, Stampin' Up!

I scored the Thick Whisper White cardstock with my Simply Score Scoring Tool on the 10 1/2" side at 1/2", 3 1/2", 5 1/2", & 8 1/2".  Next I turned it around to the 8 1/2" side and scored at 2" & 6 1/2".  After that it was just a matter of cutting the score lines, and putting it together.  The Video Tutorial will walk you step by step on how to cut your cardstock.  

Forever Fern Stamp Set, Forever Greenery Designer Series Paper, Forever Gold Laser Cut Specialty Paper, Sneak Peek, Rick Adkins, Stampin' Up!

Next it was time to adhere the Designer Series Paper to my Just Jade Mats to create the layers for the top, and all four sides of the box.  I cut the Just Jade cardstock; one at 2 3/4" x 4 1/4", two pieces at 1 3/4" x 4 1/4", and two pieces for the sides at 1 3/4" x 2 3/4".  The Forever Greenery Designer Series Paper was cut 1/4" smaller for all the pieces on the top and bottom.  The top DSP piece was cut at 2 1/2 x 4", and the front and back pieces measure 1 1/2" x 4".  And, the two side pieces measure 1 1/2 x 2 1/2".  I adhered them with a little Multipurpose Liquid Glue after glueing the box base together.  

Forever Fern Stamp Set, Forever Greenery Designer Series Paper, Forever Gold Laser Cut Specialty Paper, Sneak Peek, Rick Adkins, Stampin' Up!

To finish off the box I added one of the elements from the Forever Gold Speciality Designer Series Paper to the top of the box with a few Stampin' Dimensionals.  I then took a piece of Whisper White cardstock that measures 1 1/2" x 2 1/4" and stamped my sentiment from the Forever Fern Stamp Set in Garden Green Classic Ink.  And, then added it to the center of the Gold Laser Die cut with a few more Stampin' Dimensionals.  

Video Tutorial: 


If you are viewing this post by email you may have to click here or on the image below to view the video.  Not all mail servers will show the embedded video tutorial. 


If you would like to get you hot little hands on these products they will be out on June 3, 2020 or you can join my team and add them to your Stampin' Up! Starter Kit.  The Starter Kit is always the best deal in the catalog you get $125 in products for only $99 with free shipping.  Plus you get at least a 20% discount on all your orders while you are a demonstrator.  If you have questions about joining please feel free to message me.  

Three main reasons to Join!  

  1. You Get at least a 20% discount on all your orders while you are a demo.   
  2. You get to join my fun Kinsmon Crafters Team and Private Facebook Group.
  3. Access to directions to all my online classes 

Thanks for dropping by today, I hope that you have enjoyed this little sneak peek of some of the new products coming from the 2020-2021 Stampin' Up! Annual Catalog, be on the look out for a few more in the coming weeks.  I am working hard on my Online BOGO Sale and will be announcing that date very soon, you will not want to miss it.  

Happy Stampin' 
Rick Adkins 


Use the Host Code on any order of $50 (before taxes & shipping) or more during the month and receive a gift from me in May as a Thank You. If your order is $150 or more, please do not use the host code.  You will forfeit your Stampin' Rewards if you do; and I want you to get those rewards.


If you place any size order with me during the month of May, you will receive the May Creative Stampers Tutorial Bundle from me as a little thank you.  This month's tutorial bundle features Birthday Bonanza Suite of Products from the January-June Mini Catalog.  The Creative Stampers Tutorial Bundle can either be earned for FREE with any size order or Can be purchased for $20 from me.

Product List:

Template Designed by creativeworkerbee