Monday, January 28, 2019

Kylie's International Highlights Winners Blog Hop


Hello and welcome to my second post for today.  And, I am super excited to be part of Kylie Bertucci's International Highlights Top Ten Winners Blog Hop this month.  This month's theme was Encouragement.  I created a card using one of the same stamp set that I used on the card that was picked as a wining card.  I will share a look at that card in just a little bit.  Here's a look at the card I created for today's blog hop.  


Here's a look at the card that was picked as one of the wining cards for the International Highlights. 

Lovely Lattice Black Magic Card by Rick Adkins

Tips & Tricks: 

I used the same techniques that I used earlier today on my card this morning.  I stamped the image on my piece of Thick Whisper White Cardstock (4 x 5 1/4), but instead of stamping the Lovely Lattice image up and down I turned it on it's side and then stamped it.  This created a totally new look for the stamp set which worked really really nicely.  I then masked off the image and stamped the vine image from the Beauty Abound Stamp Set.  

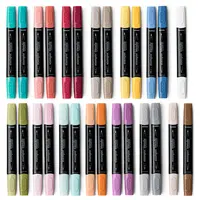
I removed the mask and started coloring with my stampin' blends.  As far as the colors goes I used Flirty Flamingo Light & Dark mixed with Petal Pink light and dark and a little pink pirouette (which is retired but mixed beautifully with the flirty flamingo.)  You can currently find the Pink Pirouette Stampin' Blends in the Clearance Rack at this time.  To color the leaves I used Mint Macaron (light & dark) and Soft Sea Foam (light & dark).  

After all the coloring was complete it was time to do a little watercoloring.  I took my watercolor paint and mixed up two colors.  I mixed one that was as close to Flirty Flamingo and Petal Pink as I possibly could.  I added a little water around the top left and bottom right corners of the flowers and added a little paint and let it flow.  I then flicked on some watercolor into the still damp paper.  You can watercolor on the Thick Whisper White cardstock as long as you use very little water, and don't flood the paper with to much water.  The flicking allowed for the texture on the cardstock.  At this point it was time to dry it.  I hit it with my heat tool until it was completely dry.  I ran it \through my Big Shot to flatten the paper back out.  Here's a close up look at the coloring.  


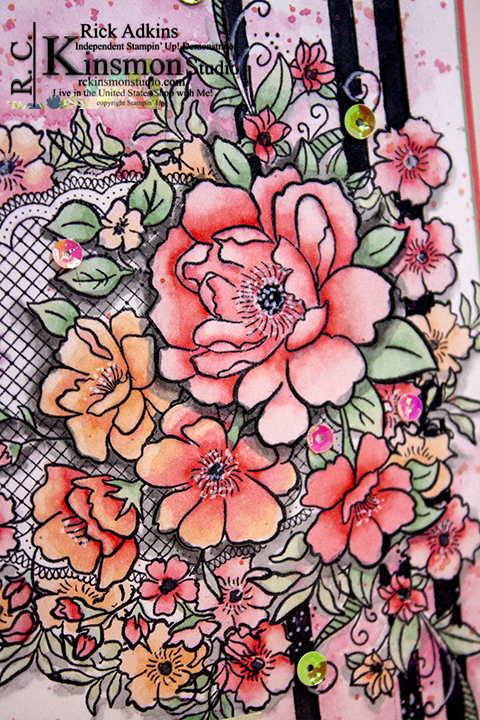
Once I had all the coloring done it was time to add the graphic detail to the card.  I took a t-square ruler and a pencil and added a few lines behind the stamped and colored flowers.  I did six lines total and then used journaling pens and went over the pencil lines.  After that I took the Basic Black Stampin' Blends and colored the lines in.  


To make the lines from the vines that disappeared from coloring in the lines; I used a white gel pen and went over them.  I only went over the parts that would overlap the black.  I did go in and added some white dots on all the flower centers to add a little more texture.  


To finish off the card I added a few of the Iridescent Sequins in Powder Pink and Pear Pizzazz.  I adhered them with a little multipurpose liquid glue.  Once I did this I added the card front to a piece of Mint Macaron Cardstock cut at 4 1/8 x 5 3 /8.  I then placed the entire card front to my Flirty Flamingo Card base (4 1/4 x 11 scored at 5 1/2).  I did add a whisper white insert to the inside of my card that was cut at 4 x 5 1/4.

As I sat and looked at the card which I always do to make sure it was complete or not.  I decided that It still needed a sentiment on the outside of the card.  So I took a small strip of Soft Sea Foam cardstock and my versamark ink pad and stamped the I Believe in You sentiment from the Amazing Life stamp set in the 2019 Occasions Catalog.  This was the perfect sentiment for an encouragement card.  I mean really what better sentiment could I have picked than that.  

Thanks for dropping by today for the blog hop I know the other winners have done a great job with there cards for you you will find the blow roll below.  Below the blog roll you will find the shopping list for this project.  Remember that we have just kicked off Saleabration and you can earn the Lovely Lattice Stamp Set as your free Saleabration item with a $50 order in my online store

Happy Stampin'
Rick

Blog Roll: 


Product List
Stamparatus
[146276]
$49.00
Heat Tool
[129053]
$30.00

A Friend is Someone Who Chooses You Lovely Lattice Card

Hello and welcome to my blog.  I hope that you are having a wonderful day.  Today, I am sharing a card that I created using the Lovely Lattice SAB (Saleabration) Stamp Set and the Beauty Abounds Stamp Set from the Occasions Catalog.  I did something something with this card.  I created a fun modern card with a floral and graphic pattern.  This created a fun new look for this card.  Here's a look at today's card.


Tips & Tricks:

When I created this card I had the idea and knew what I wanted to do but it took a minute to come up with the how to.  So I decided that the best course of action would be to do a little masking and use my Stamparatus to do the stamping.  But in order to get both stamped images on the page as one required a little masking. 
So I stamped the the image from Lovely Lattice first on my piece of Thick Whisper White Cardstock then while I still had the image on my Stamparatus plate I took a piece of masking paper and stamped the image again.  I use the Avery Self Adhesive Removable Labels for masking; I got them off of Amazon I've linked to the ones that I use above.  I then cut out the mask using my paper snips and laid down my mask over the stamped image.  At this point I could take the stamp that I was going to use from Beauty Abound without having to worry about any unwanted stamping anywhere.  

Once the stamping was complete it was time to pull out the Stampin' Blends and watercolors and start the coloring process.  I started out by coloring the flowers and leaves.  I colored the images with Poppy Parade Light, Pineapple Punch Light & Dark, Pumpkin Pie Light, and a little Calypso Coral Light blends.  The leaves were colored with Mossy Meadow Light & Dark and the Old Olive Light blends.  I threw in a little of the Dark Mint Macaron Stampin' Blend on the vines coming from the flowers.  I then took my watercolors and added a little water around the image and added in a mint color and a green.  I let these colors blend together and then worked my way around the image.  At this point I took my heat tool and dried it really well.  I flicked on some Mossy Meadow, and Smokey Slate from my blends.   


I then took a straight edge and drew a few lines with a pencil.  I made sure to vary the thickness of the lines.   Once this was done I took my journaling pens and went over each line that I drew.  Next I colored in some of them with my basic black stampin blend marker.  This created a nice bold graphic pattern.  Once all this was done I then took my Smokey Slate blends and went around some of the flowers and created a look of dimension.  


To finish off the card I stamped the sentiment from Beauty Abound in Memento Tuxedo Black ink.  To get a nice dark image I placed the stamp in the Stamparatus so that I could stamp the image twice in the same place.  By using the Stamparatus I was guaranteed perfect placement.  I added a little extra sparkle to the card by adding a few of the iridescent sequins in Powder Pink and So Saffron from the Iridescent Sequin Assortment pack.  Yes, I picked out just these two colors.  I sat down and separated all the sequins out into a different container. This allowed me to be able to see each color and use them without grabbing the wrong one so much more easily.  It was a little more work in the beginning, but so so worth it.  

If you would like any of the supplies that I used on my card you can pick them up in my online store by clicking on the images below in the supply list. 

Happy Stampin'
Rick 

Product List
Stamparatus
[146276]
$49.00

Monday, November 27, 2017

Create a Pearlized Holly Wreath

Thursday, November 16, 2017

Super Easy Stampin' Up! Year of Cheer Gift Card Holder and Envelope Vid...

Thursday, November 9, 2017

Year of Cheer Stand Up Calendar Card Video Tutorial

Tuesday, November 7, 2017

How to Make a Quilted Christmas Gift Box and a Paper Bead Bracelet

Tuesday, October 24, 2017

Simple Basic Coloring Technqiue & Introduction to Stampin' Blends

Stampin' Blends are Stampin' Up!'s new premier alcohol markers that will release on November 1, 2017.  The Stampin' Blends features dual tips one being a brush tip and the other a fine point tip; which will allow you to add just the right amount of color where you need it.  Each of the 12 colors come in a dark and light shade for easy coloring.  Also in the Stampin' Blends collection is a Bronze and a Ivory Marker which only come in those shades.  There is also a blender which is  a must have tool for fixing any little mishaps or to add a little extra highlighting.  Each of the light and dark shade markers are available individually or in a combo pack, which saves on replacement costs.  Stampin' Up! has done in-house testing for evaporation and life testing and are really happy with the results, so you can feel confident in their life cycle.  The markers also feature a Press fit seal to prevent air from entering the barrel and causing any evaporation.  The nestable lids make it easy to keep track of and have a tight fit for a long lasting color.  The squareish design helps your Stampin' Blends form rolling around on your work surface.


Supply List: 

Friday, September 29, 2017

Spooky Cat Halloween Milk Carton

Monday, September 25, 2017

How to do the Stained Glass Technique featuring Stampin' Up! Products

Friday, September 22, 2017

Conical Witch’s Hat Treat Holder Video Tutorial Featuring Stampin' Up! p...

Monday, September 18, 2017

Spooky Cat Tri Fold Shutter Card Tutorial with Stampin' Up! Products


Visit My blog for a free PDF tutorial by clicking here!


Friday, September 15, 2017

Spooky Night 2 x 2 Flip Top Halloween Treat Box

Monday, September 11, 2017

Holly Berry Happiness Online Class Preorder


Holly Berry Happiness Online Class (Part of my Christmas card Series)

Deadline to Register: September 16, 2017
Time: Watch and Create on your own time
Cost:  Depends on the Budget Friendly Option You Pick
Location: The comfort of your own craft space/home.

Join me in the studio from the comfort of your own home for my kick off to Christmas Online Class Series.  Each Class will feature a different stamp set and products from Stampin’ Up!.  The kick off class features the Holly Berry Happiness stamp set (in the 2017-2018 Annual Catalog on page 118.)  In this class you will make 10 cards (2 of 5 designs). 

I have created three different cost saving options for you to pick from.  Class fees include all shipping and taxes.  Online classes will ship no later than September 29th as long as everything ships to me when expected. 

To sign up for this class you can visit my blog at http://wp.me/P2AuXD-2c1 and fill out the contact form if you are not on my blog.  If you are on my blog you can fill out the contact form below. 
o   Option #1: $55.48
o   Which Includes the following:
§  Holly Berry Happiness Photopolymer Stamp Set
§  The holly Berry Builder Punch
§  A Pack of Stampin’ Dimensionals for FREE
§  My Cards to Go Make & Take Packets
§  24/7 Access to the Online Video Tutorial
§  Printable PDF Instructions emailed to you
o   Option #2: $33.67
o   Which Includes the following:
§  Holly Berry Happiness Photopolymer Stamp Set
§  My Cards to Go Make & Take Packets
§  24/7 Access to the Online Video Tutorial
§  Printable PDF Instructions emailed to you
o   Option #3: $15.00 Printable PDF Instructions Tutorial

Additional Supplies Needed for this Class:
o   Garden Green Classic Stampin’ Pad (#126073)
o   Old Olive Classic Stampin’ Pad (#126953)
o   Cherry Cobbler Classic Stampin’ Pad (#126966)
o   Basic Black Archival Stampin’ Ink Pad (#140931) or a Memento Tuxedo Black Ink Pad (#132708)
o   Paper Snips (#103579)
o   Snail Adhesive (#104332)
o   Stampin’ Dimensionals (#104430)

Template Designed by creativeworkerbee