Hello and welcome to my blog; this is my second post for today. My first post was about the new Storage by Stampin' Up! that will be available on April 1, 2019. If you missed that post you can see it here. My card for this weeks Paper Craft Crew challenge is a fun fold card that I call a inside z-fold card featuring the Amazing Life Stamp Set. Here's a look at my card.
Here's the card that inspired my card today. You can click on the card image below and check out what all the other design team members created with this weeks inspiration.
I am not a big fan of Tic Tac Toe challenges but this one was actually very fun today. I picked the #simplestamping, Monochromatic, and Green combo for my card today.
Video Tutorial:
Tips & Tricks:
Remember to turn the designer series paper in the opposite than the one you want to face out. If you don't the wrong side will be facing out instead of the intended size; not that this may be a bad thing or anything since the designer series paper from Stampin' Up! is like the cutest in the world.
Make sure that your score lines are nice and creased. If not your card may not line up right.
You're going to make valley, mountain, valley folds before attaching this piece to your card mats.
I hope that you have been inspired by my little card. Thanks for dropping by make sure you watch the video which was recorded on my YouTube Live yesterday. If you need any of the products that I have used today you can pick them up in my online store by clicking on the shopping list below.
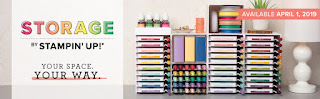
OMG! How super exciting it was announced yesterday that we will have new storage solutions for our ink pads, ink refills, and more! Whether you have an entire room or a small corner in your home for stamping, your creative space should be tailored to you. Stampin' Up!'s new product line, Storage by Stampin’ Up!, provides you with modular storage solutions that let you organize—and customize—your space your way.
Product Details:
Product Launch: April 1, 2019
All order types qualify (e.g., customer, demonstrator, workshop, and online).
No order limits apply.
Storage by Stampin’ Up! will be featured in the 2019–2020 annual catalog.
You can download the PDF price chart for the Storage by Stampin' Up! by clicking here.
Features & Benefits:
Storage by Stampin’ Up! is designed to store and showcase your Stampin’ Pads, Stampin’ Ink Refills, Stampin’ Blends, Stampin’ Write Markers, Watercolor Pencils, and other accessories. Here are some other features and benefits of Storage by Stampin’ Up!:
Keeps products organized, tidy, visible, and trackable at all times.
Ensures that your Stampin’ Pads, Stampin’ Write Markers, and Stampin’ Blends are all stored horizontally, as recommended.
Designed to be stylish, durable, compact, stackable, and modular.
Blends in naturally with most home decor with its white neutral color.
Stacks vertically and can be arranged to fit practically any flat workspace.
Easily assembled and disassembled for rearrangement and/or cleaning.
Since the units are modular you can fully customize your work station. Whether you are just starting out or already have tons and tons of products, the Storage by Stampin’ Up!'s modular storage solutions will allow you to organize and customize your workspace in a way that perfectly fits your specific needs.
Headed out to a crop of class you can take a handful of storage trays with you to show off your new stylish storage system. The individual trays are lightweight, compact, and easy to assemble, so they will make great eye-catching displays for the colors and cards you’re promoting and will keep your workshop tables and displays orderly at the same time.
Here are a few suggestions on arranging them.
You can download the Configuration chart by clicking here.
I am so looking forward to April Fool's Day now since that's the day that the new Storage by Stampin' Up! line of products release to both customers and demonstrators alike. I will be figuring out which units and how many I will need for my craft desk. I know that you will be doing the same thing until then. Just a note that the old style ink pads will not fit in this new storage option.
You will be able to order starting April 1, 2019 in my online store right here on my blog.
Thanks for dropping by today! I hope that you will find some great inspiration from my post today.
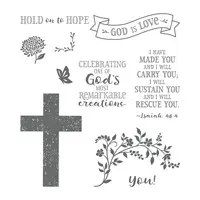
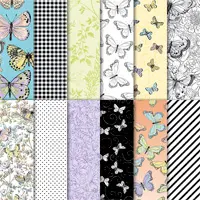
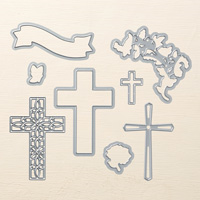
Hello and welcome to my blog; today I am going to be sharing with you the card that I designed for this month's Church Card Ministry. I used pieces of the Botanical Butterfly designer series paper and the Hold on To Hope Stamp Set and the Cross of Hope Framelits. Here's a look at my card.
This is a great card design to use up scraps of designer series paper. I say this because all the strips of different sizes and you just glue them down to a piece of whisper white or scrap cardstock that's 4 x 5 1/4. Once they are all glued down you just trim off the excess and mat it on your chosen mat color.
That goes on your card base mine is from a piece of whisper white thick cardstock; that I cut down to 4 1/4 x 11 scored at 5 1/2. I then stamped the little butterfly from the Hold on to Hope stamp set and die cut it out with the matching framelits. I stamped the sentiment on a piece of whisper white and created the fish tail banner. The sentiment came from the Itty Bitty Greetings Stamp Set from the Annual Catalog.
The cross was cut out of four different scraps of cardstock some of which I were left over stamped pieces that were mess ups. I layered four crosses up before placing them on the starburst that I had punched. I placed a little of the Saleabration Organdy ribbon in highland heather behind and around the cross. You could totally change the sending prayers sentiment for a happy Easter and have a super cute and easy Easter card.
You will find the full list of supplies used in the Shopping List below.
Happy Stampin'
Rick
What to get all the Stampin' Blends but are on a budget I have you covered. Email me to sign up or if you have questions.
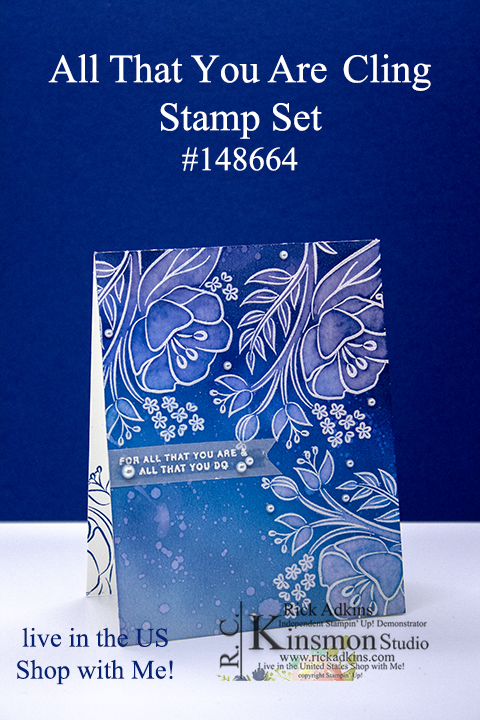
Hello and welcome to my blog for the second post today; I am here with you this time for Kylie's International Highlights Top Ten Winners Blog Hop. This month's theme was encouragement and I can not think of anything more encouraging as a simple thank you. My card features the All That You Are Stamp Set and a fun easy technique that's called Watercolor Bleaching. Here's a look at my card.
To create this card all you have to do is a little heat embossing and then ink blend over it. So I started out with the large stamp from the All That You Are stamp set and versamark ink and heat embossed it in white embossing powder on Whisper Whiten cardstock (4 1/4 x 5 1/2). Next I did my ink blending using four different shades of blue. I used Balmy Blue, Pacific Point, Blueberry Bushel, and Night of Navy inks in that order to create a gradient look. Once I had all the ink blending done I used a paper towel to rub all the ink from the embossed areas.
After I made sure all the ink was dry I then came in with a watercolor brush and just pain old water to left the color from the areas I didn't want it. This is what gives the bleach effect. A little trick is if you load the area with a good bit of water to begin with and flow it out to the other end and let it just a few minutes, you get better results. Then you take a paper towel and blot off the water. You then continue to work around the images in the same manner. As your working the areas that you started out in will get a little lighter as it dries. It's not going to pull all the water up but it gets enough where it leaves a beautiful result that is very reminiscence of the bleaching technique without the smell of household bleach.
Video Tutorial:
I told you that this was a super easy technique and looks so cute when done. To finish off the card I added a sentiment heat embossed on a strip of vellum and added it to the card with a little tear and tape. then added the card front to a whisper white thick card base (4 1/4 x 11 scored at 5 1/2). Thanks for dropping by for my second post today. If you need any of the products you've seen today you can order them in my online store. Make sure you hope along the blog hop you will find the blog roll below unless you're on my WordPress site. If you're viewing this post there you can click here and go to the blog roll.